Overview
Use the Special Request eProcurement Requisition (ePro req) to order items from external suppliers that are not strategic suppliers or Marketsite+ suppliers.
For Special Request eProcurement requisitions (ePro reqs) that require competitive bidding by Procurement Services or when ordering goods or services that require special handling, you may need to submit supporting documentation, such as:
- A specifications sheet (e.g., machinery specification) to be used in the competitive bid process
- A supplier quotation (e.g. pricing)
- A completed Sole Source Justification Form
- An associated agreement that requires Procurement Services’ review and signature
- Attached documentation is preferred to lengthy or detailed information in the Comments field on the Checkout page.
Important Information
- If you maintain Ship To and ChartField values in your My Profile page, these values are automatically applied as defaults in your ePro reqs unless you choose to override them.
Budget check
your req on the Confirmation page after submitting it for approval. This process verifies that a corresponding budget line exists for the ChartField combination(s) in the req and allows you to immediately identify any errors. If no errors exist and additional approvals aren’t required, the req is built into a PO automatically by the system. Failure to budget check may result in processing delays and additional steps to verify budget check status.- You must submit your req in order for it to progress through the system. If you only save the req, it will not be routed for approval (if special handling required), built into a purchase order (PO) by the system, and the PO won’t be sent to the supplier.
- Before viewing the steps below, review the methods for submitting a req:
For Campus Staff If a one-time purchase, with no signature required, is needed, request purchase via… M-Pathways ePro Requisition If a signed agreement is needed, submit it via... Request Contract Support For U-M Health Staff If a signed agreement is needed, send information via… Email to Michigan Medicine Contracts and Procurement
Navigation
Homepage: Purchasing and Payments; Tile: Create Requisition
Step-by-Step Process
- Click the Gear
 icon.
icon.
Create Requisition Page Screenshot
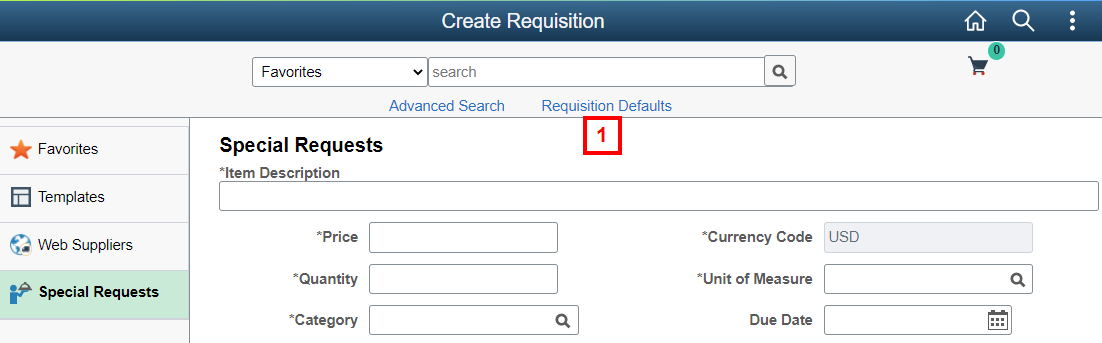
- Click Defaults.
- Enter or Lookup the Supplier ID.
Requisition Defaults Page Screenshot
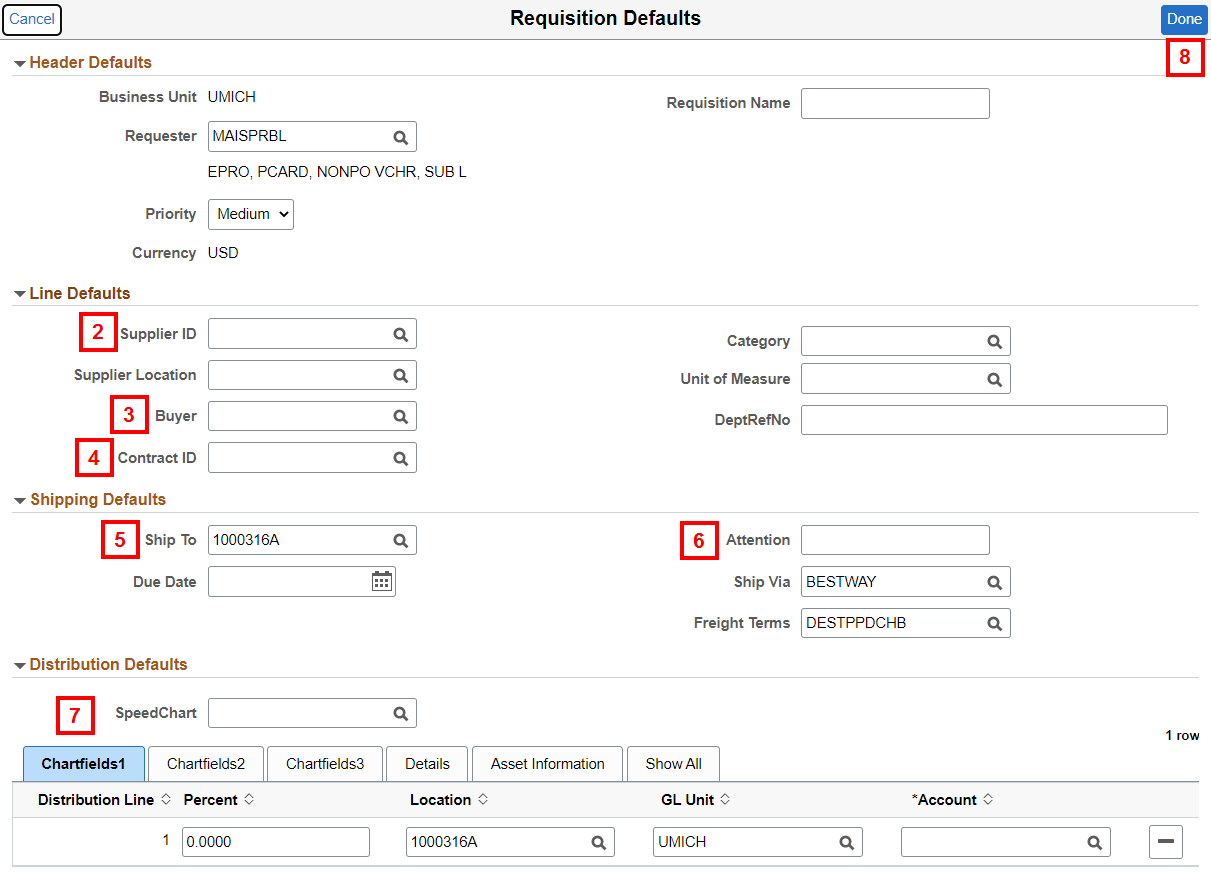
- If you’re working with Procurement Services or Hospital Procurement to place an order, enter or Lookup the Buyer.
Notes:- Only enter a Buyer if you have been explicitly told to do so by a Buyer.
- If you enter a Buyer, you will receive the following warning message:
Pop-Up Warning Message Screenshot

- If the supplier has a procurement contract with the university, enter or Lookup the Contract ID (also referred to as the Agreement or Contract Number).
Notes:- If you need a new supplier contract or signature, complete the applicable Contracting form.
- If multiple contracts exist for a supplier, a buyer from Procurement Services can assist you with selecting the appropriate Contract ID.
- Verify, enter, or Lookup the Ship To code. If applicable, use the Lookup to search by Location Code, Description, Building #, Address Line 1, or Address Line 2.
Notes:- The Ship To is a code that represents a building name and a street address. When entered in a Special Request ePro req, this code translates to the delivery address that is printed on the PO.
- When you are granted access to enter ePro requisitions in M-Pathways, you are assigned a Ship To value that defaults into the Ship To field in the My Profile page and on the ePro req Requisition Defaults page. This default value corresponds to the building in which you work. Unless otherwise requested, the Ship To value you are assigned begins with a
1.
- If shipping to a non-university address, note this in the Justification Comments field on the Checkout page.
- Ship To codes beginning with
1
indicate the building only. The building name, street address, state, and zip code display on the purchase order (PO) that is sent to the supplier. - Ship To codes beginning with
2
indicate both the building and a specific room number. The building name, room number, street address, state, and zip code display on the PO.
- Enter the complete name and phone number, including area code, of the contact person for this req in the Attention field. If using a Building Ship To code, enter the room number as well.
Note: If the Attention field is left blank, it will automatically populate with the Requestor's name. - Verify, enter, or Lookup the SpeedChart or ChartField combination for the req.
Notes: - The SpeedChart is the same as a ShortCode.
- Do not enter an Account value. It defaults from the Category entered on each req line.
- Use the Lookup to search by the Category (Code) or Description.
- Click Done.
- Enter an Item Description.
Note: Include a brief description of the item or service being purchased. Do not include quote numbers or other non-descriptive information.Create Requisition Page Screenshot
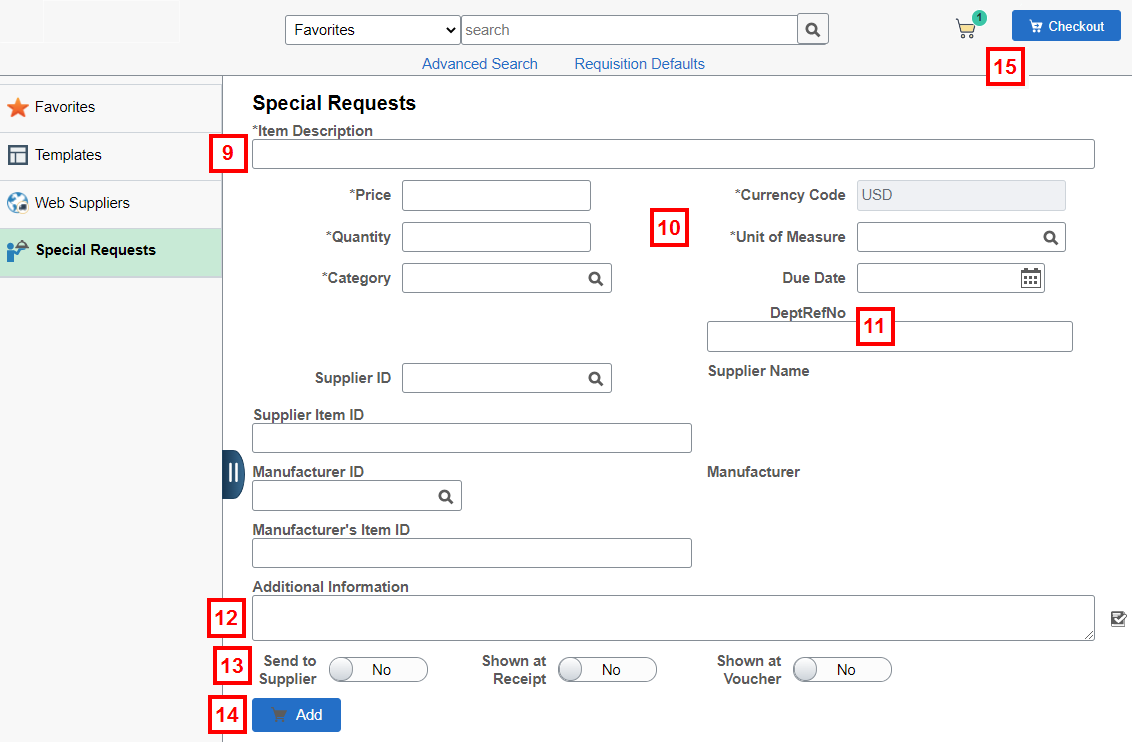
- Enter or select applicable values for the following fields for the req line:
- Price (i.e., unit price)
- Quantity
- Unit of Measure (UOM)
- Category
- If applicable, enter a departmental reference number in the DeptRefNo field for the line.
- If applicable, enter a comment for the line in the Additional Information field.
- Select where the comment applies:
- Send to Supplier displays on the PO that goes to the supplier.
- Show at Receipt displays at time of receiving and on saved receipt (not sent to supplier).
- Show at Voucher provides payment information to Accounts Payable (not sent to supplier).
- Click Add to cart.
Note: Repeat steps 10-15 for additional items. - Click Edit Cart
 to review the items and if applicable, update the Quantity and Unit of Measure,
OR
Click Checkout to go directly to the Checkout page.
Notes:- If applicable, you can add more items by clicking Continue Shopping.
- In this procedure, you will go to the Checkout page.
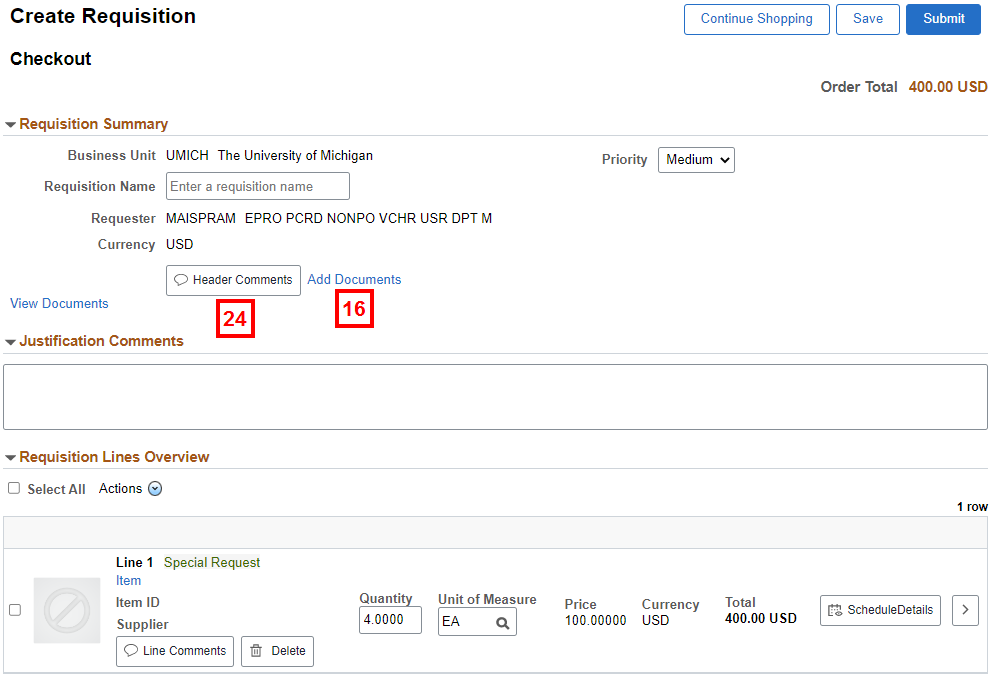
Complete steps 17-28 to add attachments and comments to the entire req. Otherwise, go to step 29.
- Click Add Documents.
- For requests between $10,000 and less than $50,000, attach supporting documentation of any due diligence that has been performed, to ensure that the university is receiving best-value pricing. Examples of supporting documentation include but are not limited to:
- Quotes from other suppliers.
- Screenshots of web search results.
- Invoices/similar purchase history.
- Comparable pricing for other institutions.
- Relevant pages out of an awarded grant (could be a combination of the grant application and Notice of Award).
- Relevant materials displaying sponsor requirements of a specific supplier.
- For requests of $50,000 or more that have received approval for a sole-source award -- outside of the competitive bid process -- attach the Sole Source Justification (SSJ) Form and all supporting documentation.
- For requests between $10,000 and less than $50,000, attach supporting documentation of any due diligence that has been performed, to ensure that the university is receiving best-value pricing. Examples of supporting documentation include but are not limited to:
- Click Add Attachment.
- Click My Device.
- Navigate to and Open the file.
Note: Only .pdf and .tif files are accepted. - Click Upload.
- Once the upload is complete, click Done.
- Click View to verify the document uploaded.
Note: Repeat steps 17-22 to attach additional files. - Click Done.
- If applicable, click Header Comments to add comments to the entire req.
- Header Comments can be used to send a comment to the Supplier, show a Comment on the Receipt, and/or show a comment on the Voucher.
- Enter Comment Text to notify Procurement Services that an attachment is included in the requisition.
Note: Comments are required if you include an attachment.Requisition Header Comments Page Screenshot
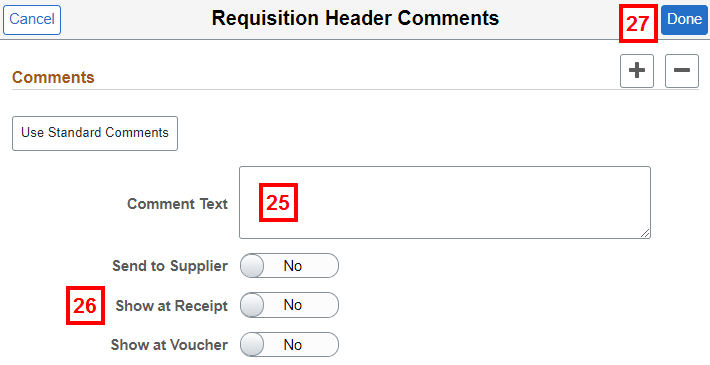
- Select where the comment applies:
- Send to Supplier displays on the PO that goes to the supplier.
- Show at Receipt displays at time of receiving and on saved receipt (not sent to supplier).
- Show at Voucher provides payment information to Accounts Payable (not sent to supplier).
- Click Done.
- Enter Justification Comments.
- If applicable, enter the Contract Number.
- Contract Numbers will not always auto-populate in the Contract ID field.
- Entering the applicable Contract Number in this field will help to expedite the review and approval of the requisition.
- For purchases between $10,000 and less than $50,000, use this field to provide a detailed explanation of why the supplier was chosen and how the supplier can meet the university's requirements/needs. Justification does not need to be based on cost alone. This can include:
- The condition that limits the purchase/agreement to the proposed supplier for the requested good(s) and/or service(s) (e.g. performance risks, compliance issues, licensing, etc.).
- The significant advantage that the proposed supplier has over any other supplier that offers similar good(s) and/or services (e.g, technological superiority, technical expertise, etc.).
- If applicable, include relevant information from the awarded grant (not application) requirement that specifies the proposed supplier.
- For purchases $50,000 or more that have an approved sole source, ensure the SSJ form has been completed and all supporting documentation is attached.

- If applicable, enter the Contract Number.
Complete steps 30-33 to add comments to an individual req line. Otherwise, go to step 34.
- Click Line Comments on the req line.
- Line Comments are used when more information is listed in the Item Description, Supplier Item ID, Manufacturer ID, or Manufacturer's Item ID fields that needs to be communicated to the supplier at Receipt or at Voucher.
- Line Comments are used when more information is listed in the Item Description, Supplier Item ID, Manufacturer ID, or Manufacturer's Item ID fields that needs to be communicated to the supplier at Receipt or at Voucher.
- Enter the Comment Text.
Requisition Line Comments Page Screenshot

- Select where the comment applies:
- Send to Supplier displays on the PO that goes to the supplier.
- Show at Receipt displays at time of receiving and on saved receipt (not sent to supplier).
- Show at Voucher provides payment information to Accounts Payable (not sent to supplier).
- Click Done.
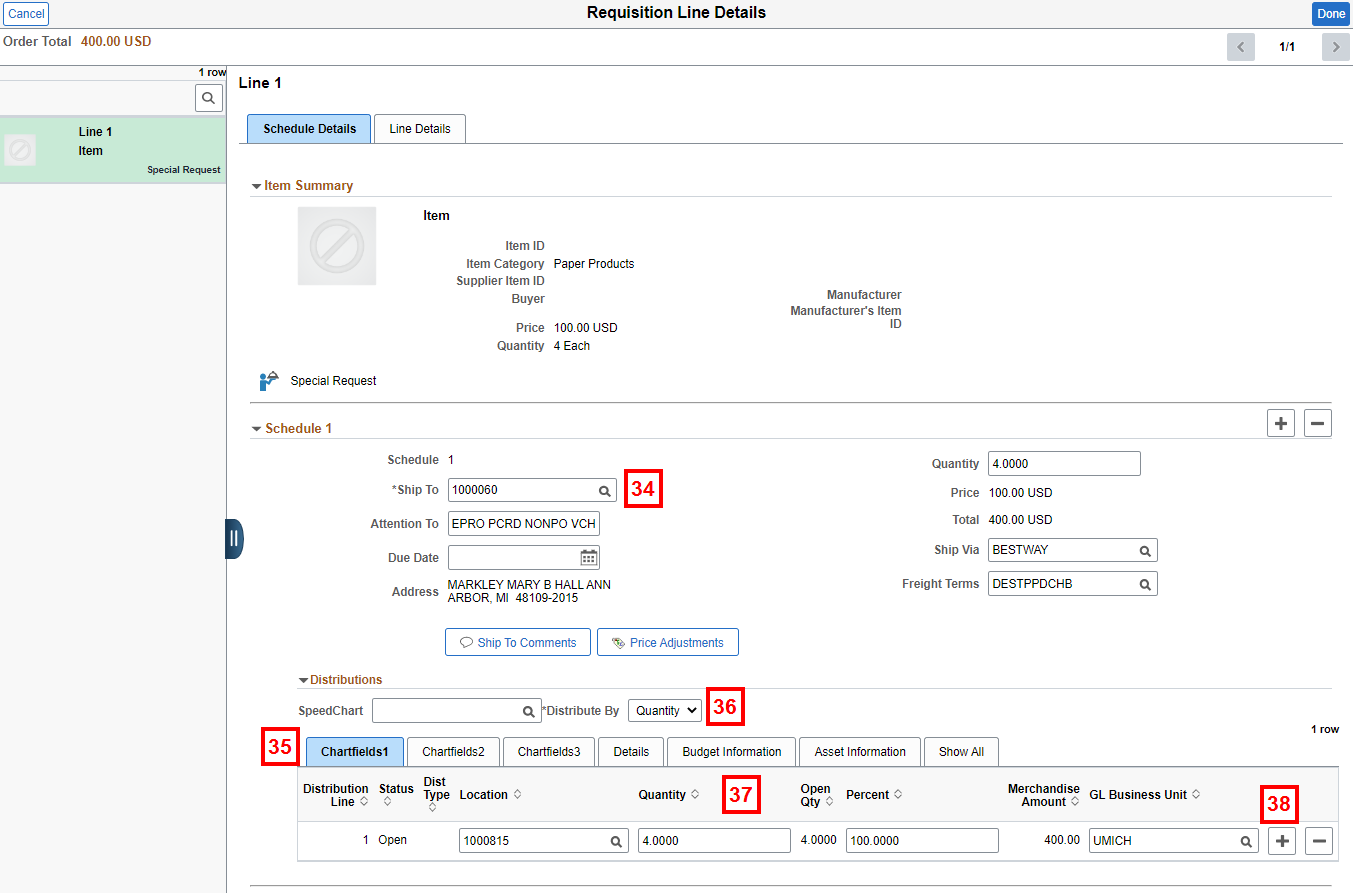
- Click Schedule Details on the req line to view the shipping and ChartField information.
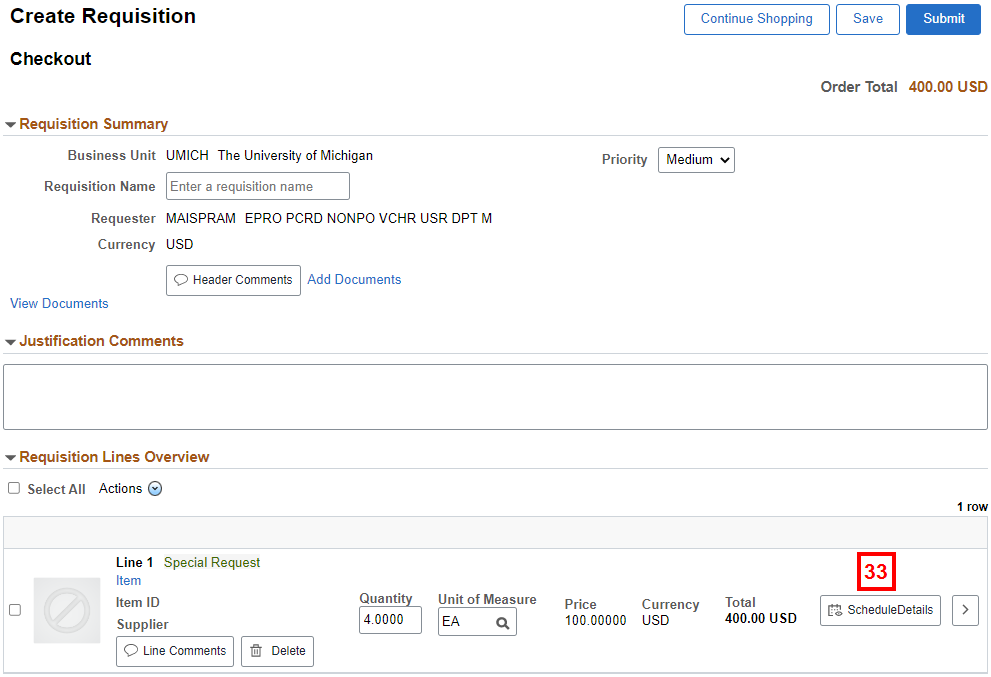
- Verify, enter, or Lookup the Ship To code for the individual req line.
Requisition Line Details Page Screenshot
To split the distribution for an individual req line among multiple ChartField combinations by the quantity of the item ordered or by dollar amount, complete steps 36-42. Otherwise go to step 43.
To split the distribution of multiple req lines by percent, refer to Split ChartField Distributions for an ePro Req using Mass Change.
- Select Quantity or Amount from the Distribute By drop-down list.
Note: 'Amount Only' POs are liquidated by amount rather than the default of by quantity. To request an ‘Amount Only’ PO, select Amount from the Distribute By drop-down list. The req will automatically route for buyer review, as only a Buyer can create an ‘Amount Only’ PO. - Based on the value selected in step 36, change the Quantity, Percent, or Merchandise Amount field to the value you want to distribute to the first ChartField combination.
Note: Changing the Quantity, Percent, or Merchandise Amount prior to adding the row allows the M-Pathways system to automatically calculate the values for the subsequent distribution(s). - Scroll over to click Add Row
 to insert an additional ChartField distribution row for the req line.
 - Enter or Lookup ChartField values for the new distribution row.
- Repeat for steps 36-39 for additional distribution rows.
- If applicable, enter or Lookup Project/Grant information. Otherwise, go to step 43.
- Repeat steps 35-41 for additional req lines.
- Click Done.
Complete steps 44-47 to override the Supplier's default dispatch method and/or Payment Terms for the requisition. Standard payment terms are thirty (30) days and should not be modified unless there is a material benefit to the university. Refer to Select an Alternate Dispatch Method or Payment Terms for a Purchase Order for more information. Otherwise, go to step 48.
- Click the Override Default Dispatch box to change the Address Sequence Nbr and Dispatch Method.
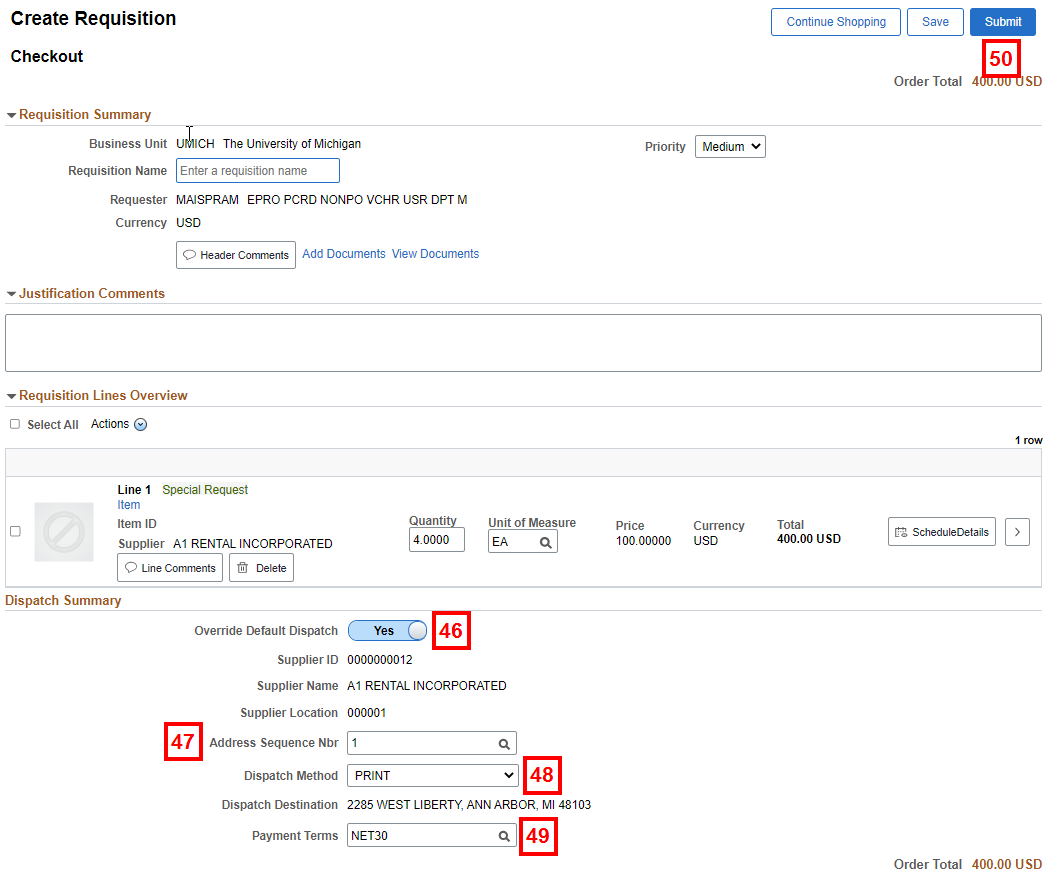
- Enter or Lookup the Address Sequence Nbr.
- Select a Dispatch Method from the drop-down list.
Notes:- To enter an alternate email or fax number for dispatch, select Email - User Entered or Fax - User Entered.
- If two Suppliers are listed on a line, Phone is the only dispatch method that can be selected.
- Enter or Lookup the Payment Terms to override the payment terms set by the supplier record.
- Click Submit.
- Verify the Status.
Notes:- Reqs under $10,000 entered with a supplier ID and without a buyer, display an Approved status.
- Reqs requiring approval display a Pending status.
- Refer to ePro Special Request and Marketsite+ Requisition Approvals and Routing for more information.
Checkout Confirmation Page Screenshot
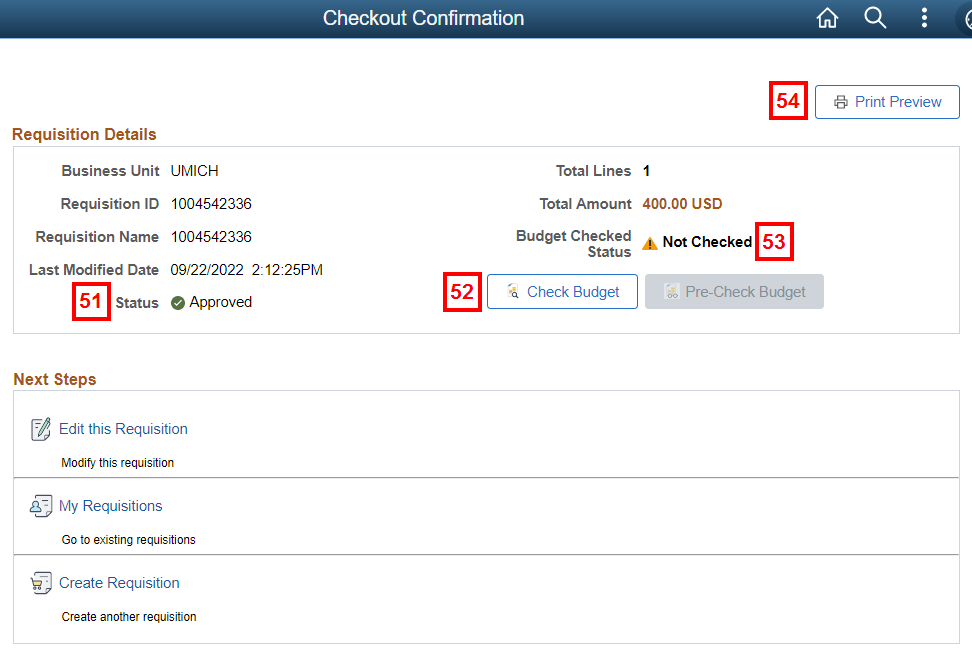
- Click Check Budget.
- Review the Budget Status:
- Valid = budget line exists
Note: The Check Budget button no longer displays. - Error = no budget line exists (or other error)
Note: Refer to Resolve Budget Check Errors for eProcurement Transactions for more information.
- Valid = budget line exists
- If applicable, click Print Preview to display a printable version of the requisition in a separate browser window.
Related Documents
- Refer to Edit a Special Request eProcurement Requisition to complete a req you’ve saved, but not submitted.
- Refer to Manage an eProcurement Requisition to track your ePro req from order through payment.
- Refer to eProcurement Requisition Template to create and use an ePro req template to facilitate frequent orders of the same goods or services.
- Resolve Budget Check Errors for eProcurement Transactions
- Refer to Select an Alternate Dispatch Method or Payment Terms for a Purchase Order for more information on dispatch methods.
- Submit a request to Procurement Services by completing a form.