Overview
Employees may incur business expenses for travel, hosting, or other general business needs. Business expenses may be incurred via a U-M Card which includes PCard, Travel Card, or Central Travel Account (CTA) virtual card (currently used for airdfar only). In additon, some business expenses may be incurred out-of-pocket. This procedure will cover the process of submitting an expense report for all types of expenses, regardless of the method of payment.
In this document, you will learn to:
- Create the Expense Report Header
- Apply a Cash Advance (if applicable)
- Apply Per Diem Travel Meal Expenses (if applicable)
- Import U-M Card Expenses to a Concur Report
- Enter Out-of-Pocket Expense Lines
- Edit Lines with Exceptions
- Add Transactions to an Existing (un-submitted) Report at a Later Date
- Print, Save, or Email an Expense Report
- Submit an Expense Report
- Apply Different/Additional Workflow Prior to Report Submission
Step-by-Step Process
 |
Notes:
|
Create the Expense Report Header
The Report Header defines the overall purpose of the report. Check with your department for any unit-specific data that needs to be entered in the key fields of the report header. For more information, see Concur Expense Report Key Fields and Use of the Details Menu.
- Enter a Report Name.
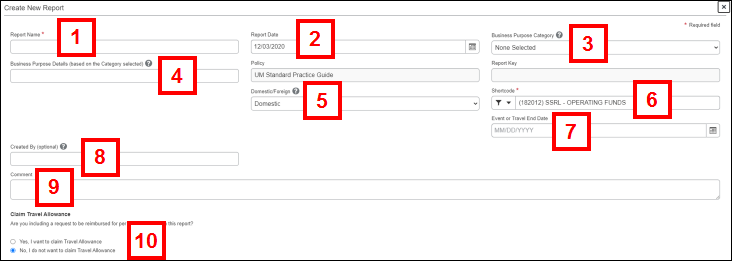
- Accept today's date as the Report Date.
- If applicable, select a Business Purpose Category for the expense report. If a Business Purpose Category is selected, note the information in parentheses. This information describes what should be included in the Business Purpose Details field. A Business Purpose Category is not required to be completed at the header level, but is required at the individual expense line level. See the Note in step 4 below.
- If applicable, enter the Business Purpose Details. This should include details as noted in the parenthesis from the Business Purpose Category previously selected.
Note: If a Business Purpose Category or Business Purpose Details are entered on the Report Header, this data will copy to all of the expense lines. These fields can be edited on the individual expense line level. If the Business Purpose Category or Business Purpose Details are not entered or left blank on the Report Header, all individual expense lines will require updates, including lines for Fixed Meals (per diem). - Domestic defaults in the Domestic/Foreign field, as the majority of travel and purchases are domestic. This data will copy to all expense lines. If there are a few foreign transactions on the expense report, change the field to foreign on the individual expense lines. If most or the entire report will be foreign, change the field to Foreign in the header.
- Either accept the default ShortCode from your Expense Profile or select a new one.
Notes:
- Concur displays a list of matching values as a ShortCode is entered. Select the applicable value from the list.
- All U-M Card and Out-of-Pocket expenses that are added to the created report will be charged to the ShortCode entered in the Report Header unless itemized at the line level to a different ShortCode.
- If this report is for travel, select a Travel End Date from the calendar.
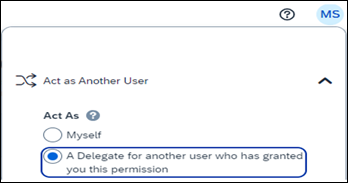
- The Created By field is optional and helps identify expense reports created by delegates. A delegate can enter their uniqname in this field.
- If applicable, enter a Comment.
- At the bottom of the Create New Report pane, Concur prompts you to indicate whether you are reporting travel meal expenses (also known as “fixed meals”, “per diem”, or “travel allowances”) under Claim Travel Allowance.
- If per diem expenses need to be added to the report, select Yes, I want to claim Travel Allowance and then click Next. Continue to Apply Per Diem Travel Meal Expenses.
- If per diem expenses do not need to be submitted, No, I do not want to claim Travel Allowance defaults. Click Create Report and either Import U-M Card Expenses to a Concur Report or Enter Out-of-Pocket Expense Lines.
Apply a Cash Advance
If you received a cash advance for travel or hosting, apply it to an expense report to indicate how the funds were used.
Cash advances must be applied to an expense report, and that report must be submitted for approval, within 45 days of the trip return date or hosting event date. Any unused cash advance funds are payroll deducted from your next paycheck.
As specified in the Cash Advance Requester Attestation for the cash advance funds, if the cash advance is not applied and the expense report is not submitted within the timeframe, the entire cash advance amount can be payroll deducted and future cash advance requests may be denied.
Reimbursing the U-M for unused cash advance funds will require additional line information. If all of the cash advance funds are not used for the trip or hosting event, designate the unused amount in the expense report using an Expense Type of Cash Advance Return. This “expense” line identifies the amount for the payroll deduction.
Note: This Expense Type is only available once a Cash Advance has been applied.
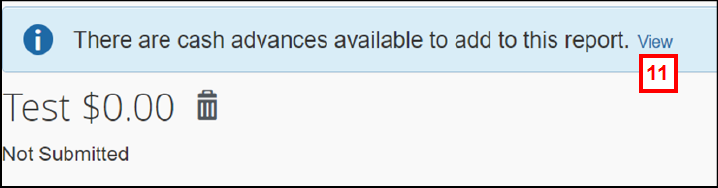
- If a cash advance needs to be applied to the expense report, click View next to “There are cash advances available to add to this report” in the banner.
- Click Add. All available cash advances appear.
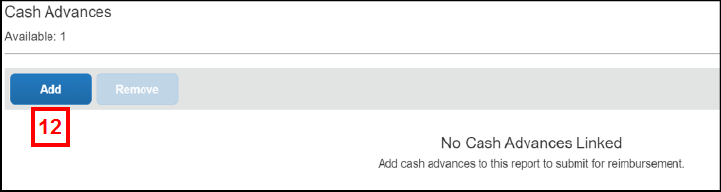
- Check the box next to the applicable cash advance.
Available Cash Advances Screenshot
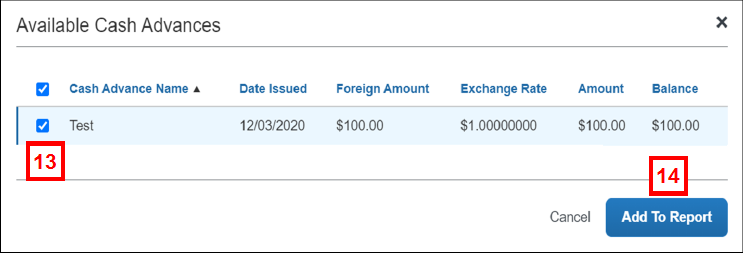
- Click Add to Report.
Apply Per Diem Travel Meal Expenses
Travel meal expenses are reimbursed by a daily travel allowance (i.e., "per diem" or "fixed meals"). Trips that are 12 hours or more in duration are eligible for the daily per diem reimbursement for meals and incidentals. To apply per diem expenses in Concur, a Travel Itinerary must be entered for the expense report. The itinerary identifies the city and dates to which the per diem rate applies.
The per diem rate for each city is governed by the U.S. General Services Administration (GSA). For a complete list, visit the GSA website.
The per diem reimbursement amount for a meal cannot be claimed if:
- The meal was provided as part of another expense (e.g., conference-supplied lunch or hotel-provided continental breakfast).
- The meal was provided as part of a hosted event (e.g., recruitment dinner).
- The meal was paid for by someone else.
Meal expenses for a hosted event are not subject to per diem and are entered as separate expenses. For complete instructions on adding hosting meals, refer to Add Attendees to a Hosted Meal or Event in a Concur Expense Report.
If you purchase a meal with your PCard while on travel status, refer to Itemize Expenses in a Concur Expense Report for instructions on how to correctly record the expense on an expense report.
Once you have identified the expense report as needing to add per diem, there are two methods for generating your itinerary:
- To manually enter each leg of your travel in the New Itinerary Stop pane, go to steps 1-4.
- To create a single day itinerary, go to steps 5-11 to manually enter each single day trip.
The itinerary is for business-related travel only. If your trip included personal travel prior to/after the business trip, adjust the departure and arrival dates for the itinerary to exclude the personal travel.
To enter an itinerary for trips exceeding a single day:
- Complete the New Itinerary Stop pane for each leg of your departure flight as follows:
- Enter the Depart from (city).
- Select the departure Date from the calendar.
- Enter the departure Time.
- Enter the Arrive in (city).
- Select the arrival Date from the calendar.
- Enter the arrival Time.
Travel Allowances - Create New Itinerary Screenshot
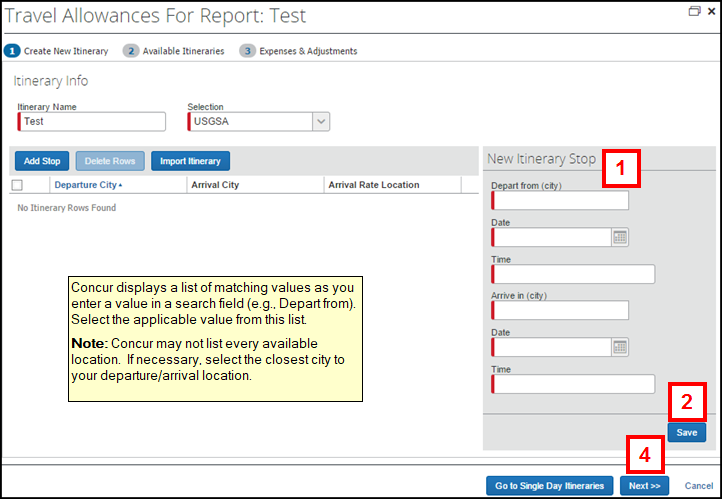
- Click Save.
- Repeat steps 1 – 2 for each leg of your return flight.
- Click Next and skip to step 12.
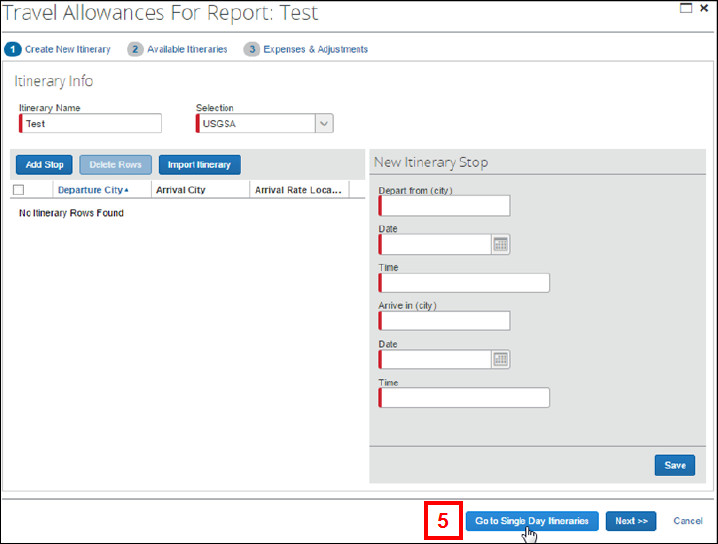
To enter a single day itinerary:
- Click Go to Single Day Itineraries.
Travel Allowances - Create New Itinerary Screenshot
- Select the Start Date from the calendar.
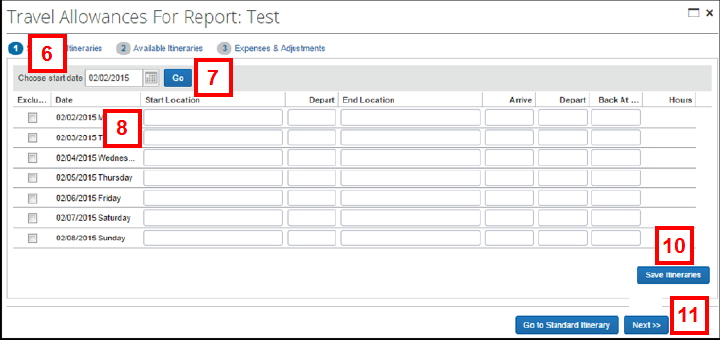
- Click Go.
- Dates will display a week at a time.
- Complete all fields as follows:
- Enter the Start Location.
- Enter the Depart time.
- Enter the End Location.
- Enter the Arrive time.
- Enter the Depart time from the End Location.
- Enter the Back at Origin time.
- Repeat step 8 for each single day trip.
- Click Save Itineraries.
- Click Next.
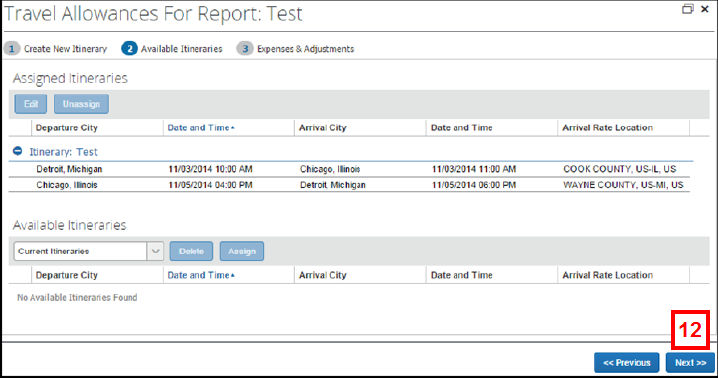
- Click Next to assign the itinerary to the expense report.
Notes:- To assign multiple itineraries to a report, use the options in the Available Itineraries list.
- You cannot have multiple itineraries with the same date range in Concur.
Travel Allowances - Available Itineraries Screenshot
- Review the per diem expense for each day.
Travel Allowances - Expenses & Adjustments Screenshot
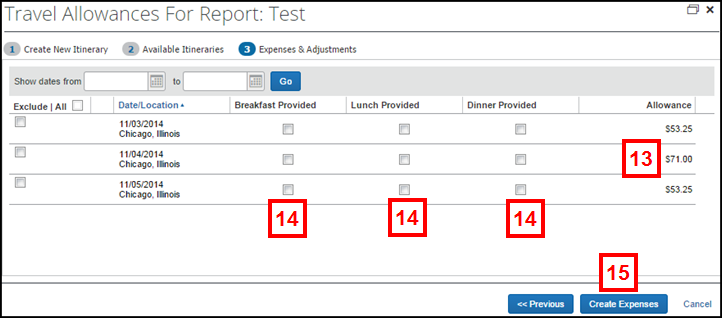
- If applicable, check the pertinent Breakfast-, Lunch-, or Dinner Provided boxes.
Notes:- Checking a Provided box reduces the per diem rate based on the meal selected and ensures you are not reimbursed for travel meals twice.
- Days on which travel occurs automatically have a reduced per diem rate of 75% per the GSA.
- Click Create Expenses.
- Verify the imported per diem expenses (Fixed Meals) appear in the Expenses list.
Expense Report - Expenses Pane Screenshot

If you forget to include travel allowances as you are beginning your expense report (i.e., clicked No instead of Yes to the Travel Allowance question), use the following steps to add the itinerary and adjust the travel allowances, as applicable:
- Select Manage Travel Allowance from the Travel Allowance menu on the Expense Report page.
- Using the Create New Itinerary pane, build the itinerary for all stops within the trip.
- Click the Expense Adjustments tab to exclude any provided meals from the daily per diem.
- Click Update Expenses to add the per diem expenses to the expense report.
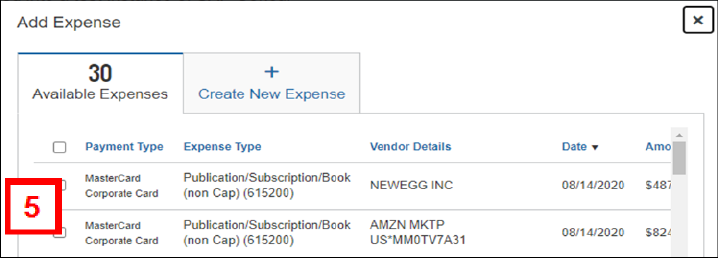
Import U-M Card Expenses to a Concur Report
Travel expenses booked using a U-M Card will be imported to Concur. To locate these expenses, click the Expense tab on the Concur homepage. Expenses are located in the Available Expenses pane on the Manage Expenses page.
Using the Available Expense Pane
- Check the box next to each travel expense to import them into the expense report.
OR
Check the Select All box next to the Receipt column heading to import all available expenses.Expense Report - Available Expenses Screenshot

- Click Move to, and select an existing report or select New Report to create a new report to add the selected expenses to.
Note: Concur imports a maximum of 60 U-M Card transactions at a time. If there are more than 60, repeat steps 1-2. - Verify the imported expense(s) appear in the Expenses list.
Expense Report - Expense List Screenshot
Importing U-M Card Expenses while in a Report
- Click Add Expense.
Expense Report - Expense List Screenshot
- On the Available Expenses tab, select individual expenses by checking the boxes next to the expenses or check the top box next to the Payment Type column to select all U-M Card charges to add to the report.
Expense Report - Expense List Screenshot
- Click Add to Report.
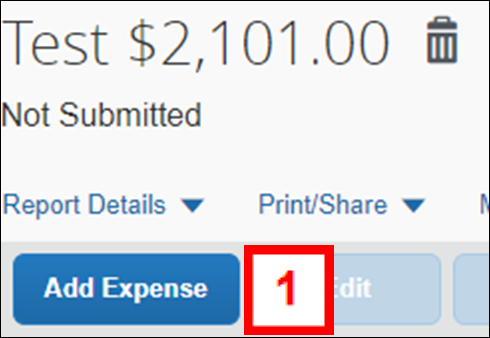
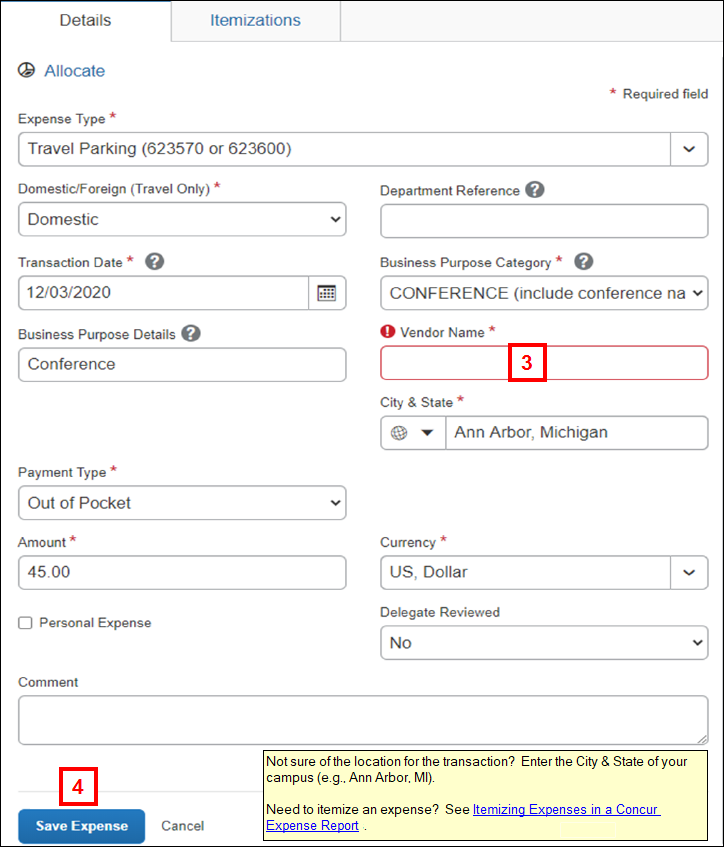
Enter Out-of-Pocket Expense Lines
Concur also offers the option to add out-of-pocket expenses (e.g., travel that was booked on a personal credit card, business expenses paid with cash) to the expense report for reimbursement.
- Click Add Expense.
Expense Report - New Expense Screenshot
- Click the Create New Expenses tab.
Expense Report - Add Expense Screenshot
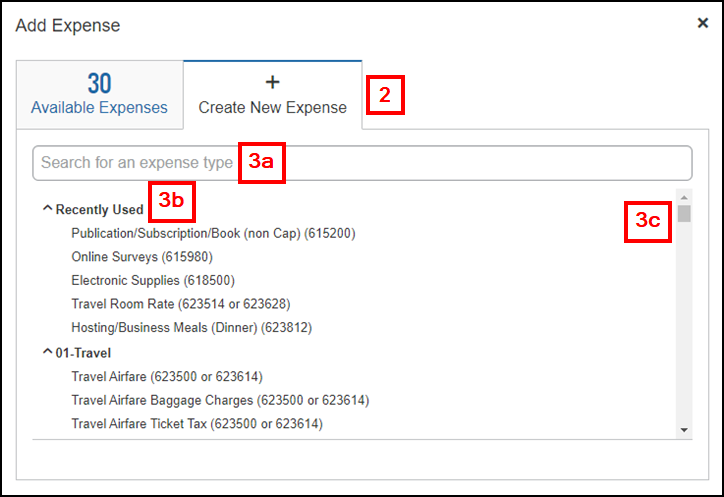
- Use one of the following methods to select the applicable Expense Type for the line:
- Enter the name of the expense (e.g. airfare) in the Expense search field and select the matching value from the search menu.
- Select an Expense Type from the Recently Used Expense Types menu. This list is based on values you’ve used in expense reports.
- Scroll through the Expense Types menu and select the Expense Type.
- If applicable, enter departmental data in the Department Reference field.
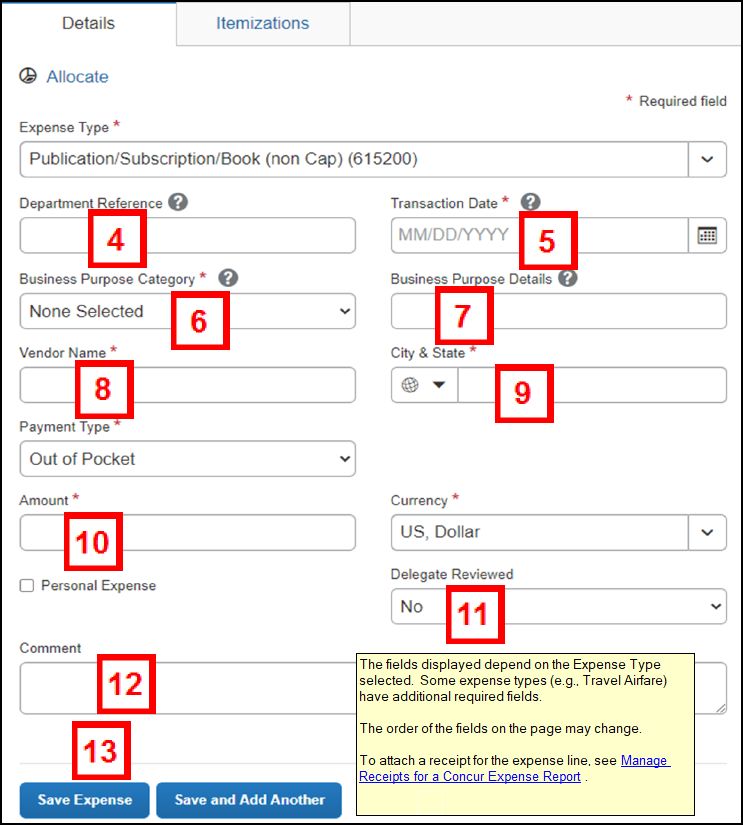
- Enter the Transaction Date.
- The Business Purpose Category is required for every expense line. If the Business Purpose Category was entered on the Report Header and needs to be changed, a new value can be selected for each individual line. Note the information in parenthesis as this will require possible changes to the Business Purpose Details.
Note: If the Business Purpose Category was not entered or left blank on the Report Header, it must now be selected as it is a required field at the expense line level. - If applicable, change the Business Purpose Details that defaulted from the Report Header or if the Business Process Category was changed at the line level and now requires different details.
Note: Some Business Purpose Category selections do not require information to be added to Business Purpose Details. - Enter the Vendor Name.
- Enter the location where the expense was incurred in the City & State field.
- Enter the total price of the expense in the Amount field.
- The Delegate Reviewed field is optional and can be changed at any time by both the submitter and delegate. This field has no impact on expense report processing. It is an aid for delegates to identify if the line was reviewed. This can be helpful when adding new expenses to the report throughout the month and tracking which lines have been completed.
- If applicable, enter a Comment.
- Click Save Expense.
Edit Lines with Alerts
Concur alerts you when an expense line is missing data or does not comply with a U-M travel, hosting, or expense SPG guidelines by:
- Listing the expense in an Alert pane above the Expense List pane with a flag icon and a description.
- Flagging the transaction in the Expense List pane.
There are two types of alert flags:
- Expense Alert Warning (“yellow flag”)
 - may or may not require a correction prior to report submission. Explanations are required for U-M audit purposes. Requires a justification Comment to provide information for U-M audit purposes. Yellow flags remain visible after a Comment is entered to alert approvers and auditors to look for a line Comment.
 - Expense Alert Error (“red flag”)
 - the expense line must be corrected prior to submitting the expense report. Red flags disappear after the appropriate corrective action is taken.
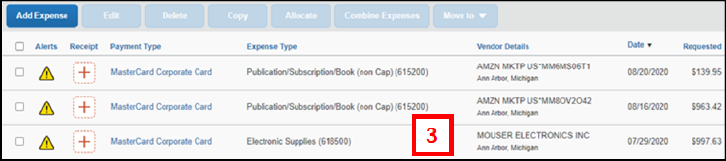
- Click the alert icon next to the expense.
Expense Report - Expenses Screenshot

- Review the alert description to identify what to correct and/or comment upon.
- Enter or correct the data as needed.
Common corrections include, but are not limited to:
- Entering missing data (e.g., Expense Type, City & State).
- Modifying the Business Purpose Category and/or Business Purpose Details to explain why the specific expense is necessary to U-M.
- Itemizing the expense (e.g., PCard ATM Cash Advances, or to claim a portion of the expense as Personal).
- Add a justification Comment to explain the situation for the expense.
- Click Save Expense.
- Repeat steps 1-4 for each transaction until all Expense Alert Error icons disappear.
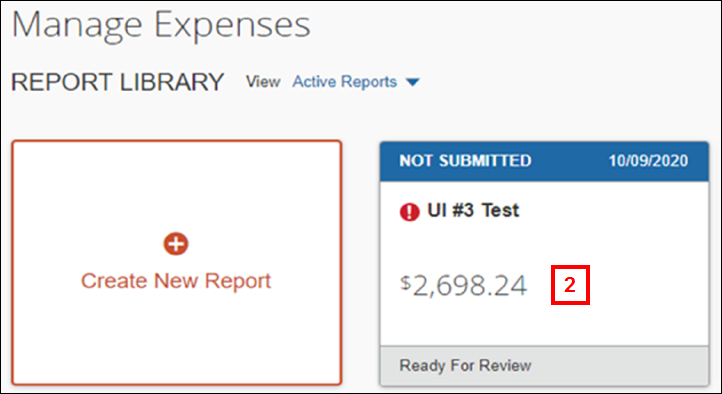
Add Transactions to an Existing (un-submitted) Report at a Later Date
Expense reports are automatically saved in Concur after the Report Header is created.
Note: Transactions are automatically saved when imported into a Concur report. Additional expenses can be added to an existing expense reportg throughout the month prior to submitting it for approval. It is optional to change the Delegate Reviewed to read Yes. This field has no impact on expense report processing, but it can be helpful when adding new expenses to the report throughout the month and tracking which lines have been completed (both the submitter and delegate can change this field at any time).
- On the Home page, click Open Reports.

- Click on the desired report.
Print, Save, or Email an Expense Report
While it is not required to print your expense report for routing or approval in Concur, the system permits you to print, save it as a PDF file, or email the U of M Detailed Report to another employee.
- If you have a “role” for an expense report (i.e., you create it, submit it, or approve it), you are encouraged to access the original report in Concur.
- The U of M Detailed Report itself does not include the imaged receipts or other supporting documentation for the expense report, but the PDF version does.
Business Process Information
You may wish to email or send a PDF file of the U of M Detailed Report to provide supporting documentation to your unit’s or project/grant’s Statement of Activity report reconciler.
You are encouraged to use “green” practices for expense reporting by utilizing system options (e.g., electronic approval, email) in lieu of printing, if possible.
- Click Print/Share.
Expense Report - Print/Share Screenshot
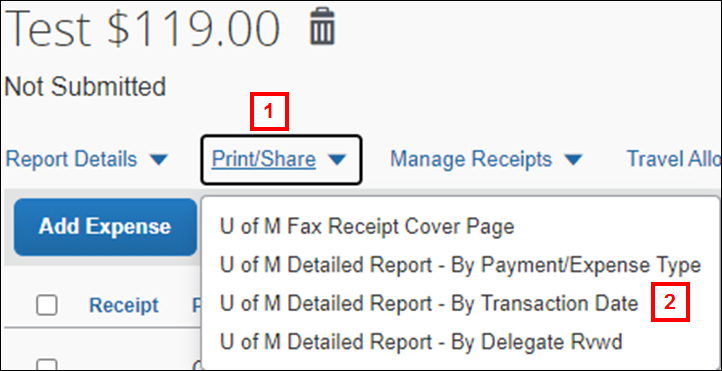
- Select either U of M Detailed Report – By Payment/Expense Type, U of M Detailed Report – By Transaction Date, or U of M Detailed Report – By Delegate Rvwd.
- Click Email.
Email U of M Detailed Report Screenshot

- Enter an email address in the Email Recipient(s) field.
Notes:- The email address must include @umich.edu for U-M employees.
- Multiple addresses must be separated by a semicolon (;) or a comma (,).
U of M Detailed Report - By Payment/Expense Type Screenshot
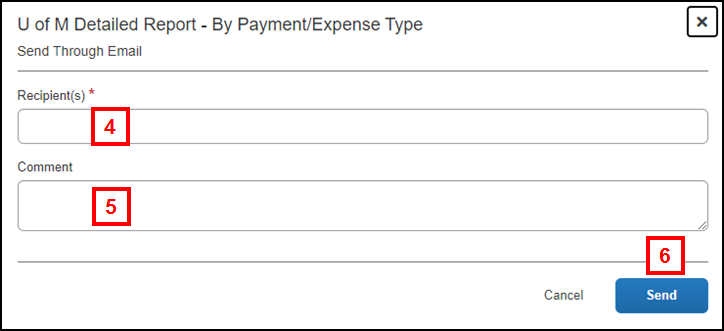
- If applicable, enter comments to include in the email in the Comments field.
- Click Send.
Note: The email includes the PDF version of the report (with the receipt images, if available) as an attachment. eReceipts and receipts attached at the line are not available until the report has been submitted.
To save the U of M Detailed Report as a PDF:
- Click Save as PDF to download the file and save it in the desired location.
Note: The PDF version of the U of M Detailed Report includes any receipts that were faxed/attached to the expense report.Save or Print U of M Detailed Report Screenshot

To print the U of M Detailed Report:
- Click Print.
- Click Print in the Print dialog box.
- Click Close.
Submit an Expense Report
Employees must submit their own expense reports. Expense Delegates can create the report, attach receipts, and apply additional workflow, but cannot submit on behalf of another person.
Expense Delegate: It is optional to mark Yes in the Delegate Reviewed box as expense lines are reviewed and new expenses are added throughout the month. When the expense report is complete, click Ready for Review to send a system email informing the employee that it is ready for review and submission.
The employee will see “Ready for Review” by the report name on the Concur home page or Active Reports list (Expense tab). This wording disappears after the report is submitted or if the delegate recalls the report using the Not Ready for Review button.
Using the the Not Ready for Review button doesn’t recall the initial email notification or send an updated email to the employee.
- Click Submit Report.

- If applicable, fax any required receipt(s) or attach the receipt image(s).
Notes:- The expense report won’t be released for unit approval until the required receipts are faxed/attached.
- For complete instructions, see Manage Receipts for a Concur Expense Report.
- Click Accept & Continue.
Note: The attestation is your electronic “signature” validating the expenses upon submission.
Verify the Cash Advance Information in the Expense Report
There are three possible scenarios for processing cash advances on an expense report. The Report Totals pane allows you to verify that the cash advance, and any reimbursement to you or U-M, is correctly applied to the report.
- The cash advance amount equals the total amount of out-of-pocket expenses.
- The cash advance amount is less than the amount of out-of-pocket expenses, and the U-M owes you additional funds. The system first deducts the amount of the cash advanced to you and then reimburses you the balance owed.
- The cash advance amount exceeds the amount of out-of-pocket expenses, and the unused funds will be deducted from your next paycheck.
Concur displays these totals when the expense report is submitted. They may also be viewed by selecting Report Totals from the Report Details drop-down list in the expense report.
- Review the following information in the Report Totals pop-up box:
- Amount Total
- Less Cash Advance Returns (when applicable)
- Company Pays Employee
- Company Pays Card (MasterCard Corporate Card)
- Cash Advance Utilized (when applicable)
- Employee Pays Company (when applicable – amount that will be payroll deducted from your paycheck)
- Total Paid by Company
- Total Owed by Employee

- Click Close.
To accept the default approval workflow (as defined in your Expense Profile), continue to step 6. Otherwise, go to Apply Different/Additional Workflow.
- Confirm your default expense Approver(s) appear in the Manager Approval field.
Note: When two default approvers are assigned in the profile, all expense reports submitted will require two levels of approval. If appropriate, either of the default approvers can be changed, as a one off, in the expense report.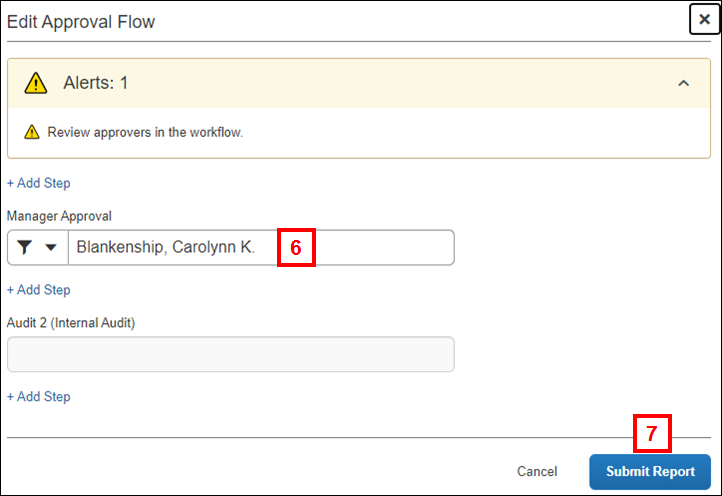
- Click Submit Report.
Apply Different/Additional Workflow Prior to Submission
Expense Delegate: Follow similar steps shown below prior to notifying the employee that the report is ready for review and submission. Select Report Timeline from the Report Details menu to access the Approval Flow.
To change the Manager Approval for this report only, overwrite your default approver(s).
To add additional unit approval:
- Determine if the additional unit approval should occur before or after the Manager Approval.
Note: Concur notifies your default approver(s) (as identified in your Expense Profile) if you route your expense report to another employee for review or if you enter an additional unit approval workflow prior to the Manager Approval. - Click + Add Step above or below the Manager Approval field to insert additional workflow routing before or after the Manager Approver,
OR
Click + Add Step above or below the User-Added Approver field to insert additional workflow routing before or after the User-Added Approver.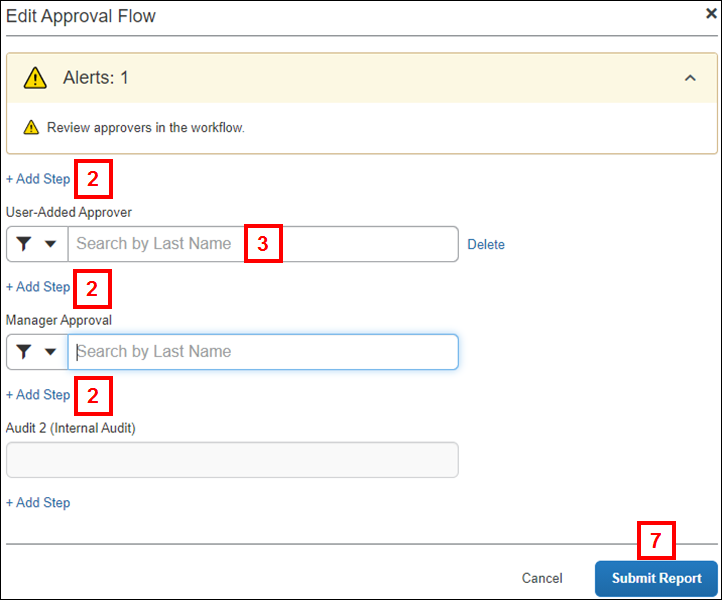
- Click in the User-Added Approver field.
- Click the Down Arrow in the User-Added Approver field and select how you wish to search for the unit approver (e.g. Last Name, First Name, Email Address, etc.).
- Enter the approver’s name in the User-Added Approver field based on your search parameter. Select the name from the list, as applicable.
- Repeat steps 1-5 above as applicable.
Note: Per U-M business process, do not add additional approval workflow after Audit 2 (Internal Audit). - Click Submit Report.