Overview
When an expense is imported or added to an expense report, a single Expense Type is applied to the transaction. That expense may need to itemized to accurately represent what was purchased (e.g., multiple types of business expenses on one vendor receipt).
Additionally, the university requires an exense be itemized to provide the appropriate level of detail for reporting, accounting, and auditing purposes. This includes:
- Itemizing Hotel Expenses – Required by the U-M to identify room rates, taxes, and other miscellaneous expenses.
- Itemizing ATM Cash Withdrawals – Required by the U-M to identify what was purchased.
- Designating Part of an Expense as Personal – If a receipt included both allowable and non-allowable expenses (i.e., business dinner which included alcohol not allowed by a unit or a dinner that exceeded SPG guidelines).
Important Information
When an expense is itemized, the Business Purpose Category, Business Purpose Details, and Comment fields may be used to provide additional detail about the itemization. For more information, see Concur Expense Report Key Fields and Use of the Details Menu.
If an expense needs to be itemized and allocated, first itemize and then allocate.
This procedure assumes you know how to create an expense report and enter/import expense lines into the report. For complete instructions, see Create and Submit a Concur Expense Report.
This procedure begins each example at the point you click Itemizations when entering the expense.
Step-by-Step Process
Itemizing Expenses
When an expense is itemized, the total of the individual itemizations must add up to the parent expense line. Therefore, the first itemization added uses the same Expense Type as the parent expense line. For example, if a Meijer expense of $100 needs to be itemized, where $75 was for supplies for a hosted meal (e.g., napkins, etc) and $25 was for office supplies, you would:
- Enter or import the expense line for $100 at Meijer using the Hosting Entertainment-Other Expense Type.
- Create an itemization for $75 using the Hosting Entertainment-Other Expense Type to reflect the true hosting cost.
- Add an itemization for remaining $25 using the Office Supplies Expense Type.
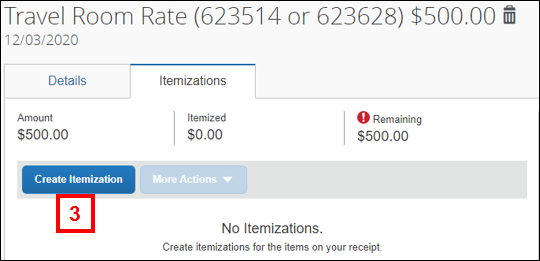
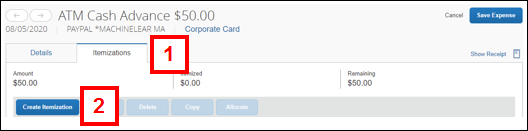
- Click the Itemizations tab.
Note: The Itemizations tab displays the Total Amount of the transaction, the Itemized total, and the Remaining amount.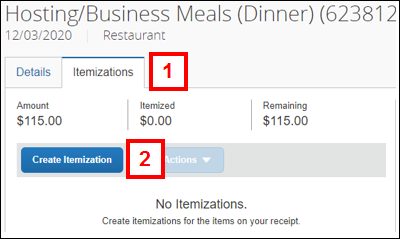
- Click Create Itemization.
- Select the same Expense Type as the parent line from the drop-down list.
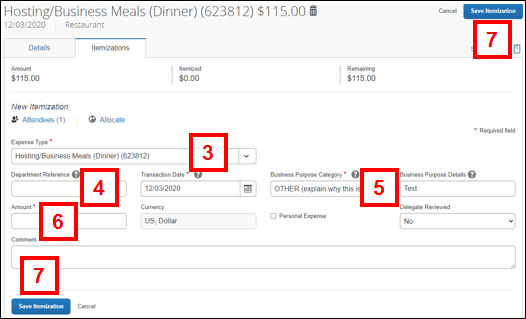
- If applicable, enter a Department Reference.
- If applicable, update the Business Purpose Category and Business Purpose Details to reflect the reason for the itemized expense.
- Enter the Amount.
- Click Save Itemization.
Note: In the Expense List pane, you see the parent line with the word Itemized under the amount. An alert flag appears next to the parent line with a message reminding you to complete the itemization for the expense. - Repeat steps 2-7 for the new expense and any additional itemization of the parent expense.
- Verify the Remaining amount for the parent line is $0.00 and that any alert flags/messages related to itemization no longer appear.
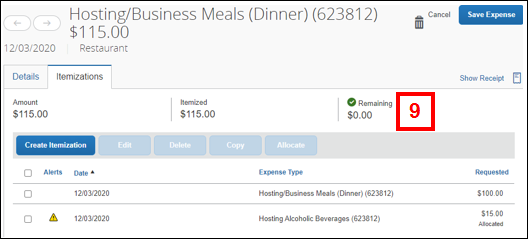
The word Itemized appears under the Requested amount on the parent line in Expense List pane. To see the itemized expenses, click the expense line and select the Itemizations tab.
Itemizing Hotel Expenses
The following highlights those itemization steps that are specific to the Travel Room Rate Expense Type for hotel accommodation. It is required to itemize any hotel expense to define or verify the nightly rates for the room and specify any tax(es).
Enabling e-Receipts in Concur and booking hotel accommodations in Concur may reduce the amount of data entry needed to itemize hotel expenses.
If a block of rooms needs to be entered for either travel or conference expenses, select either the Travel Room Block Charges or Conference Planning Room Block Charges Expense Type rather than the Travel Room Rate Expense Type. Provide a detailed explanation of the business purpose for this reservation, including number of rooms and nightly cost in the Comment field.
Note: These Expense Types do not have the same itemization steps as a typical single room.
If you need to enter a room deposit, select the Travel Room Deposit (Pre-Paid) Expense Type.
- Enter or verify the Check-In Date, Check-Out Date, and Amount. If these fields are left blank, you will receive an error that these fields must be entered before advancing to itemizations.
Notes:- For a PCard expense, these dates are populated from the imported PCard transaction data.
- For an out-of-pocket expense, the Check-Out Date defaults from the Transaction Date entered on the New Expense pane.
- Based on these dates, the Nights is automatically calculated.
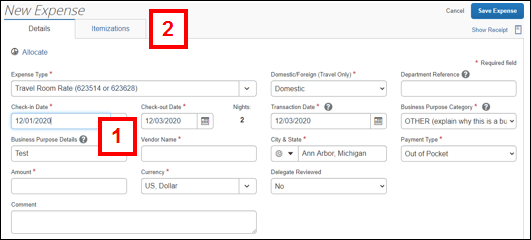
- Click the Itemizations tab.
- Click Create Itemization.
- Select the same Expense Type as the parent line from the drop-down list.
Note: The expense type chosen for the parent line will always appear first under Recently Used in the drop-down.
- Once the Travel Room Rate Expense Type is selected, fields will appear to itemize your hotel folio. If the room rate was the same every night, continue to the next step. If there are multiple room rates on your hotel folio, go to step 10.
- Confirm the The Same Every Night box is selected.
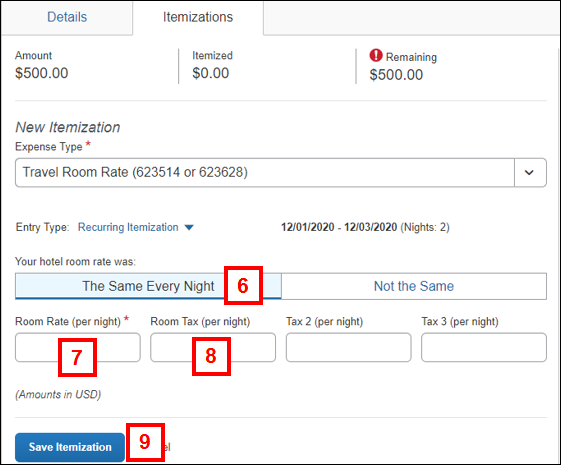
- Enter the Room Rate (per night).
- Enter additional nightly tax(es) in the Room Tax (per night), Tax 2 (per night), and/or Tax 3 (per night) fields, as applicable.
- Click Save Itemization.
If there are multiple room rates on your hotel folio, complete the steps below:
- Select the Not the Same box. Once this is selected, the fields below will change and show you each night separately.
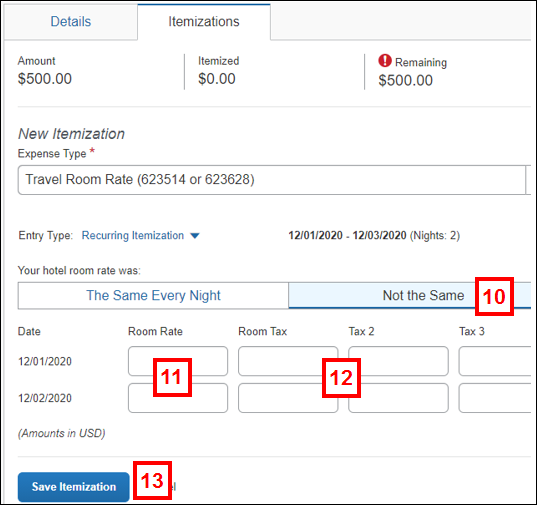
- Enter the nightly room prices in the Room Rate fields next to the appropriate dates.
- Enter additional nightly tax(es) in the Room Tax, Tax 2, and/or Tax 3 fields next to the corresponding dates, as applicable.
- Click Save Itemization.
Review the Remaining amount to verify if additional itemizations are required for the hotel expense. If it is not $0.00, itemize any hotel expenses that were not room rate charges (e.g. in-room movie to be charged as Personal expense or Travel Parking) or a credit for a pre-paid deposit.
- Click Create Itemization.
- Select the appropriate Expense Type from the drop-down list.
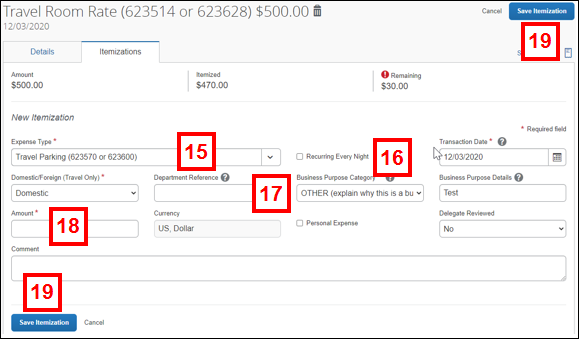
- Check the Recurring Every Night box if this charge is for an extra charge that is not related to the room rate but recurred every night (e.g. Travel Parking, Internet). If this is not a recurring charge (e.g. Personal mini bar charge), do not check the box.
- If applicable, enter or update the Department Reference, Business Purpose Category & Details, and/or Comment.
- Enter an Amount for this expense.
- Click Save Itemization.
- If applicable, repeat steps 14-19 for each additional itemization for the expense.
- Verify the Remaining amount for the parent line is $0.00 and that any alert flags/messages related to itemization no longer appear.
Itemizing ATM Cash Withdrawals
In addition to itemizing an ATM Cash Advance expense to indicate what you purchased with the funds, an itemization line may need to be added for any ATM fee charged by the bank at which the withdrawal was made and/or any Unused ATM Advance funds.
Unused ATM funds will be deducted from any reimbursements owed to you by the U-M at the end of the expense reporting process. If you owe the U-M funds by the end of process, they will be deducted from your next payroll check.
This procedure demonstrates both types of itemizations for the ATM Cash Advance Expense Type. Follow the general itemization steps to record how you spent the funds.
- Click the Itemizations tab.
- Click Create Itemization.
- Select the appropriate Expense Type for each expense incurred, including one for Bank Fees if applicable.
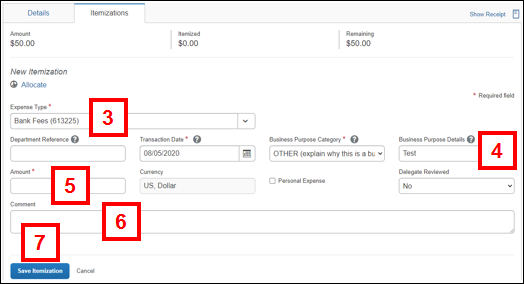
- Enter Business Purpose Details indicating the reason for the ATM Cash Advance.
- Enter the fee Amount.
- If applicable, enter a Comment.
- Click Save Itemization.
- Repeat steps 2 - 7 for additional expenses using the funds from the ATM withdrawal and choose the appropriate Expense Type for each expense.
In the event ATM funds were not used, follow these steps to include it in your itemization of the ATM Cash Advance:
- Click Create Itemization.
- Select Unused ATM Advance from the Expense Type drop-down list.
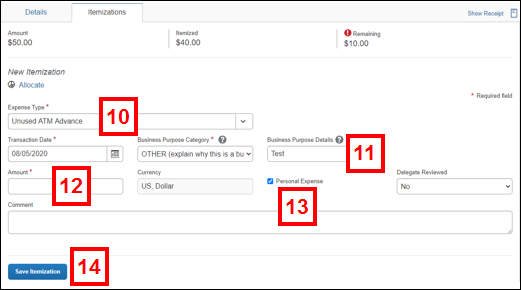
- Enter Business Purpose Details indicating the reason for the ATM Cash Advance.
- Enter the Amount of the advance that was not used.
- Check the Personal Expense box.
Note: The system requires this box to be checked for this Expense Type. - Click Save Itemization.
Designating an Expense as Personal
In some cases, a transaction (or a portion of one) is a personal expense and should not be charged to the U-M.
If a PCard was used to pay for a meal while traveling on U-M business, the PCard transcation must be marked as a Personal expense to correctly apply the per diem lines in the expense report.
Note: Select the PCard transaction for the “travel meal” from the Expense List pane.
- Select Personal from the Expense Type drop-down list.
- Check the Personal Expense box.
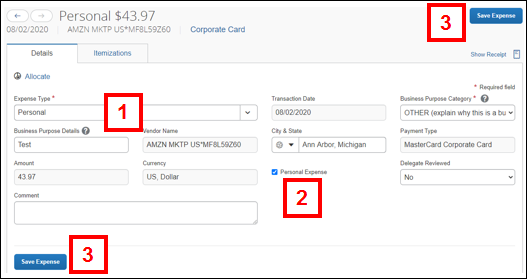
- Click Save Expense.
Note: If you are itemizing part of a transaction as a personal expense, follow the standard itemization steps and click Save Itemization on the Itemization tab.