Overview
This procedure describes how to post Journal Entries (JEs) to the General Ledger. Posting is the second part of the journal entry process:
- Create JE
- Post JE
- Approve JE (if necessary)
Refer to Journal Entries: Troubleshooting and Process Descriptions for more information.
Important Information
This document provides instructions for the two methods to post a JE:
- Posting JEs Manually
You run the Post Journal process online.
- Posting JEs Using the M-Pathways Batch Process
The Post Journal process initiates the following actions sequentially (All JEs go through all four stages of the process):
- Edit Journal – compares the ChartField combinations in the JE against the combination edit rules in M-Pathways.
- Submit Journal – determines whether the JE contains lines that will trigger workflow, and if so, electronically routes it for approval. You initiate the process through the Submit Journal stage.
- Approval Step 1: If a JE contains a line greater than or equal to $10,000 it will route for Department approval. Refer to the Authorized Approver Table for more information.
- Approval Step 2: Sponsored Programs approval.
- Budget Check Journal – verifies that a corresponding budget line exists for the ChartField combination(s) used in the JE.
- Post Journal – posts the JE to the General Ledger.
Navigation
NavBar > Navigator > General Ledger > Journals > Journal Entry > Create/Update Journal Entries
Posting JEs Manually
If you uploaded JEs, go to step 1. If you created JEs online, go to step 5.
- Click the Find an Existing Value tab.
Find an Existing Value Page Screenshot
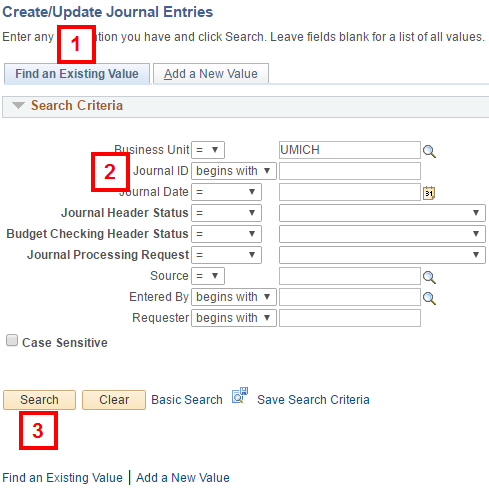
- Enter the Journal ID. Use the Journal Entry Load Status report as a guide.
- Click Search.
- Click the Lines tab.
- Select Post Journal from the Process drop-down list.
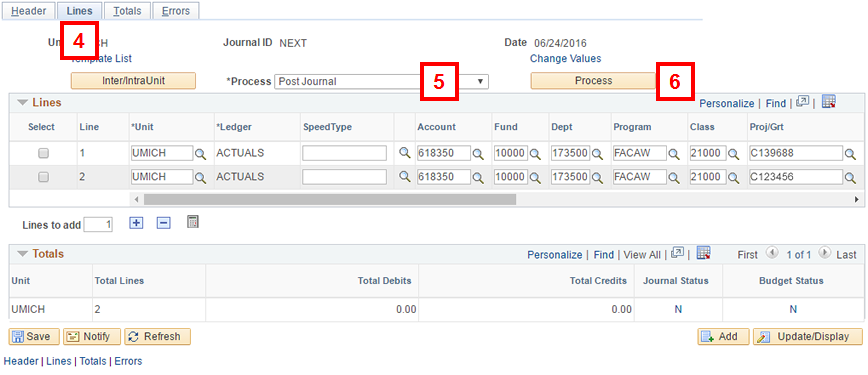
- Click Process.
Note: If applicable, verify supporting documentation has been attached before posting. Refer to Create an Online Journal Entry (JE) for more information.
- Click OK.
Note: M-Pathways determines if there are Edit Journal errors and Budget Check Journal errors. If there are none, the journal workflow submission message appears. Refer to Journal Entries: Troubleshooting and Process Descriptions for more information.
- Click OK to continue with the Submit Journal stage.
-
For Sponsored JEs: Verify the Journal Status is V (valid).
For Non-Sponsored JEs: Verify the following field values:
- Journal Status value is P (posted)
- Budget Status value is V (valid)
For both types of JEs: If Journal Edit errors exist, the Journal Status value is E. Complete the following:
- Click the link to view information about the error.
- Correct the ChartField error(s). Refer to ChartField Combination Edit Rules and/or work with your Fin Ops Coordinator to correct these errors.
- Repeat steps 5–9.
Navigation
NavBar > Navigator > General Ledger > Journals > Process Journals
Select the report: Journal Edit Errors – User ID or Journal BC Errors – User ID
Posting JEs Using the M-Pathways Batch Process
If you don't manually post your non-sponsored JEs, you must run two reports in M-Pathways the next business day to verify whether your JEs have posted successfully during the overnight batch process. These reports identify if Edit Journal or Budget Check Journal errors occurred.
Important Information
You can use the following instructions to run either report, but the images are for the Journal Edit Errors – User ID report.
The following steps are written for Windows machines. Mac users, refer to Run a Report to the Report Manager for instructions after step 6 in this procedure.
- Click Search to display your existing Run Control IDs.
- Click the link for the applicable Run Control ID.
Notes:
- If you know your Run Control ID, select = (equal to) from the Run Control ID conditions drop-down list and enter your Run Control ID in the field.
- To create a Run Control ID, click the Add a New Value tab and follow instructions in the M-Pathways Run Control ID Information – Reference document.
- Verify the values in the Report Request Parameters group box:
- Business Unit displays UMICH
- Ledger displays ACTUALS
Journal Edit Errors by Oprid Page Screenshot
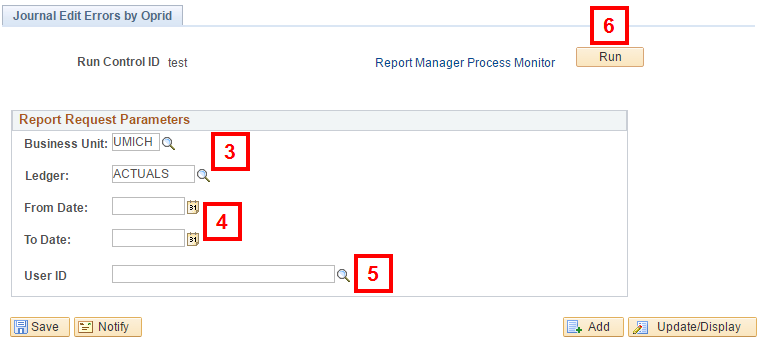
- Enter the From Date and To Date.
- Enter your uniqname in the User ID field.
- Click Run.
- Verify or select these values in the following fields:
- Type displays Window
- Format displays PDF
- Click OK
Note: Verify that the following status pop-up windows appear:
- Queued
- Processing
- Success (or Error)
- Verify the report displays in a window.
Note: If the report doesn’t display in the window, go to the Process Monitor, then click View Log/Trace. From there, click the file ending in .pdf to open the report (if one exists).
- If applicable, click Print on your browser’s toolbar to print the report.
- Repeat the procedure to run the other report.
Notes:
- If there are no Edit Journal errors, the report doesn’t display. The system opens the Process Monitor > View Log/Trace page, but no PDF file is listed.
- If there are no Budget Check Journal errors, the report displays but it contains no data.
If either report indicates that Edit Journal or Budget Check Journal errors exist, correct them using the JE's Lines page.
Navigation: NavBar > Navigator > General Ledger > Journals > Journal Entry > Create/Update Journal Entries
Refer to Journal Entries: Troubleshooting and Process Descriptions for more information on the following:
- Addressing Edit Journal process errors.
- Addressing Budget Check Journal process errors.
- Additional procedures you can complete on the Lines page.