Overview
This document outlines the Journal Entry (JE) approval process. Approval is the final part of the journal entry process:
Refer to Journal Entries: Troubleshooting and Process Descriptions for more information.
All sponsored JEs require approval. A non-sponsored JE only requires approval when a single line of the journal is $10,000 or greater (i.e. A JE with 1,000,000 lines of $1.00 each does not require approval).
Navigation
NavBar > Navigator > General Ledger > Journals > Journal Entry > Manage Journal Approval
Step-by-Step Process
Note: This document provides navigation to the approval page through the M-Pathways Main Menu. This is the preferred method because it allows you to view all JEs pending your approval in one location. The approval page can also be accessed through your worklist or email notification.
- Click Search.
Note: Clicking Search while using the default settings will return results for all JEs that require your approval. If desired, you may enter different search criteria (i.e. Select Approved from the Approval Status drop-down list to view all of your previously approved JEs).
Manage GL Journal Approval Page Screenshot
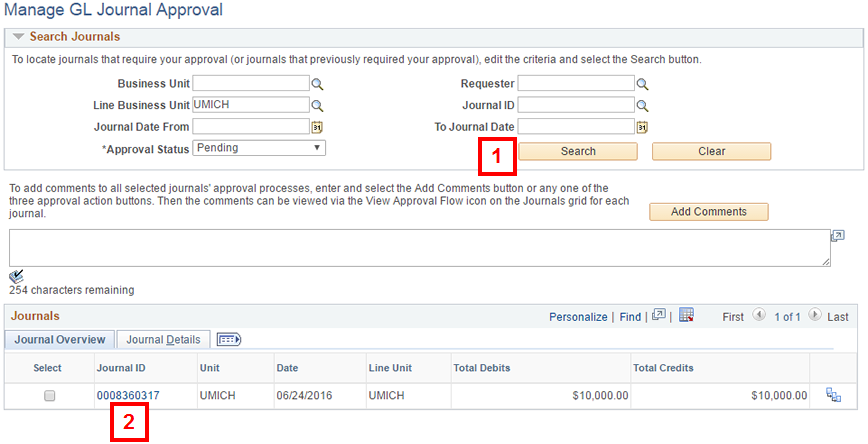
- Click the Journal ID for the JE you would like to approve.
Note: If appplicalbe, click Show All Columns
 to display chartfield information for the JEs.
 - If desired, click Show All Columns .
GL Journal Approval Page Screenshot
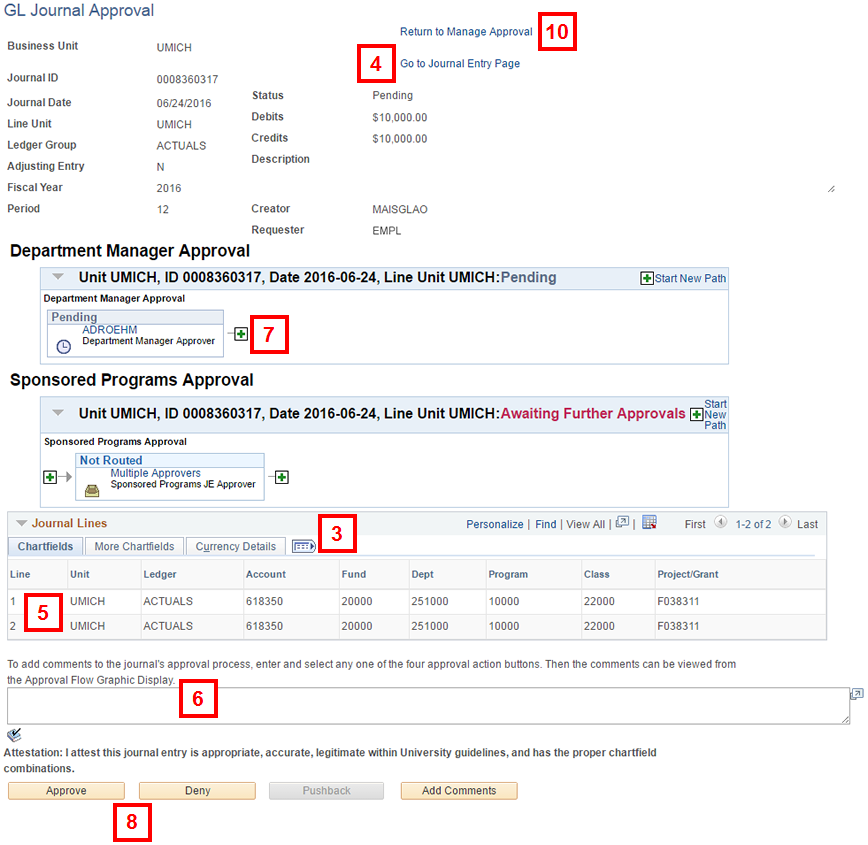
- To add or view support documentation for the JE, click Go to Journal Entry Page.
Notes:
- To view support documentation, click the View Support link on the Journal Entry page.
- Refer to Create an Online Journal Entry (JE) for information on adding support documentation to a JE.
- Review JE information to determine whether to approve or deny.
- If applicable, enter comments.
Notes:
- You must enter comments if you Deny approval for a JE.
- To save comments without approving or denying the JE, click Add Comments.
- To add an ad-hoc approver, click Insert Approver. Otherwise, go to step 8.
- Click Approve or Deny.
- The JE displays as Approved, Denied, or continues to the next person on the approval path.
- If applicable, click Return to Manage Approval to approve/deny additional JEs.