Overview
This procedure describes how to use M-Pathways to create Online Journal Entries (JEs). Creating the JE is the first part of the journal entry process:
- Create JE
- Post JE
- Approve JE (if necessary)
Refer to Journal Entries: Troubleshooting and Process Descriptions for more information.
Create JEs
- Use this document to create JEs online for both sponsored and non-sponsored activity in M-Pathways.
- Use the Journal Upload process if you want to create a large number of JEs at one time, or efficiently enter a JE with many lines into the M-Pathways system. Refer to Upload a Journal Entry Data File into M-Pathways for details.
Important Information
If a journal contains both sponsored and non-sponsored lines, it is treated as a sponsored journal by the M-Pathways system. All sponsored journals are routed to Sponsored Programs for approval as part of the Post Journal process. Sponsored activity is indicated by an Initial Fund value of 20000 or 25000 on a Project/Grant beginning with C, F, M, N, or R.
Navigation
Main Menu > General Ledger > Journals > Journal Entry > Create/Update Journal Entries
Step-by-Step Process
- Enter or select the Journal Date.
Add a New Value Page Screenshot

- Click Add.
Note: After an accounting period has closed, you cannot create a JE for that period.
- Enter the Long Description applicable to the JE.
Journal Header Page Screenshot
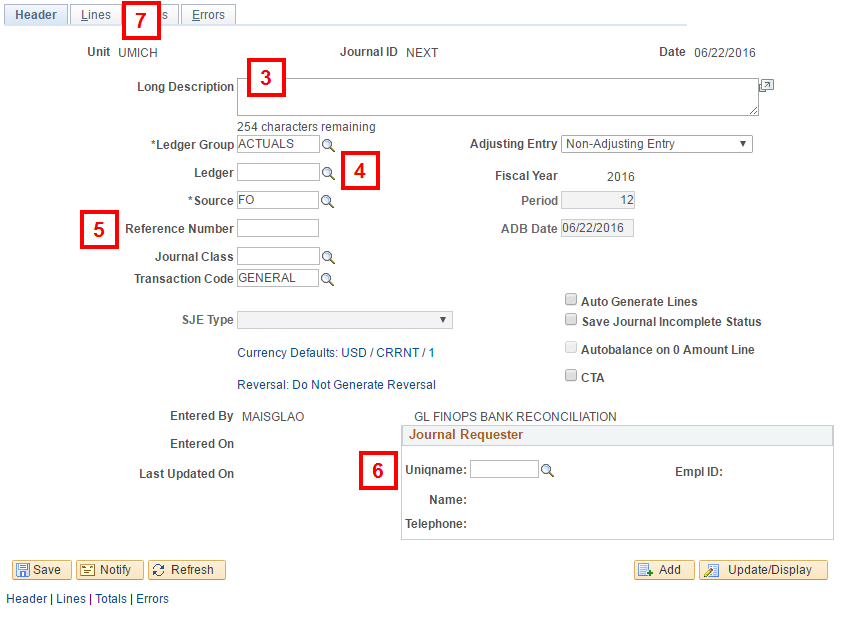
- Verify the following information:
- ACTUALS defaults into the Ledger Group field.
- Your organization's journal source code defaults in the Source field.
- If applicable, enter a departmental Reference Number for the JE.
- Enter or Lookup
 the Uniqname of the person responsible for requesting this journal.
Note: The Journal Requester field drives the workflow for the JE. The workflow is based upon the Journal Requester's primary appointing Dept. ID at the time of save.
- Click the Lines tab.
- Enter the applicable ChartField values in the following fields: Account, Fund, Dept, Program, Class, Proj/Grt.
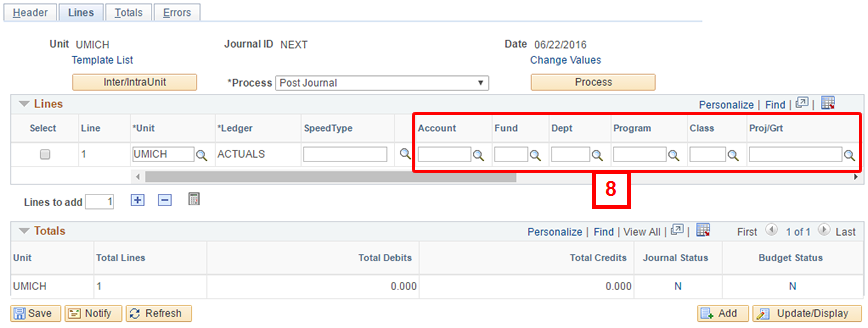
- Scroll right or press Tab to move to the remaining fields for the journal line.
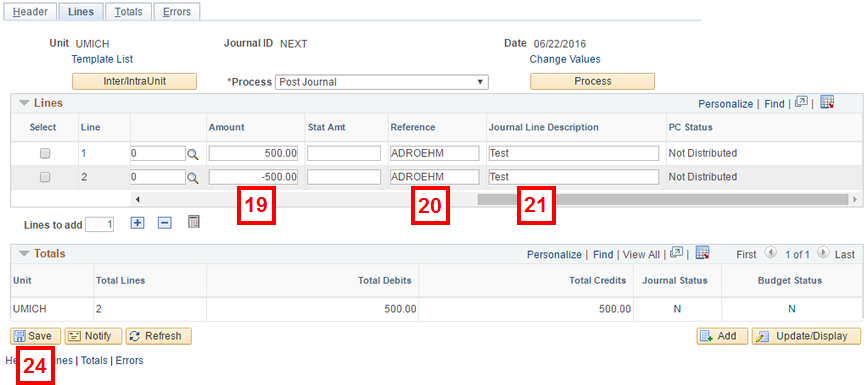
- Enter the Amount for the journal line.
- Enter debits as positive numbers.
- Enter credits as negative numbers.
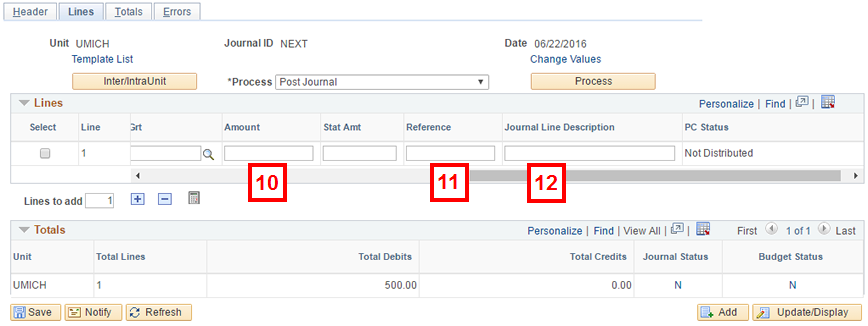
- If applicable, enter a Reference for the journal line.
- Enter an applicable explanation for the journal line in the Journal Line Description field.
Note: The Account value description defaults in the Journal Line Description field if you click Refresh before entering a more specific description for the journal line. Overwrite the Account value description if it appears in this field.
- Scroll to the left side of the Lines page.
- Enter the number of rows you want to add in the Lines to add field or accept the default value of 1.
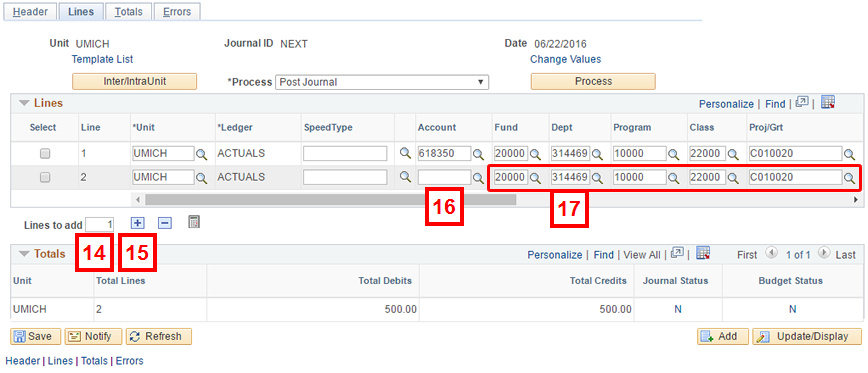
- Click Insert Lines to add the row(s).
Note: The data from the previous row (except for the Account value) is copied down to the inserted rows.
- Enter the Account value for the corresponding line.
- Change the applicable ChartField values for the corresponding line.
- Scroll right or press Tab to move to the remaining fields for the journal line.
- Verify that the Amount defaulted to the line that was added. Change the amount if applicable.
- If applicable, overwrite the departmental Reference for the journal line.
- If applicable, overwrite the defaulted description with an applicable explanation for the journal line in the Journal Line Description field.
- Scroll to the left side of the Lines page to continue adding lines or to process the JE.
- Repeat steps 16–21 for each line added.
Note: For JEs with many lines, it is recommended that you save occasionally. M-Pathways permits you to save the online journal only if total Debits equal total Credits.
- Click Save.
Notes:
- When you Save, the system checks for valid values and verifies that the journal is balanced (Total Debits and Total Credits are equal). Refer to Journal Entries: Troubleshooting and Process Descriptions for more information.
- To delete a journal, complete the following:
- Select Delete Journal from the Process drop-down list.
- Click Process.
- Click Yes.
Notes:
- Posted journals can't be deleted.
- Deleted journals can be searched for and copied from.
If supporting documentation exists, go to step 25. If supporting documentation does not exist, this procedure is complete. Go to Post Journal Entries (JEs) in M-Pathways.
- To attach supporting documentation, click the Header tab.
Journal Header Page Screenshot
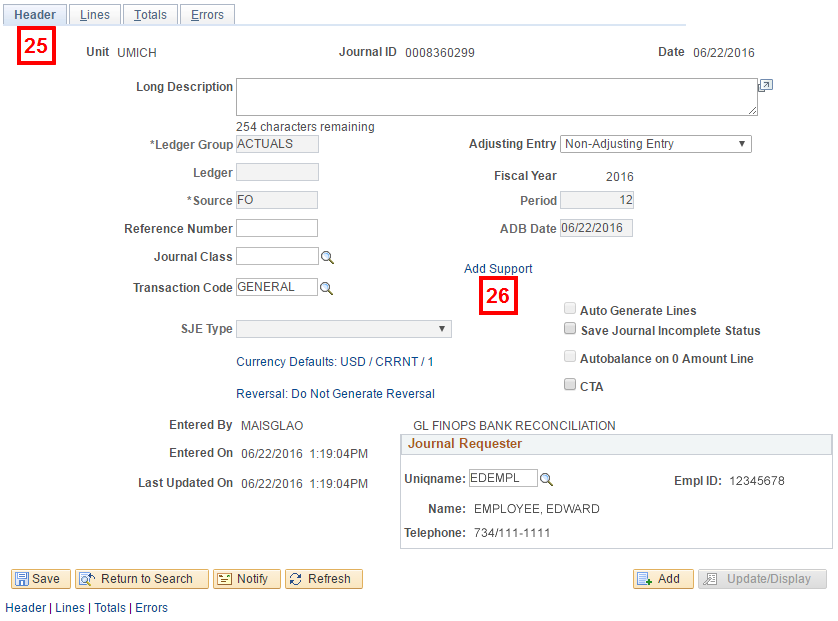
- Click Add Support.
Note: Support documents may not exceed 10MB. If supporting documentation exceeds 10MB, attach to an e-mail and send to: jesupport@umich.edu
- Click Choose File.
- Navigate to and select the document you wish to add to the journal entry.
- Click Open.
Note: Only PDF(.pdf) and TIF(.tif) files can be added as supporting documentation.
- Click Upload.
- Repeat steps 27-31 to attach additional supporting documentation.
- All support documents attached are combined into one file.
- Click View Support to view attached documents.
- Click Delete Support to remove all attached documents.
- After the journal entry posts, supporting documentation can no longer be added or deleted.
This procedure is complete. Go to Post Journal Entries (JEs) in M-Pathways.