Overview
This document explains the steps for preparing a Graduate Student Appointment job offer in M-Pathways Human Resource Management System (HRMS) - Recruiting.
Important Information
- The Regular, Temporary, and Graduate Student Appointment job offer templates differ slightly. This step-by-step procedure illustrates a Graduate Student Appointment job offer. See Prepare a Regular Job Offer and Prepare a Temporary Job Offer for more details.
- Prepare a job offer after you complete all interviews and select a Candidate.
- Prior to preparing the job offer:
- Add a contact note indicating the employee’s actual first date of employment for the I-9 Form, Section 2, see Add Applicant Notes.
- Changes can be made to the date as required prior to completion of the I-9 form.
- Review the dispositions for all applicants and update all seriously considered candidates. For more information on how to disposition applicants, see Disposition Applicants.
- Change the disposition of the selected Candidate to “Interview”.
- Changes can be made to a job offer until the offer status changes to “Accept”. For more information see Approve/Deny a Job Opening.
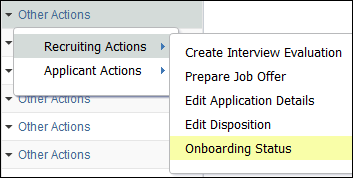
- To view existing offer information, select Prepare Job Offer from the Other Actions > Recruiting Actions drop-down menu.
- If selected Candidate rejects the job offer, copy all applicable comments from the offer and prepare a new offer for the next Candidate. Change the status on the original offer to “Withdrawn”, and then prepare a new job offer.
- For a Graduate Student Appointment job offer checklist and cheat sheet, see Offer Checklist & Cheat Sheet (Graduate Student Appointment).
Navigation
Homepage: Recruiting; Tile: Search Job Openings
NavBar > Navigator > Recruiting > Search Job Openings
Step-by-Step Process
- Search for the Job Opening ID.
- Mark the candidate as interviewed, if not already assigned a Disposition of “Interview”. For more information on changing dispositions, see Disposition Applicants.
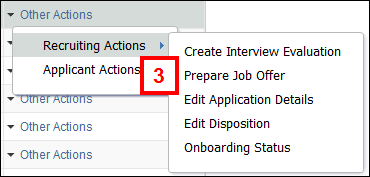
- Select Prepare Job Offer from the Other Actions > Recruiting Actions drop-down menu for the selected applicant.
- Enter or lookup
 the six-digit Admin Department code.
 - Verify that the correct department displays or enter or lookup a value in the Appt Department field.
- If applicable, enter or select the NEO Date (New Employee Orientation).
- Enter or select the Appt Begin Date.
- If applicable, enter or select the Appt End Date.
- Verify or select the Offer Date.
- If the department uses Supervisor ID, enter or lookup the eight-digit EmplID.
- Verify the correct contact displays in the Department Contact field.
- If applicable, check the Other Employing Department Contacted box (not shown here).
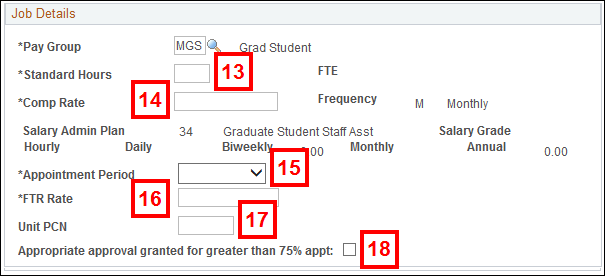
- Verify the correct value in the Standard Hours field.
- Enter the job offer's compensation rate in the Comp Rate field.
- Verify or select a value from the Appointment Period drop-down list.
- Verify the full time rate is correct in the FTR Rate field.
- This value defaults from the Comp Rate field.
- The FTR Rate is based on 40 standard hours.
- If applicable, verify the Position Control Number (PCN) in the Unit PCN field.
- If applicable, check the Appropriate approval granted for greater than 75% appt box.
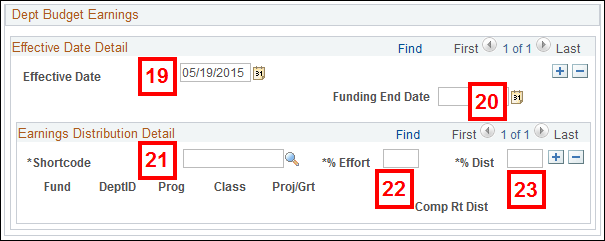
- Enter or select the Effective Date.
- Enter or select the Funding End Date.
- Enter or lookup the Shortcode.
- Enter the % Effort related to the shortcode.
- % Effort = (Standard Hours/40) x100.
- The sum of the % Effort field(s) must directly correlate to the standard hours percentage.
- Enter the % Dist (Percent Distribution).
- To add additional shortcodes, click Add Row
 to insert a new row in the Earnings Distribution Detail group box and repeat Steps 21-24.
 - To add additional effective dates, click Add Row to insert a new row in the Effective Date Detail group box and repeat Steps 19-25.
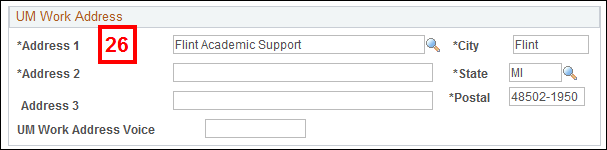
- Enter the UM Work Address:
- Verify that the department name is correct in the Address 1 field.
- Address 2 is the Room number and building of the primary work address.
- UM Work Address Voice is the Candidate’s ten-digit work phone number with area code.
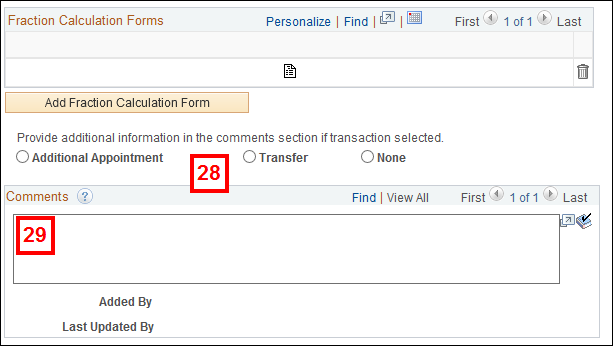
- Review the Fraction Calculation Form group box.
- If a Fraction Calculation Form was added when the job opening was created, the form displays. To make edits to the existing form, click the appropriate link.
- To add a Fraction Calculation Form, click Add Fraction Calculation Form and include all applicable details. For assistance with the form, see Complete Fraction Calculation Form.
- To delete a Fraction Calculation Form, click Delete Row
 .
. - If the job offer is not a new hire, specify as Additional Appointment, Transfer, or None by selecting the applicable radio button and providing additional information in the Comments field.
- If applicable, enter Comments.
- Order: Include the most recent comment at the top.
- Spacing: Use two line breaks between comments when possible.
- Format: <<MM/DD/YY First initial Last Name: Comment>>.
- General communication: Include any brief, pertinent comments related to candidate selection.
Note: If the Job Opening ID is unknown, enter known values in search criteria field(s). For more information on how to search for a job opening, see Search Job Openings.
Note: To communicate the correct I-9 date to the Regional I-9 offices, add an applicant note indicating the actual first date of employment. For more information on applicant notes, see Add Applicant Notes.


Note: If the selected Candidate has a current Admin Department, verify the value in the Admin Department field.
Note: The Academic HR Notified 60-Day Retro Hire box is checked if the Appt End Date is more than 60 days retro.
Note: The Offer Date field populates automatically with today’s date.
Note: The Department Contact receives a daily digest e-mail of new hires that have not completed Self-Service onboarding.
Note: If the selected Candidate has active job data, the other employing department must be contacted to coordinate time commitment and funding.
Note: The Job History group box displays if the graduate student has an active appointment.
Notes:
Note: If the total appointment effort for the Candidate is greater than 75% (greater than 30 hours), the department must gain approval from the student’s advisor or Academic HR prior to proceeding.
View Dept Budget Earnings screenshot
Note: The Funding End Date does not stop pay.
Notes:
Note: The % Dist values for all shortcode rows must equal 100.
Notes:
View Fraction Calculation Form screenshot
Notes:
Note: This is optional and for informational purposes. These comments are sent to HRRIS to assist in processing.
Note: Follow these recommendations when entering details in the Comments field:
Offer Approvers
- Hiring Team/Approvers for a job opening automatically populate as Approvers on the job offer. Verify the Approvers are correct and make necessary changes before finalizing the job offer.
- You may list any number of Approvers for the job offer. A few guidelines apply:
- For Michigan Medicine, at a minimum, an EPC is required and marked as Primary with a Seq# of 1. If multiple Offer Approvers are selected, the EPC must be the final Approver in the sequence and be the only one marked Primary
- Group Approvers are automatically added and act as the primary and final approver for the Ann Arbor academic campus, Flint and Dearborn.
- Approvers review/approve the job offer in the exact sequence order that you provide.
- Every Approver must approve the job offer before the hire can be prepared.
- Verify the job offer Approvers are correct in the Offer Approvers group box.
- Click Add Approvers to add additional job offer Approvers.
- Click Delete Row to delete job offer Approvers, if necessary.
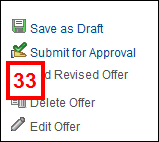
- Click Submit for Approval.
View Offer Approvers screenshot

View Submit for Approval screenshot
For Reference
View the Onboarding Status from the Other Actions > Recruiting Actions drop-down menu for the selected applicant.
View Other Actions Recruiting Actions screenshot