Overview
Steps required to process a Fellowship Benefit Eligibility Load:
- Run the Fellowship Benefits Reports to help determine eligibility, see Run Graduate Student Reports.
- Complete the Fellowship Benefit Load Spreadsheet Template.
- Using the information in this document, upload the Fellowship Benefit Load Spreadsheet Template.
More information about the Graduate Student Fellowship Benefits process can be found in Graduate Student Fellowship Benefits.
Navigation
NavBar > Navigator > Workforce Administration > Collective Processes > Fellowship Benefits
Step-by-Step Process
Before uploading the Fellowship Benefit Load spreadsheet template, complete the Fellowship Benefit Load Spreadsheet Template.
Note: Do not upload after 7:00 p.m. weekdays or on Saturdays.
To use a previously created Run Control ID:
- Enter all or part of your existing Run Control ID.
- Click Search.
- If applicable, click the Run Control ID in the Search Results and then go to step 7.
To add a new Run Control ID:
- Click Add a New Value.
- Enter the Run Control ID.
Note: The Run Control ID is associated only with your Login ID. It is helpful to assign the Run Control ID a name that is easy to remember so that you can find and reuse the Run Control ID in the future. - Click Add.
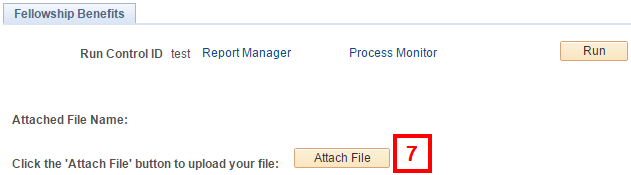
- Click Attach File.
- Click Choose File.
- Navigate to and select your fellowship information .csv file.
- Click Open.
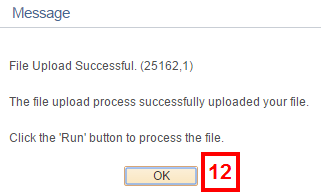
- Click Upload.
Note: If you receive a message that the "file is invalid," the file path may be too long. Move the file to the higher-level directory, and then repeat steps 9-11. - Click OK on the confirmation message.
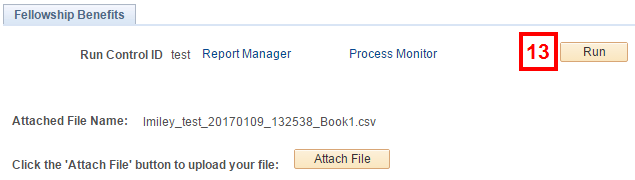
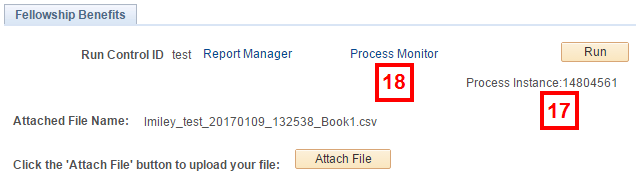
- Click Run.
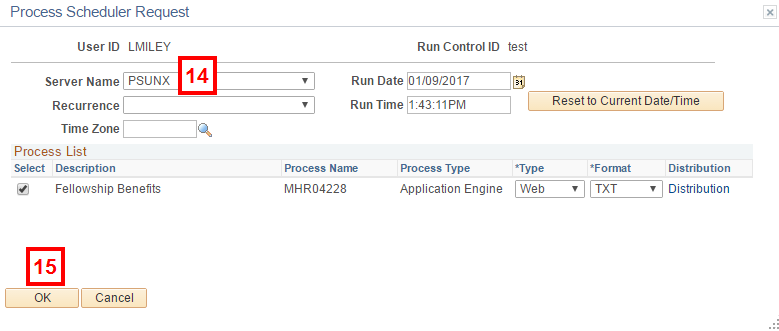
- Select PSUNX from the Server Name drop-down list.
- Click OK to run the process that will read your uploaded file and save fellowship information in M-Pathways.
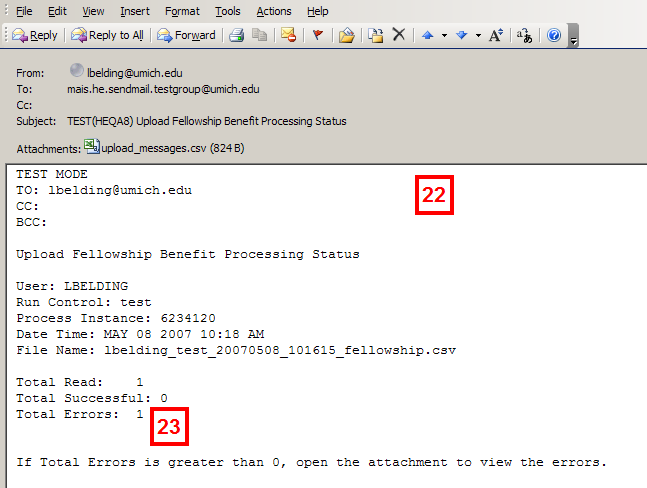
- Check your umich.edu email (and junk mail folder) for an upload confirmation message. It may take a few minutes to arrive.
- If you receive a confirmation email, go to step 23.
- If you do not receive a confirmation email, you need to verify that the process ran successfully. Go to step 17.
Fellowship Benefits Page Screenshot
Fellowship Benefits Page Screenshot
Process Scheduler Request Page Screenshot
Note: The time required to upload your file will vary depending on the number of records you are uploading and peak processing times. If the Run Status never displays Success, contact the ITS Service Center at 734-764-HELP (4357) or email 4HELP@umich.edu.
- Write down the Process Instance number and note the time and date the report was run.
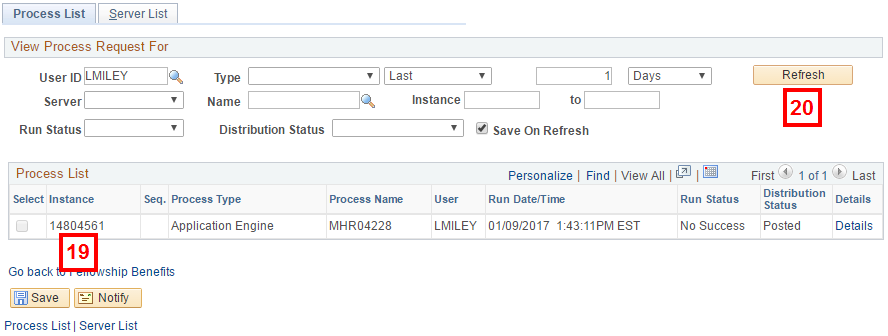
Note: You will use this information to locate the correct upload request in the Process Monitor. - Click Process Monitor.
- Locate the upload request in the Report List using the Instance (Process Instance number) and Run Date/Time fields.
- Click Refresh until the Run Status is Success.
- Check your email (and junk mail folder) for an upload confirmation message. If you still do not have a confirmation, contact the ITS Service Center at 734-764-HELP (4357) or email 4HELP@umich.edu.
- Review your confirmation email that details:
- User - User's Uniqname
- Run Control - Run Control ID
- Process Instance - Process Instance
- Date Time - Date/time file uploaded
- File Name - Your original file name is updated when the file is uploaded to M-Pathways. The new file names uses your uniqname, run control ID, date/time stamp, and your original file name.
- Upload record information:
- Total Read - number of records read
- Total Successful - number of records that were added to M-Pathways
- Total Errors - number of errors (Note: Individual records may have multiple errors.)
- If Total Errors is greater than zero. a CSV file is attached to the email.
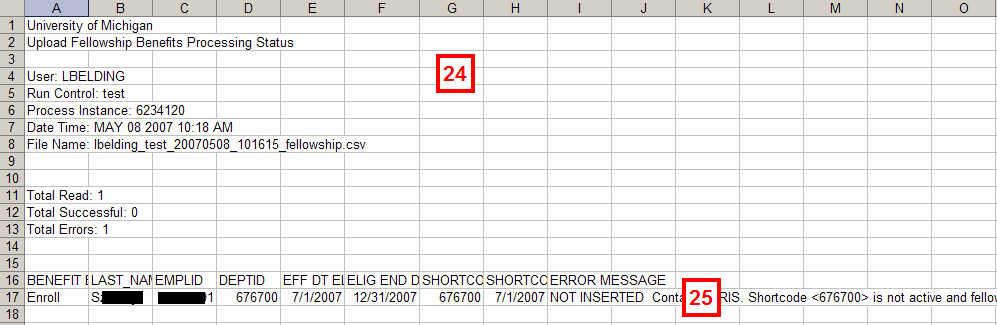
Note: The CSV Message Report includes the specific record with errors and the error that occurred. - If the confirmation email contains an attachment, open and view the report.
- View the row details:
- NOT INSERTED - An error has occurred; the row was NOT loaded to Job Data, see step 26.
- INSERTED: The row was successfully loaded to Job Data; this is an informational message only.
- To fix rows that were NOT INSERTED:
- Open the Fellowship Benefit Load template spreadsheet.
- Copy the lines with errors from the confirmation email attachment, columns A-H (ensuring to not include the error).
- Paste the copied lines into the template spreadsheet.
Note: This method enables the spreadsheet edits to operate if the original data was manually entered (not pasted from another location).
- Correct the errors and re-upload the spreadsheet.
Fellowship Benefits Page Screenshot
More information about processing messaged and errors can be found in Upload the Fellowship Benefit Load Spreadsheet - Processing Messages.