Overview
A template for each letter code needs to be configured in Microsoft Word and uploaded into M-Pathways Student Administration (SA). Templates can be edited at any time. However, only one template file can be current (based on effective date) on a Template ID at one time.
In order to create/update and upload a communication template, you need:
- The HE COMMGEN SETUP USER role.
- BI Publisher installed in Microsoft Word. Contact the ITS Service Center if you do not have this add-on.
This document includes information on both creating a new template and updating an existing template. Follow the appropriate instructions as needed.
Terminology
In a communication template, there are two types of data - Static and Variable.
Static data - This is the basic text of the communication which does not change, regardless of recipient. Examples include salutations, informational text, website addresses, office mailing addresses, signatures, etc.
Variable data - This is text inserted in a communication based on an M-Pathways SA data field and is unique to each recipient. Examples include name, EmplID, citizenship, etc. Click to view a list of variable data fields found within CommGen queries.
Create a New Template
Before you begin the process of writing your communication, you need to either:
- Open a new, blank document in Microsoft Word. Save this document in .rtf format, giving the file a name that conveys the contents of the communication.
- Open a pre-existing template in Microsoft Word. Use the Save As function in Word to save the document in .rtf format. It is recommended you use a file name that conveys the contents of the communication.
There are two different methods available when writing a communication:
Option 1: You can write the full communication, leaving spaces for the variable data fields which are later inserted when the text is complete.
Option 2: You can begin writing the communication, inserting each necessary variable data field as you compose the communication.
Step-by-Step Process
- Click the Sample XML button on the BI Publisher menu in Microsoft Word.
View Sample XML button in Word
- Navigate to and select the XML Data Source file you saved during the Create a CommGen Data Source process.
- After selecting the Data Source, you should see a "Data Loaded Successfully" message.
- Click the Field button to view a list of variable data fields that can be inserted into the communication.
View Field button in Word
- Click on the field you want to insert in the template, and drag to the correct position in the Word template. Repeat this step until all variable data fields are placed in your template.
View illustration of moving a field into a template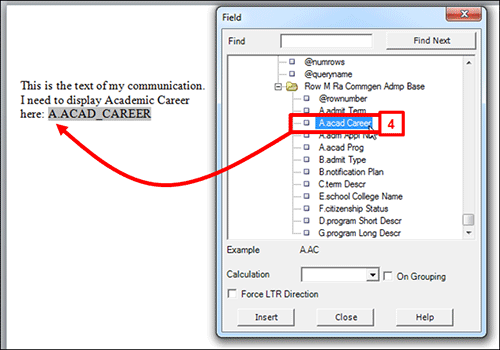
- If your letter requires more complex logic than what is provided in a single field, see the document on Using Complex Logic in a CommGen Template.
- Update the document Properties. This is required for every template to retain the proper spacing and formatting when the communication is sent to various email domains, such as Gmail and Hotmail.
- Word 2010:
View screenshot of Word 2010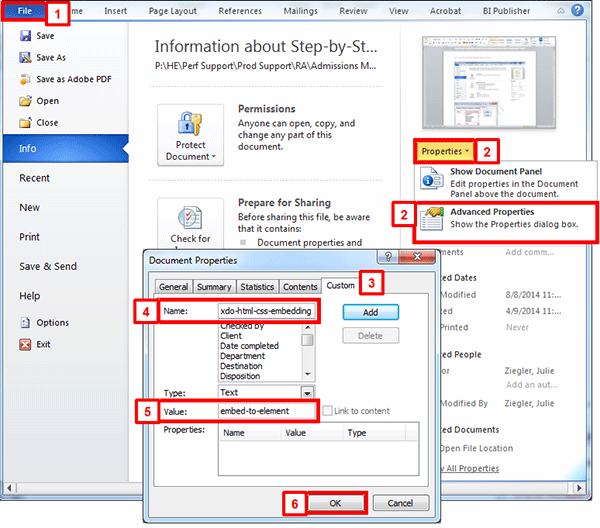
- Click the File tab. If the Information about... page does not display, click Info in the left panel.
- From the Properties menu, select Advanced Properties.
- Click the Custom tab.
- Enter xdo-html-css-embedding in the Name field.
- Enter embed-to-element in the Value field.
- Click OK to save the changes.
- Word 2010:
- (Optional) Click the PDF button to preview your letter.
View PDF button in Word
- When the template is complete, save the communication, verifying it is in .rtf format.
Update an Existing Template
Note: You must have the HE COMMGEN SETUP USER role to modify a Report Definition.
Download the Template from M-Pathways Student Administration (SA)
- Navigate to Reporting Tools > BI Publisher > Create BIP Report Definitions.
- Search for the template that needs to be updated.
- If you do not know the name of the report, contact the ITS Service Center
- Click the Template tab.
View the Template tab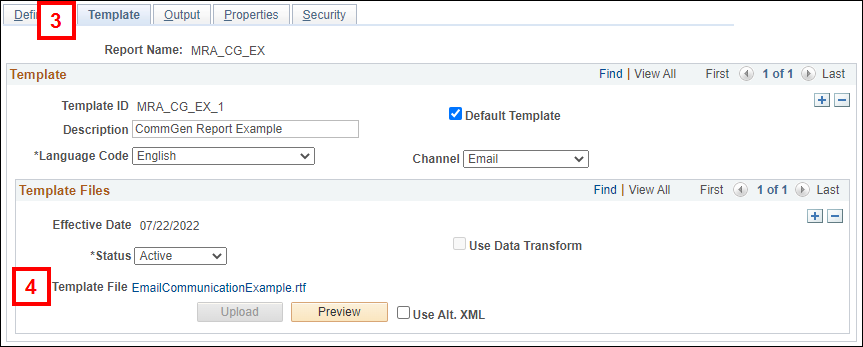
- Click the link in the Template file field to open the template in Microsoft Word.
- If making changes to variable data, do not close your browser window.
- In Microsoft Word, save the file to a local drive, being sure to keep it in .rtf format.
If making changes to static data only:
- Edit the text of the communication as needed.
- Save the template in .rtf format.
- Continue to the Upload the Revised Template section.
If making changes to variable data:
- On the M-Pathways Report Definition page, click the Definition tab.
View the Definition tab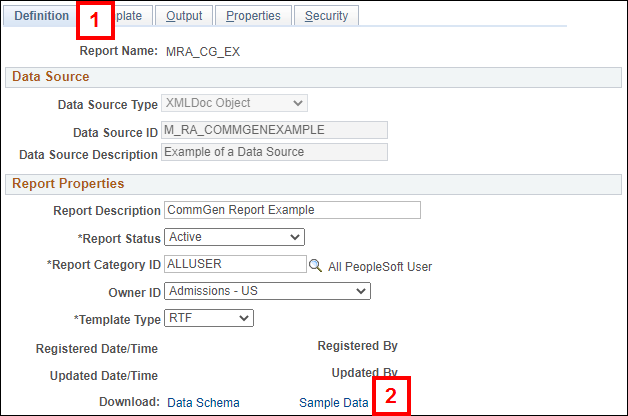
- Click the Sample Data link.
- When prompted, save the .xml file locally.
- In Microsoft Word, on the BI Publisher tab, click the Sample XML button, then navigate to and select the file you saved in step 3. You should receive a "Data Loaded Successfully" message; click OK on this message.
View the Sample XML button in Word
- Click the Field button to view a list of variable data fields.
View the Field button in Word
- Drag and Drop any new or additional fields from the Fields window into the correct place in your template.
View illustration of moving a field into a template
- When all changes are complete, including any needed static text changes, save the template in .rtf format.
Upload the Revised Template
- Return to the Report Definition page.
- If you closed your browser window or the session timed out, navigate to Reporting Tools > BI Publisher > Report Definition. Search for and open the Report Definition.
- Click the Template tab.
- To review an audit history of previous letter template files, click the Include History button.
- Click Add a New Row (+) in the Template Files section.
View Template tab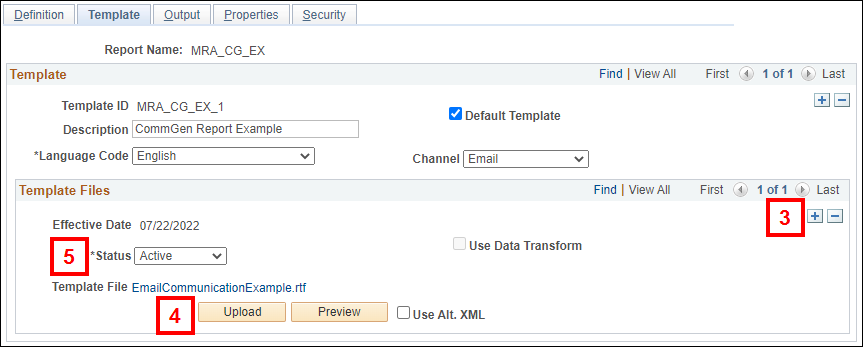
- Click Upload, then navigate to, select and Upload your revised .rtf template.
- Activate your revised template by selecting Active from the Status drop-down menu.
- Click Save.
Once your template is created and saved, the next step in the CommGen process is to Create a Report Definition.