Overview
Information used to personalize communications to students - name, address, academic program, etc. - is pulled from Student Administration database tables and collected into a data source file. Based on the administrative function associated with your data source, a pre-defined and static list of fields is made available for use in your communication. That list can be supplemented either by adding ITS-maintained custom queries, which provide any additional data needed, or by creating a completely separate data source.
You should set up your data sources to include only the data (and queries) necessary to produce a particular communication. The inclusion of extraneous fields which are not incorporated into the communication content points toward the need for a separate data source. Additionally, including many of these extraneous field values in the data source slows down the CommGen process and may lead to overall system performance degradation.
Navigation
Campus Community > Communications > Set up Communications > Communication Data Source
Create Data Source
- Click the Add a New Value tab.
- Enter a name in the Data Source Map ID field.
- Data source file names should follow this convention: M_
_ _ . For example, M_RA_OUA_MAIN, M_RA_RAC_PROC, or M_FA_OFA_ISIR. - Functional Areas for Student Administration include:
- RA = Recruiting and Admissions
- FA = Financial Aid
- SR = Student Records
- SF = Student Financials
- HE = Cross Student Administration
- Data source file names should follow this convention: M_
- Click Add.
- Enter a Description of the data source that relates to the business process or function you are supporting by running CommGen.
View the Communication Data Source page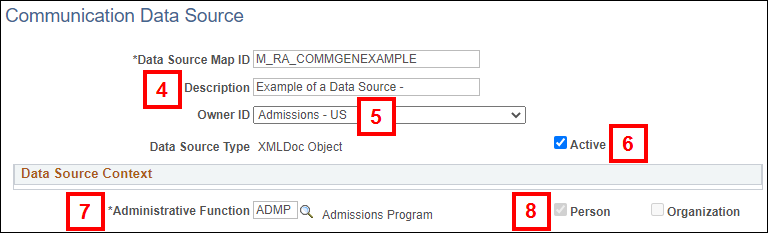
- Select the correct Owner ID value from the drop-down list. Owner ID values relate to the functional area within Student Administration.
- RA = Admissions - US
- FA = FA-General
- SR = Student Records
- SF = Student Financials
- HE = Campus Community
- Verify the Active box is checked. This should be checked by default.
- Enter or look up the Administrative Function.
- The Generic Process Data table populates with the default fields and tables available for the selected function.
- Verify the Person box is checked and the Organization box is unchecked. These should be set properly by default.
- If additional data fields are needed for your communication, enter or look up the Query Name in the Custom Extract Data section.
View the Custom Extract Data section
- Several additional data field queries are available to the Admissions community. See the CommGen Data Source Queries page for query descriptions:
- M_RA_COMMGEN_ADMP_COMM
- M_RA_COMMGEN_ADMP_EDR
- M_RA_COMMGEN_ADMP_OUA1
- M_RA_COMMGEN_ADMP_RES (Max Nbr field must be 1)
- M_RA_COMMGEN_ADMP_SIGNER_ID
- If more data fields are needed, contact the ITS Service Center to have additional queries created.
- Attaching all additional queries to a single data source is NOT allowed. When the process is run, every variable field for every communication generated is stored, which can potentially cause system performance degradation. Instead, evaluate what data is actually needed for specific communications and create separate data sources when necessary.
- Several additional data field queries are available to the Admissions community. See the CommGen Data Source Queries page for query descriptions:
- Delete the Max Nbr value and leave the field blank.
- The Max Nbr is the number of records the query returns. It defaults to 1. When the field is blank, there is no restriction on the number of records returned, so the full qualifying student population is always selected.
- Click Register Data Source.
- Any time a change is made to a data source, it must be re-registered.
Save Data Source File
The data source file needs to be downloaded and saved on your computer in order to build your communication template.
- Navigate back to Campus Community > Communications > Set up Communications > Communication Data Source.
- Search by Data Source Map ID, Administrative Function, or Description. Enter a full or partial search key, then click Search.
- Select your file.
- Click the View/Download Sample Data File link to view the XML.
- XML (EXtensible Markup Language) is a computer markup language much like HTML. It is used to clearly mark and organize the different parts of a document so it can be read on different computer systems.
- XML employs tags which indicate the logical structure, in addition to the display specifications, of the coded data. For example:
ULSA
- Save the file in .xml format to your computer.
Once your file is saved, you can open your letter template in Microsoft Word. See the Creating a CommGen Template procedure for instructions.