Overview
This document explains the steps for creating a new job opening in M-Pathways Human Resource Management System (HRMS) - Recruiting.
Important Information
- Required fields are denoted by an asterisk (*). All required fields need to be completed in order to Save and Submit the job opening. The fields without an asterisk (*) are optional.
- If the job opening may be underfilled pending the selected Applicant’s qualifications, use the highest level as the primary Job Code/Title. Include all associated job codes in the job opening setup.
- The Career Interests list combines official university Career/Job Families and other career interests types to assist job seekers find positions of interest. The first career interest defaults based on the Job Family associated with the selected job code. There is no limit on the number of Career Interests that you can include on the job opening.
- Multiple applicable Careers Interests can be added.
- For example, office and administrative support job openings can be hard for job seekers to locate because they may reside in multiple career/job families. You can increase the search optimization of your job opening by including multiple Career Interests. For instance, if you work in Human Resources and are posting an Administrative Assistant position, include “Administration”, “General Office/Administrative Support”, and “Human Resources” in the Career Interest field.
- Save the job opening by clicking the “Save as Draft” button. This feature assigns a Job Opening ID, holds the Job Opening in Draft status, and saves completed work. Return to the job opening at any time to complete the process.
- A single job opening can have multiple hires. The Target Openings field identifies the number to be filled and the Available Openings displays how many hires have been completed. The system tracks the Available Openings and changes the job opening Status to Closed when no more openings are available.
- The Regular, Temporary, and Graduate Student Appointment job opening templates differ slightly. This step-by-step procedure illustrates a Regular job opening in the screenshots. Steps specifically for Regular, Temporary, Graduate Student Appointment job openings are indicated in the numbered steps.
- For a Regular job opening checklist and cheat sheet, see Job Opening Checklist & Cheat Sheet (Regular).
- For a Temporary job opening checklist and cheat sheet, see Job Opening Checklist & Cheat Sheet (Temporary).
- For a Graduate Student Appointment job opening checklist and cheat sheet, see Job Opening Checklist & Cheat Sheet (Graduate Student Appointment).
Contents
Section 1 - Opening Information
Section 2 - Staffing and Salary Information
Navigation
Homepage: Recruiting; Tile: Recruiting > Create Job Opening
NavBar > Navigator > Recruiting > Create Job Opening
Step-by-Step Process
Section 1 - Opening Information
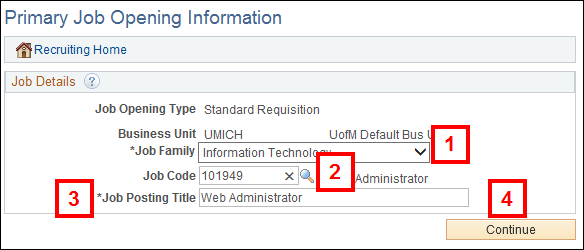
- Select the Job Family from the drop-down list.
- Enter or Lookup
 the Job Code/Title.
- Only the Job Codes/Titles associated with the Career/Job Family in Step 1 display.
- The value in the Job Posting Title field populates based on the Job Code/Title. You can change it to a Posting Title for posting purposes.
If the job opening can be underfilled, type the primary posting title and then the underfill title, separated by a forward slash “/” (such as “Network Administrator Senior / Network Administrator Associate”.) - Click Continue.
- If applicable, check the Accept Non Posted Applications box.
- The Accept Non Posted Applications checkbox, along with no posting dates, allows you to create a job opening and have Applicants apply without it being posted on the Careers website.
- GSA Only: If applicable, check the Student Commitment box (not shown in screenshot).
- The Student Commitment checkbox, allows you to create a job opening and have students apply without completing the online application information.
- Verify Limited Number of Openings displays or select Unlimited Number of Openings from the drop-down list.
- Limited - Job opening closes when last opening is filled.
- Unlimited - Stays open until manually closed.
- Verify 1 displays in the Target Openings field or enter a new value.
- The Available Openings field populates based on the value in Target Openings.
- Enter or Lookup the Appointing Department.
- The values in the Org Group and Work Location fields populate based on Department ID. If applicable, change the values in Work Location fields.
- If you select Multiple Locations in the Work Location field, the additional locations are required on the Posting Information page.
- Regular Only: Select the HR Employment Office location from the drop-down list.
Temporary Only: Enter or Lookup the Posting Contact (not shown in screenshot).
GSA Only: Enter or Lookup the Department Contact (not shown in screenshot).
- If your department uses Position Control Numbers (PCN), enter the Unit PCN.
- Regular and Temporary: Verify New Position is selected or select the Replacement radio button.
- If you select the Replacement radio button, a new section appears titled Employee Being Replaced. Enter or Lookup the EmplID.
- If you select the Replacement radio button, a new section appears titled Employee Being Replaced. Enter or Lookup
- Verify the value in the Career Interest field and/or click Add Career Interest to select an additional or replacement career interest ID.
Notes:
- A value populates the Career Interest field based on the Job Family selected. Career interests allow a job opening to be ‘searchable’ under different career areas, add all applicable career interests.
- Click
 Delete Row to delete a career interest.
- Select one or multiple Mode(s) of Work.
Notes:
- Mode(s) of work is intended to inform the job seeker what options are available for this particular position. Standard template language automatically populates to the posting content. See Section 5.
- Click Delete Row to delete a mode of work.
View Primary Job Opening Information screenshot
View Job Opening Page screenshot

Section 2 - Staffing and Salary Information
- Verify the value displayed or select an applicable value in the Full/Part-Time field.
- Regular and GSA: (Optional) Enter or select the Appt Begin Date and Appt End Date.
- You may also add this information when preparing a job offer.
- Regular and Temporary: Verify Days is selected or select another value in the Shift field.
- GSA Only: Select the Appointment Period (not shown in screenshot).
- Verify or enter the position’s Standard Hours.
- Regular Only: Verify the No radio button is selected in the Paid Time Off field or select Yes.
- If the position is part of the Paid Time Off (PTO) program, select the Yes radio button. If the position uses a traditional sick and vacation time plan, keep No selected.
- Regular and Temporary: (Optional) Enter values in the Salary Range From and Salary Range To fields.
- Although salary ranges are optional, it is recommended you include the salary information. Applicants frequently ask for salary information if it is not given.
- Use hourly salary ranges for Temporary job openings.
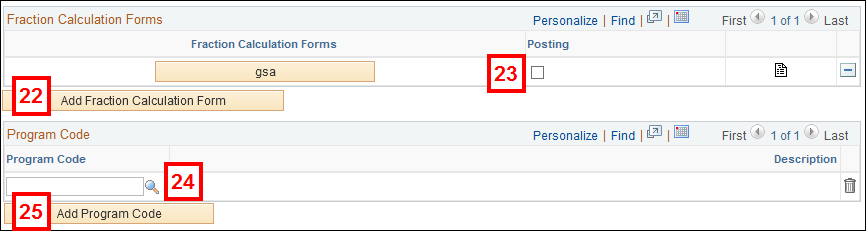
- GSA Only: To include a Fraction Calculation Form as part of the job opening, click Add Fraction Calculation Form and include all applicable details.
- GSA Only: Enter or lookup the Program Code.
- If more than one program code is required, click Add Program Code, and repeat Step 24.
- Adding program code(s) limits the applicant pool to those students matriculated in the selected program code(s).
View Staffing and Salary screenshot

Notes:
View Fraction Calculation Forms screenshot
Section 3 - Screening
The following section details how to set up screening questions on a job opening.
- The screening functionality helps manage large pools of Applicants.
- Screening questions can be selected from libraries of pre-determined question sets or individual questions.
- Question Sets organize like questions into a set making the task of entering them easier. After selecting a question set, you may delete single questions from the set if they do not fit the job opening requirements/qualifications.
- Do not change screening questions after the job has been posted on the Careers website.
- (Optional) Click Add Licenses and Certifications to add required licenses and certifications to the job opening.
- If more than one License and/or Certification is required, repeat step 26.
- (Optional) Enter or lookup the desired screening questions in the Question field.
- If more than one question is desired, click Add Screening Question, and repeat Step 28.
- (Optional) Click Load from Question Set to select from the library of pre-determined question sets.
- Click View Answers to view the full question description and assigned default point values for each available answer.
- Click Return to return to the job opening page.
- Click Final in the Applicant Screening group box to view the selected screening criteria.
- Verify 50 displays in the Percent Needed to Pass field or enter a new value.
- A higher percentage required to pass results in fewer qualified Applicants.
- Click the checkbox(es) to identify questions to use in the applicant pool screen process in the Use in Screening column.
- If a checkbox is not checked, the question still appears to the Applicant, but the results are not used in the final screening process.
- Click the checkbox(es) to identify required questions in the Required column.
- If the checkbox is turned on, the Applicant must give the correct answer in order to pass the screening process.
- The Edit Details link only appears if the screening question and/or Question Set were added from the library. If applicable, click the link to modify the questions’ assigned point values.
- Enter the point values for each question in the Points column.
- Assigning more points to a question places more emphasis on the correct answer the Applicant provides.
- Click OK to return to the Screening Criteria page.
- Click OK to return to the Job Opening page.
- Regular and Temporary: To include an underfill job code, click Add Job Code and include all applicable underfill job codes.
- Use the highest job code level as the PRIMARY job code for posting purposes. Identify all applicable job code titles in the Posting Title.
View Licenses and Certifications screenshot

View Answers to Screening Questions screenshot

View Applicant Screening screenshot

View Screening Criteria screenshot

View Screening Requirements screenshot

View Define Screening Points screenshot


Section 4 – Approvers & Hiring Team
Approvers are required for Regular job openings and optional for Temporary and Graduate Student Appointment job openings. Temporary and Graduate Student Appointment job openings are posted on the Careers website on the hour after clicking Save and Submit if no Approvers are listed and the job opening is set to be posted to the web site.
Hiring Team/Approvers
- You may list any number of Approvers for the job opening. A few guidelines apply:
- For Michigan Medicine, at a minimum, an EPC is required and marked as Primary with a Seq# of 1. If multiple Offer Approvers are selected, the EPC must be the final Approver in the sequence and be the only one marked Primary.
- Group Approvers are automatically added and act as the primary and final approver for the Ann Arbor academic campus, Flint and Dearborn.
- Approvers review/approve the job opening in the exact sequence order that you provide.
- Every Approver must approve the job opening before it can be posted.
- When the last Approver approves the job opening, it is posted on the Careers website based on the posting begin date.
- You must have an M-Pathways – eRecruit role in order to be listed as an Approver (eligible employees are listed using the Lookup in each section).
Additional Hiring Team Members
- You may list any number of Additional Hiring Team Members.
- Additional Hiring Team Members must have an eRecruit security role.
- Additional Hiring Team Members are not part of the Approval workflow, but have access to the job opening and applicant pool.
- Click Add Approvers.
- Enter the Seq#.
- Michigan Medicine Only: Check the Primary box on the line for the EPC prior to adding the EPC’s Emplid.
- Enter or Lookup the Approver's eight-digit Emplid.
- Click Add Approvers to add additional job opening Approvers.
- For Michigan Medicine, at a minimum, an EPC is required and marked as Primary with a Seq# of 1. If multiple Opening Approvers are selected, the EPC must be the final Approver in the sequence and be the only one marked Primary.
- You may list any number of Approvers for the job opening.
- Group Approvers are automatically added and act as the primary and final approver for the Ann Arbor academic campus, Flint and Dearborn.
- Approvers review/approve the job opening in the exact sequence order that you provide.
- To give other U-M employees with an eRecruit role access to the job opening and Applicants, click Add Additional Hiring Team Members.
- Enter or Lookup the person's eight-digit Empl ID.
View Hiring Team/Approvers screenshot

View Hiring Team/Approvers screenshot

Notes:
View Additional Hiring Team Members screenshot

Section 5 – Posting Information/Job Postings
All Job Postings:
- This section must be completed for the job opening to be posted on the Careers website. It contains the information that Applicants see when viewing the job opening.
- The UM EE0/AA Statement and the Mode(s) of Work posting descriptions default in for every job opening.
- You may add as many additional Description Types as you want.
- Some Description Types contain wording provided by a content expert to meet legal and policy requirements. Other Description Types allow you to enter appropriate wording for your job opening and department.
- Rich text is available for posting descriptions, and the formatting changes display on the UM job website.
- The Job Posting Destinations group box allows you to indicate where and when the job opening appears on the Careers website. At this time, all job openings are posted using only two Destinations: “External” and “Internal”.
- Internal and External Posting Types must have the same Posting Duration.
- Review the job opening at any time by clicking the Preview button.
- For assistance with creating appropriate job descriptions, see Avoiding Discrimination in Job Postings on the University of Michigan Human Resources website.
Regular Job Postings:
- Under special circumstances, some Regular job openings do not require posting information. These are referred to as “Do Not Post” job openings, and they require approval by a HR Representative or Director.
- Regular non-bargained-for job openings must be posted for at least 7 calendar days. If needed, Temporary job openings may be posted for as few as 2-3 days. If your job opening falls under a collective bargaining agreement, consult the appropriate agreement for posting requirements.
Temporary Job Postings:
- Temporary job openings with the Accept Non Posted Applications box checked are not required to complete information in the Job Descriptions or the Job Posting Destinations group boxes.
- Do not include Posting Destinations for Temporary job openings with the Accept Non Posted Applications checkbox turned on.
Graduate Student Appointment Job Postings:
- GSA job openings that are posted on the Careers website, must be posted for at least 14 calendar days. Consult bargaining agreement for posting requirements.
- Posting descriptions required for posting to the web default on the page. Complete each section.
- GSA posting descriptions contain contractual required language.
- Do not include Posting Destinations for GSA job openings with the Accept Non Posted Applications box checked.
- Click Add Job Posting to open the Posting Information page.
- Verify the Posting Title.
- This value defaults from the posting title on the first page. You may change the Posting Title here without restarting the creation process.
- Click Add Posting Description.
- Verify Internal and External displays in the Visible field.
- Select the Description Type.
- How to Apply
- Job Summary
- What You'll Do
- Mission Statement
- Who We Are
- Our Impact
- Why Work at Michigan?
- Why Join Michigan Medicine?
- Why Work at U-M Flint?
- Course Description
- Responsibilities *
- Skills You Have
- Nursing Specific Info
- Required Qualifications *
- Desired Qualifications*
- How You'll Grow
- Licensure & Certification
- Work Schedule
- Modes of Work
- Work Locations
- Underfill Statement
- Additional Information
- Union Affiliation
- Background Screening
- Contact Information
- Application Deadline
- Decision Making Process
- Selection Process
- E-Verify
- GEO Contract Information
- UM EE0/AA Statement
- UM EE0/AA Statement appears on all job openings automatically. You do not need to add it.
- If Multiple Locations was selected for Work Locations on the previous page, include the specific information under the Description Type of Work Locations. To remove, return to the previous page and change the value in the Work Locations field.
- (Optional) Select the Template from the drop-down list.
- The Template options are unique for each Description Type. Some templates contain editable text; others require you to add the text.
- If applicable, enter a description in the text-editor box.
- There is no character limit in the description field. Rich text can be used for posting descriptions, and formatting changes display on the UM job website.
- Click Spell Check
 to check the spelling.
 - Repeat Steps 51-56 to add all applicable Description Types.
View Posting Information screenshot

View Posting Description screenshot

Note: Job opening descriptions appear alphabetically in the drop-down list. You may add them to the job opening in any order; however, the job opening posting displays them in the following predetermined order:
* Description Types recommended for all job openings.
Notes:
Two options are available to control when a job opening is posted on the Careers website. Option 1 starts at Step 58. Option 2 starts at Step 60.
View Posting Destination screenshot

- Select On Approval Date from the Relative Open Date drop-down list.
- By selecting On Approval Date, the job opening posts on the Careers website when all Approvers approve the job opening.
- Enter the Posting Duration (Days).
- 7 is the typical number of days for a Regular job opening Posting Duration, 2-3 days for a Temporary, and 14 days for GSI or GSSA. Skip to Step 63 when complete.
- No not use Last Review Date field.
- Enter or select the Post Date.
- Enter or select the Remove Date.
- Repeat Option 1 or Option 2 for both the External and Internal Posting Type(s).
- You may not change the Job Opening Posting Information after submitting the job opening.
- Click Preview to review the job opening format and layout.
- Review the job opening preview.
- The header information defaults from the Job Opening details.
- Click Return to Previous Page.
- Verify the Posting Information is complete and click OK to return to the Job Opening page.
- If the job opening needs further work, click Save as Draft to save your work and return.
- If the job opening is ready for approvals, click Save and Submit.
- For Temporary and Graduate Student Appointments job openings with no Approvers listed, click Save and Submit to change the job opening status to Open and post on the Careers website, if applicable.
- After clicking Save and Submit, the first Approver is notified with a request to approve the job opening.
- If you need to attach a document to the job opening, see Add Notes and Attachments to a Job Opening.
Option 1 – Use when the final approval date is unknown.
Option 2 – Use when the posting begins in the future, or a bargaining agreement controls the posting begin date.

Note: This saves your job opening with a status of Draft.
OR
Notes: