Overview
Departments can record revenue and expense commitments using the Unit Defined Commitments functionality in M-Pathways. This document contains three sections that, when used consecutively, allow units to upload new commitments into or update existing commitments in M-Pathways using an Excel spreadsheet template. This method is best used when adding and/or updating multiple commitments.
- Creating the data file
- Uploading the data file into M-Pathways
- Verifying the results of the upload process
Additional information is located in the following sections:
Navigation
Open the Unit Defined Commitments Load Template, which is available on the following website: https://its.umich.edu/enterprise/analytics/real-time-financials/toolkit/unit-defined-commitments.
NavBar > Navigator > General Ledger > Unit Defined Commitments > Load UDC File
Step-by-Step Process
Creating the data file
- If the Security Warning message displays, click Options.
- Click Enable this content.
- Click OK.
- Enter UMICH in the Business Unit field.
Note: UMICH is the only acceptable value for this field.
- For updates to existing UDCs, enter the UDC Commitment Number in the Commitment # field. For new UDCs, enter NEXT.
Note: When updating a UDC for a sponsored project/grant (i.e., those beginning with F, N, or M), do not enter an IDC commitment (e.g., 123456A). Updating the direct cost UDC will automatically update the related IDC commitment.
- Enter applicable information in the following fields:
- Reference
- Begin Date
- End/Pay Date
- Description 1
- Description 2
- Notes
Note: Required fields and field formats are noted on the template.
- Scroll right to complete the commitment.
- Enter applicable ChartField information in the following fields:
- Fund
- Deptid
- Program
- Proj/Grt
- Account
Note: Revenues are entered as negative amounts (credits). Expenses are entered as positive amounts (debits).

- Enter the dollar amount of the commitment in the Amount field.
- Repeat steps 4 – 9 for each commitment.
- Click Create UD Commitments Load ASCII.
Note: A macro process in the spreadsheet verifies that all required data has been entered.
- Enter the desired location for the data file and its name in the file path and name field.
Notes:
- You can save the data file to any folder on any network drive to which you have access.
- The file name must end in .dat
- Click Ok.

Uploading the Data File to M-Pathways
This procedure assumes that you have an existing Run Control ID to run the upload process. If you do not, or you want to create a specific Run Control ID for the process, use the Add a New Value page to create it. For subsequent uploads, use the Find an Existing Value page and select the desired Run Control ID. See M-Pathways Run Control ID Information for more information.
- Click Search to view a list of your Run Control IDs.
- Click the link for the applicable Run Control ID in the Search Results grid.
Notes:
- If you only have one Run Control ID, the system automatically selects it when you click Search.
- If you know your Run Control ID, select = (equal to) from the conditions drop-down list and enter your Run Control ID in the field.
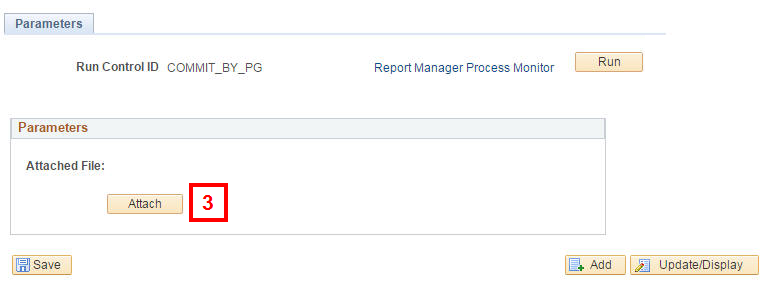
- Click Attach.
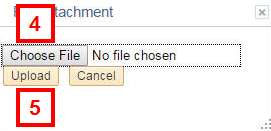
- Click Choose File and select the data file from the location in which you saved it.
- Click Upload.
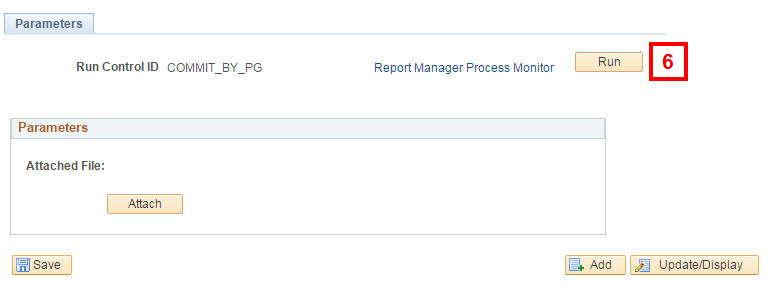
- Click Run.
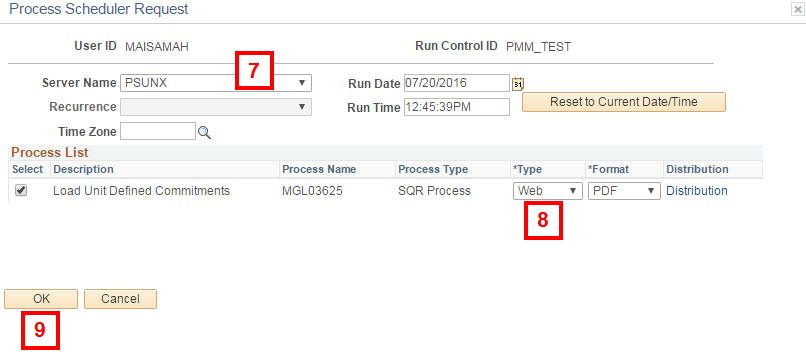
- Select PSUNX from the Server Name drop-down list.
- Select the Type field value according to the type of computer you’re using.
- MAC users: select Web
- Windows users: select Window
- Click OK.
View Process Scheduler Page (cont.) Screenshot
View Process Scheduler Request Screenshot
View Process Scheduler Request Screenshot
If you are a Windows user:
- The following status pop-up windows appear.
- Queued
- Processing
- Success (or Error)
- Review the report using the field descriptions in the Verifying the Results of the Upload Process section for reference.
If you are a Mac user:
- Click Report Manager.
- Click the Administration tab.
- Click the Load Unit Defined Commitments link in the Description field to open the report.
- Review the report using the field descriptions in the Verifying the Results of the Upload Process section for reference.
The upload process results in an Error & Control Report that acts as a status report. For a successful upload, the report provides the Commitment # for the new commitments. For an unsuccessful upload, it shows which commitment rows in the data file contained errors.
Important Information
The report is automatically stored in your Report Manager, regardless of the run procedure you use. You can retrieve the report for up to 60 days after it is run. It is recommended that you save this report for your records, as it gives you the Commitment #s for new commitments. You can print it from the .pdf report window or save it to a folder on a computer drive to which you have access.
Verifying the Results of the Upload Process
The following information describes how to read the Error & Control Report. See the Troubleshooting UDC Upload Errors document in My LINC for more information.
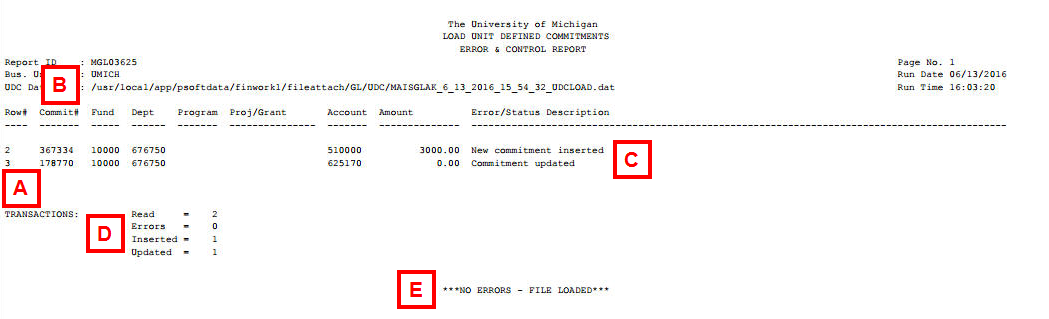
| Letter | Field/Button | Description |
|---|---|---|
| A | Commitment rows | If the UDC load is successful, the commitment rows are displayed in the order they were entered on the UDC Load Template. If the UDC load is unsuccessful, only the commitment rows containing errors appear on the report. |
| B | Commit # | Shows the assigned Commitment # (e.g., 123456) for a new unit defined commitment or the updated Commitment #. IDC Commitment #s (e.g., 123456A) are also listed below their associated UDC. |
| C | Error/Status Description | If the UDC load is successful, one of two status descriptions appear:
|
| D | Transactions | The Transactions summary provides the following information:
|
| E | Status Message | If the UDC load is successful, the message is ***NO ERRORS – FILE LOADED*** If the UDC load is unsuccessful, the message is ***ERRORS – FILE NOT LOADED*** |
Related Reports
Summarized UDC data (and applicable IDC data) appears on the various financial reports, including:
- Project/Grant Budget Status report (PBSR) shows your UDCs/IDCs for a particular sponsored project/grant.
- In M-Reports, the Other Commitments column displays expense UDCs per Budget Category.
- In M-Pathways, the Unit Defined Commitments column shows expense commitments per Budget Account/Category and revenue commitments on the Total Revenues line.
- nVision Income Statement reports (mgln075a and mgln075d-variance report) have three rows at the bottom of the report: Revenue Commitments, Expense Commitments, and Adjusted Balance.
- UM-Maintained BusinessObjects reports may also show UDC/IDC detail.
- CMB Project Grant Budget Status with Estimates [FN01 FN05 FN06 PY01]
- CMB Reporting Bdgt Ledger NonSponsored Reconciler by FundDeptPrgm [AR01 FN01 FN05 FN06 HR01 PY01]
Related Resources
- See Enter a Unit Defined Commitment to add or update a single commitment.
- See Manage and Update Unit Defined Commitments to work with multiple commitments without uploading data.
- To run the tracking reports, Commitment by Project/Grant or Commitment by Deptid report, see the following documents. These documents describe how to run any predefined report in M-Pathways.
- Run a Report to the Report Manager in M-Pathways (for Macintosh or Windows users)
- Run a Report to a Window in M-Pathways (for Windows users)