Overview
This document details how to add, edit, delete and make prospect plans historical in the Donor & Alumni Relationship Tool (DART).
Contents
- Add a Prospect Plan
- Add a Prospect Plan Using a Template
- Edit a Prospect Plan
- Delete a Prospect Plan
- Make a Prospect Plan Historical
Add a Prospect Plan
Important Information
- You must have the DART Portfolio Plan Management role to perform this task.
- The preferred method for adding a prospect plan is the Add a Plan Wizard which allows you to enter a plan, steps and/or an opportunity with one easy-to-use tool.
- To add a prospect plan, you must first Search for a Prospect.
- On the Major Giving Prospect page, click Add on the Plans tab.
- Select Add major giving plan from the drop-down list.
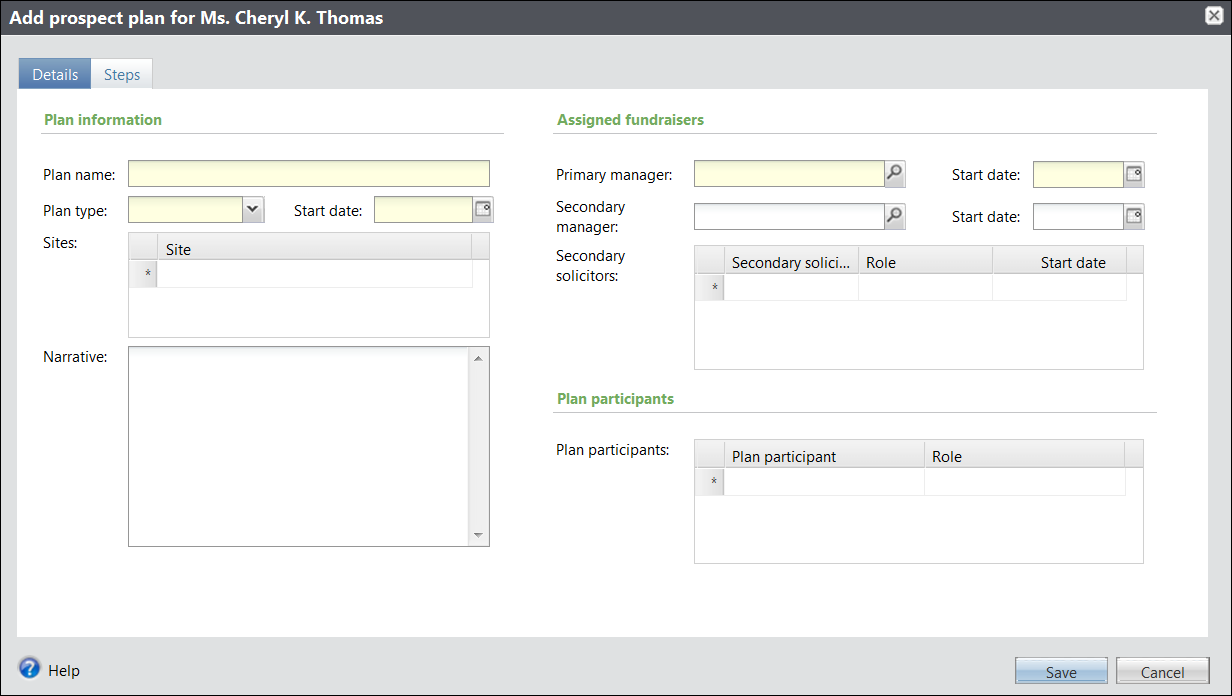
- Enter a Plan name in the U-M standardized format.
- Select a Plan type from the drop-down list.
- Enter the Start date of the plan.
- Select the Site that the plan targets.
- Enter a short description of the plan objective in the Narrative field.
- Enter or Lookup
 the name of the Primary manager of the plan.
 - Enter or select the Start date of the Primary manager.
- Enter or Lookup the Secondary manager of the plan if one is assigned.
- Enter or select the Start date of the Secondary manager.
- Enter or Lookup the names of any Secondary solicitors assigned to the plan and enter or select their start dates.
- Enter or Lookup the names of any Plan participants involved with the plan and their roles in the plan.
- Click Next to move to the Add Steps tab
OR
Click Save to exit the wizard. - All plan team members must have a documented start date entered into DART.
- To receive credit for an opportunity, an individual MUST be included on a prospect plan in DART as a primary plan manager, secondary plan manager, or secondary solicitor.
(Plan Type)_(SCU)_(Department)_(Initiative)_(Funding purpose) _(FY or CY)
Add Prospect Plan Window Screenshot
Notes:
Add a Prospect Plan Using a Template
Important Information
- You must have the DART Portfolio Plan Management role to perform this task.
- The preferred method for adding a prospect plan is the Add a Plan Wizard which allows you to enter a plan, steps and/or an opportunity with one easy-to-use tool.
- To add a prospect plan without using a template, see Add a Prospect Plan.
- To add a prospect plan, you must first Search for a Prospect.
- On the Major Giving Prospect page, click Add on the Plans tab.
- Select Add major giving plan from the drop-down list.
- Enter a Plan name in the U-M standardized format.
- Select a Plan type from the drop-down list.
- Enter the Start date of the plan.
- Select the Site that the plan targets.
- Enter a short description of the plan objective in the Narrative field.
- Enter or Lookup the name of the Primary manager of the plan.
- Enter or select the Start date of the Primary manager.
- Enter or Lookup the Secondary manager of the plan if one is assigned.
- Enter or select the Start date of the Secondary manager.
- Enter or Lookup the names of any Secondary solicitors assigned to the plan and enter or select their start dates.
- Enter or Lookup the names of any Plan participants involved with the plan and their roles in the plan.
- Click Next to move to the Add Steps tab
OR
Click Save to exit the wizard. - All plan team members must have a documented start date entered into DART.
- To receive credit for an opportunity, an individual MUST be included on a prospect plan in DART as a primary plan manager, secondary plan manager, or secondary solicitor.
- Click the Steps tab.
- Select a value from the Outlines drop-down list.
- Click Add steps from plan outline.
- Adjust Expected date for when the step completion is anticipated.
- Edit Objective text to reflect plan specifics.
- Edit the step Owner if someone other than the primary plan manager owns the step.
- Edit the plan Stage for the step.
- Update step Status.
- Planned: Awaiting approval from Prospect Manager.
- Pending: Approved by the Prospect Manager and awaiting execution.
- Completed: Executed.
- Cancelled: Cancelled due to a change in strategy or objective.
- Declined: Not completed because goals and objectives were not accepted by Prospect.
- Edit the Contact method used to complete the step.
- Enter the Category under which the step is classified.
- Enter the Subcategory under which the step is classified.
- Click Select all or Clear all buttons to adjust multiple steps at once.
- Use the Update status to drop-down as a shortcut to change the status of a highlighted step.
- Click Insert or Delete to add a step or delete a step.
- Click Edit additional details to drill down into a specific step’s details, such as actual dates and comments.
- Edit any step dates by using Adjust expected dates.
- Verify that all information has been entered correctly and click Save.
(Plan Type)_(SCU)_(Department)_(Initiative)_(Funding purpose) _(FY or CY)
Add Prospect Plan Window Screenshot
Notes:
Prospect Plan Steps Window Screenshot
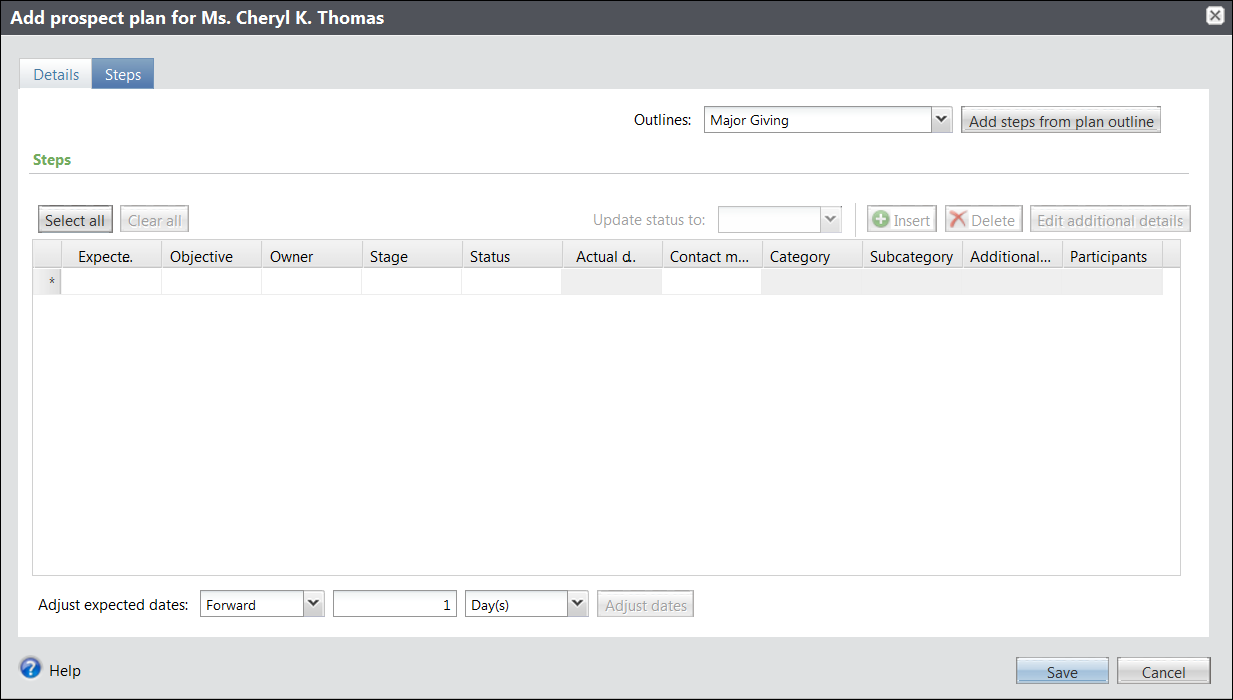
Note: The outline will automatically populate with steps from the selected plan outline, but can be edited to fit a specific plan.
Prospect Plan Steps Window Screenshot
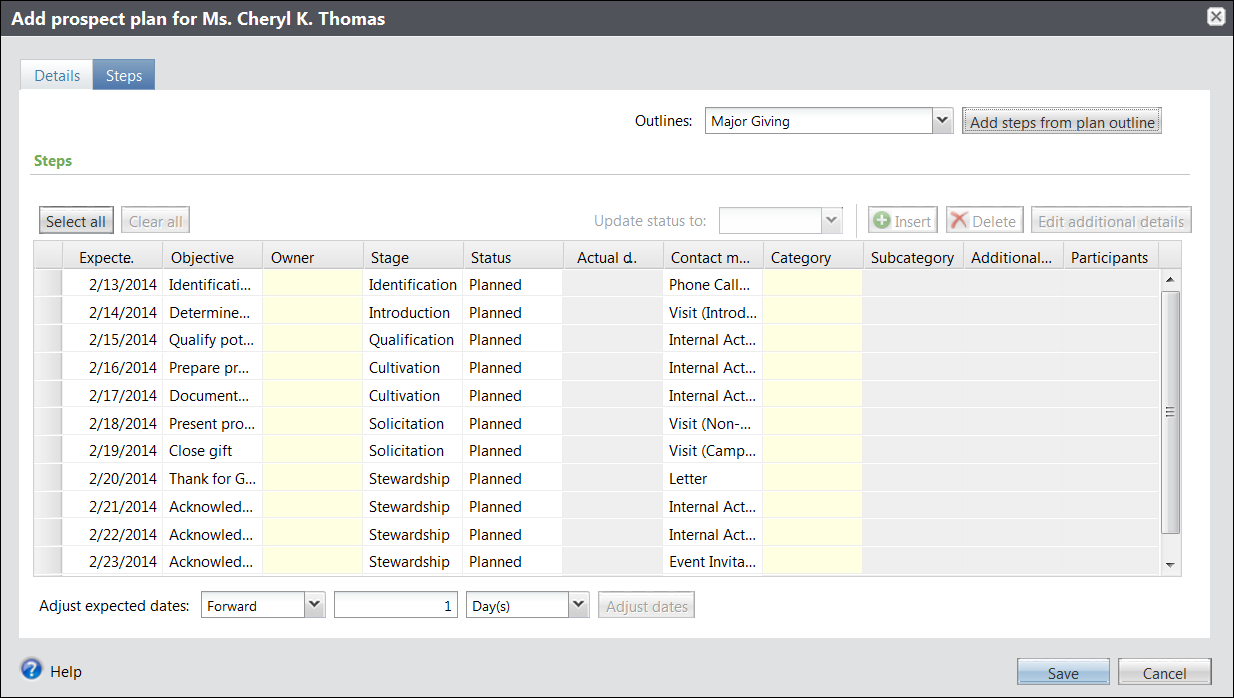
Note: The status of a new step should always be planned, unless it is entered by the prospect manager.
Note: When updating a step in an outline, the system will prompt for an actual date of the step before saving. The only way to update this information is by clicking on Edit additional details. It cannot be updated while in the outline view.
Note: Dates can be adjusted forward or backward, by any given quantity of a time period, but using this function will adjust the date for every step in the plan. Editing an individual date should be done within the outline.
Edit a Prospect Plan
Important Information
- You must have the DART Portfolio Management role to perform this task.
- To edit a prospect plan, you must first Search for a Prospect.
Edit Plan Narrative
- Click the Plan name link for the plan to be edited.
- Click Edit in the Narrative section on the Details tab.
- Enter any changes to be made to the plan narrative.
- Click Save.
Edit Plan Details
- Click Edit plan details in the Tasks section of the Explorer Bar.
- Enter any changes to be made to the Plan name, Plan type, Start date, or Sites.
- Click Save.
Edit Plan Managers
- Click Replace primary manager or Edit secondary manager in the Tasks section of the Explorer Bar.
- Enter any changes to be made to the Primary manager/Secondary manager, Start date, or End date.
- Click Save.
Note: Only incorrect information should be edited in this window. See the next section to end date a primary manager and replace them with someone new.
Replace Plan Managers
- Click Replace primary manager or Replace secondary manager in the Tasks section of the Explorer Bar.
- Enter or select an End date for the Current manager.
- Enter or Lookup the New manager.
- Enter or select the Start date.
- Click Save.
Note: The start date for the new manager will automatically populate as one day later than the end date of the current manager. This can be overwritten.
Edit Secondary Solicitors
- Click the Solicitors and Participants tab.
- Click expand
 for the solicitor to be edited.
 - Click Edit.
- Enter any changes to be made to the Solicitor, Role, Start date, or End date.
- Click Save.
Edit Plan Participants
- Click the Solicitors and Participants tab.
- Click expand for the participant to be edited.
- Click Edit.
- Enter any changes to be made to the Plan Participant or Role.
- Click Save.
Delete a Prospect Plan
Important Information
- You must have the DART Portfolio Maintenance role to perform this task.
- Plan managers cannot be deleted in DART, they can only be replaced. See Edit a Prospect Plan for details on editing a plan manager.
- To delete a prospect plan, you must first Search for a Prospect.
- Always exercise extreme caution when deleting anything in DART; only delete errors.
- Click the Plan name link of the plan to be deleted.
- Click Delete Plan in the Tasks section of the Explorer Bar.
- Verify that you want to delete the plan and click Yes.
Note: Deleting a plan will erase everything associated with the plan, including the fundraising team. To only delete a team member, see the following section.
Delete a Fundraising Team Member
- Click the Plan name link of the plan for which a team member should be deleted.
- Click the Solicitors and Participants tab.
- Click expand for the team member to be deleted.
- Click Delete.
- Verify that you want to delete the team member and click Yes.
Note: This will only delete a team member of a plan. To delete an entire plan, see the previous section.
Make a Prospect Plan Historical
Important Information
- You must have the DART Portfolio Plan Management role to perform this task.
- To make a prospect plan historical, you must first Search for a Prospect.
- Click the Plan name link of the plan to be made historical.
- Click Make Historical in the Tasks section of the Explorer Bar.
- Verify that you want to make the plan historical and click Yes.
Note: A plan cannot be made historical until all plan steps are completed and all opportunities are closed (accepted, rejected, or cancelled).
Note: A historical plan can be viewed by checking the Include historical plans box in the filter area.