Overview
- When using Search/Match to verify that a person does not already exist in M-Pathways before adding a new person record, execute the broadest possible search of the database to avoid adding duplicate IDs to the system.
- The STOP button in your browser does not cancel a search after it is initiated. If you accidentally initiate a search with incomplete search criteria or you realize the system is taking longer than expected to retrieve results, please contact the ITS Service Center.
- To move quickly to the top or bottom of a list of any 20 rows on a page, you can use the Home and End keys. The Home key moves to the top of the 20 rows of the search results and the End key moves to the bottom of the 20 rows.
- For more information on viewing Search/Match results, refer to:
Navigations
- NavBar > Navigator > Campus Community > Personal Information > Search/Match
- NavBar > Navigator > Campus Community > SEVIS > Search Tools > Search/Match
- NavBar > Navigator > Student Recruiting > Maintain Prospects > Search/Match
- NavBar > Navigator > Student Admissions > Application Entry > Search/Match
Step-by-Step Process
Execute Search
- Verify Person displays in the Search Type field.
- Verify ONLINE displays in the Search Parameter field.
- Click Search.
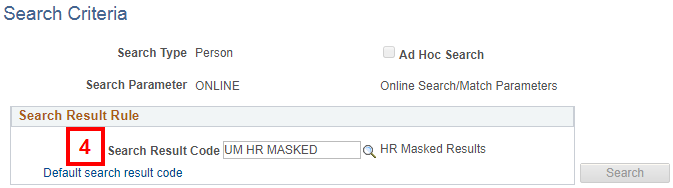
- Enter or Lookup the Search Result Code based on your security access.
- UM HR MASKED (for HR users with masked data)
- UM HR UNMSK (for HR users with unmasked access)
- UM SA MSK (for Student Administration users with masked data)
- UM SA UNMSK (for Student Administration users with unmasked access)
- The list of Search Result Code values may differ depending on user security.
- Click Default search results code to set the default for a Search Result Code value.
View Search Criteria Page - Search Result Code Screenshot
- If there is existing search criteria in any fields on the Search Criteria page, click Clear All before entering the desired search criteria.
- Enter the first letter of the first name in the First Name Search field and press Tab.
View Search Criteria Page - Search Criteria Section Screenshot
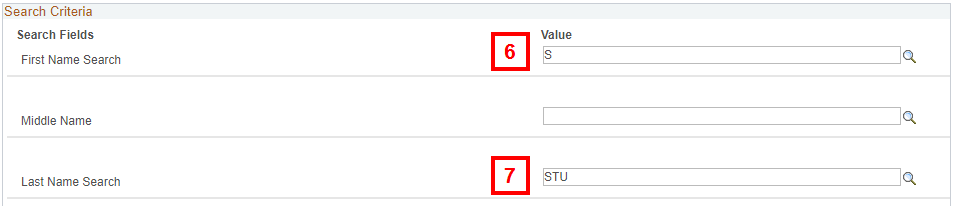
- Enter the first three or four letters of the last name in the Last Name Search field and press Tab.
- You must Tab out of a field in order to activate the Search button.
- Search/Match data fields are not case sensitive. The system automatically capitalizes First Name Search and Last Name Search data when you press Tab to move to the next field.
- Click Search.
- If no records are retrieved when searching by the Last Name, First Name and you know the individual’s National ID (i.e., SSN), return to the Search Criteria page, click Clear All, enter the applicable NID in the National Id field and click Search.
View/Sort Results
Based on the number of matches displayed in the Search Results section, you can view and sort the results using any of the following methods:
- Click View All or View 100 to view 100 rows of data at a time.
- When you click View 100, the link changes to read View 20 to allow you to return to the original view.
View Search Results Screenshot
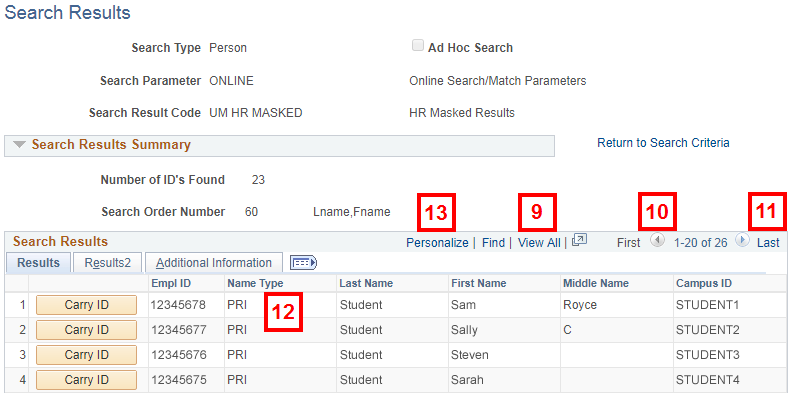
- Click Show Previous Row
 and Show Next Row
  to move between pages in the search results.
 - Click First to display the first 20 rows of search results, or Last to display the last 20 rows.
- To sort the list of matches, click the column heading by which you want to sort the data.
- Change the list from ascending to descending by clicking the column heading a second time.
- If you sort in ascending order, matches with a blank value in the field you sorted, display at the top of the list of matches.
Personalize Search Results
You can, but do not have to, set the default order of the columns and/or how the matches sort to suit your needs or preferences.
- Click Personalize.
- To change the order of columns of the Search Results matches, click the column whose order you want to change.
- Click the up or down arrows to move the column order. Repeat for any other columns you want to move.
- The order of (column 1), Tab Results, and EmplID cannot be reordered.
View Personalize Column and Sort Order Screenshot
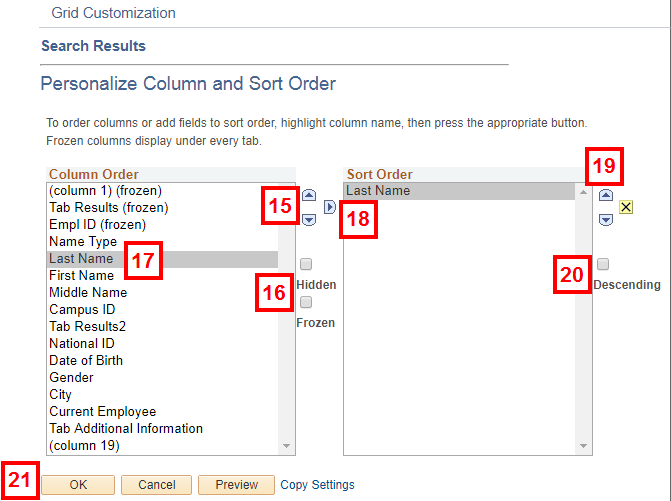
- To hide a column or freeze the order of a column, click the applicable column and check the Hidden and/or Frozen boxes.
- To have the search result matches sort in an ascending or descending order in a specific column, click the applicable column.
- Click the right arrow to copy it to the Sort Order section.
- Change the column sort order by clicking the up or down arrows.
- To have the search results for the column display in descending order, check the Descending box.
- Click OK, Cancel, or Preview, as applicable.
View Search Result Data
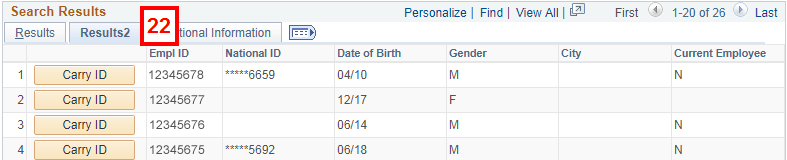
- Click the Results2 tab to view the National ID, Date of Birth, Gender, City, and External (non-UM) Email Address or current employee flag fields.
- You can click Show All Columns
 to display all fields from the Results, Results2, and Additional Information tabs.
View Search Results - Results2 Tab Screenshot
- You can click Show All Columns
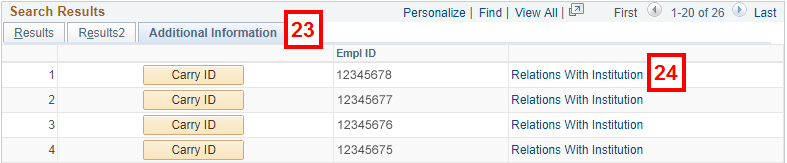
- Click the Additional Information tab to see the Relations With Institution links.
View Search Results - Additional Information Tab Screenshot
- Click Relations with Institution on the applicable Search Results line to view the individual’s relationships with U-M.
- A relationship list displays the possible relationships an individual can have with U-M. View the current relations for the individual.
- Values not used by U-M are Alumni (L), Student Financials (I), Recruiter (RCR), Advisor (AVS), Instructor (IST), and Friend (FND).
View Relations with Institution Detail Page Screenshot

- Click Return.
- Click Carry ID to facilitate navigation to other pages related to an individual without having to re-enter his/her ID.
Note: Carry ID is available only when moving to other pages within the same M-Pathways system. For example, if Search/Match is performed in M-Pathways Student Administration, the ID will not carry to pages in M-Pathways Human Resources Management System.View Search Results Screenshot

- Click Return to Search Criteria to perform another search.
- Click Carry ID Reset to erase a previous ID from system memory, if applicable.