Important Information
- You must have previously assigned a communication for a specific letter code before you can use the Letter Generation process to extract communication data.
- If the communication was completed using the Letter Generation process and you want to re-run it, you need to uncheck the Communication Completed box on the Person Communication page for it to be included in a subsequent Letter Generation data extract or re-assign the communication.
Navigation
NavBar > Navigator > Campus Community > Communications > Letter Generation
Step-by-Step Procedure
- If you have previously run this process, click Search and click on the applicable Run Control ID in the list.
If you have not previously run this process, click Add a New Value, enter a Run Control ID, and click Add.
- Refer to M-Pathways Run Control ID Information for more information on creating Run Control IDs.
- Click the One Person ID or All Person IDs radio button in the ID Selection section based on the letter code you want to extract.
- If you have previously run the Letter Generation process, the previous values display. Update data, as necessary, and go to step 15.
General Parameters Page Screenshot

- Enter or Lookup the Letter Code.
- The Letter Code can be found on the Communication page when entering a communication, or on the Comm Speedkey by Category report.
- Check or uncheck the Produce Communication and Complete Communication boxes as applicable.
- The Missing Critical Data section determines what action the system takes if a communication is missing critical data (e.g., a name, an active address). Refer to the following table for an explanation of these checkboxes.
- Communications with errors marked as unsuccessful.
- All communications marked as completed.
- Communications with errors marked as unsuccessful.
- All communications marked as completed.
- Communications with errors not marked as unsuccessful.
- Communications with no errors marked as complete.
- Communications with errors not marked as unsuccessful.
- Communications with no errors marked as complete.
- Select the address usage order you would like to use for the communication in the Address field.
- The recommended setting for admitting offices is Alt Mail, Current, Perm due to SEVIS requirements for international applicants. Other offices may choose usage orders that include the UM Work address, Loan address, etc.
- Select Pref Full, Prim Full from the drop-down list in the Address Name and Salutation fields.
- Per the University of Michigan Preferred Name Policy, Pref Full, Prim Full should always be selected. This policy states that if an individual has a preferred name, that preferred name will be used instead of the primary name.
- Select Pref Full, Prim Full from the ID Extract Name Usage drop-down list.
- Click the Date/Merge Parameters tab.
- The Extract File Path/Options field on the Date/Merge Parameters page is not a data entry field.
- If you are merging communications data in Microsoft Word, verify Comma Separated Values is selected from the File Type drop-down list.
Date/Merge Parameters Page Screenshot
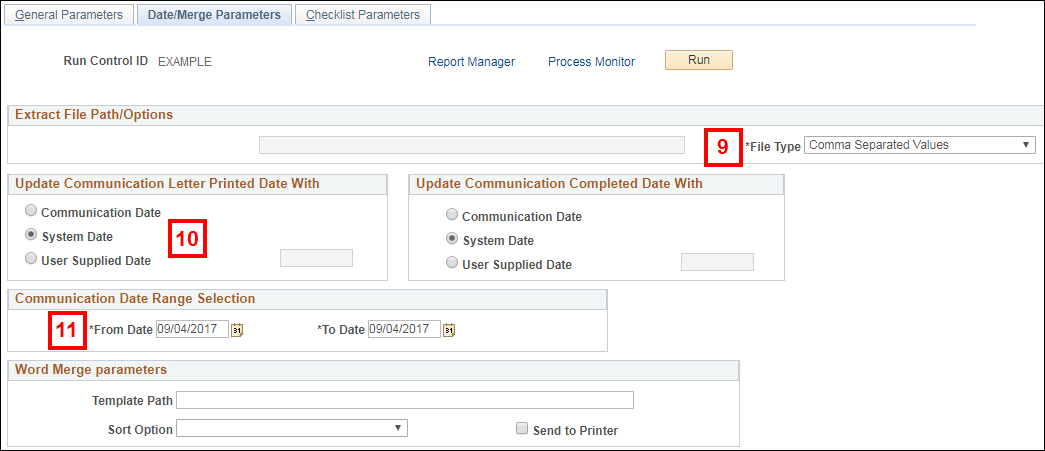
- Accept the default value of System Date (current date) or click one of the following radio buttons in the Update Communication Letter Printed Date With section:
- Communication Date – date the communication was assigned (date displayed on the Person Communication page)
- User Supplied Date – date you can enter; the text entry field is active when this option is selected
- The Update Communication Letter Printed Date With section determines the date printed on the letter.
- The Update Communication Complete Date With section determines the date that populates the Date Activity Completed field on the Person Communication page for the individual.
- Enter or select the date range for which you want to extract communications in the From Date and To Date fields.
- The Letter Generation data extract includes only communications with a Communication Date that falls within the date range selected.
- The Template Path and Sort Option fields are not used by U-M.
- If you want to extract checklist data to include in the communication, click the Checklist Parameters tab and perform steps 13-14. Otherwise, go to step 15.
- Select a value from the Checklist Type drop-down list.
Checklist Parameters Page Screenshot
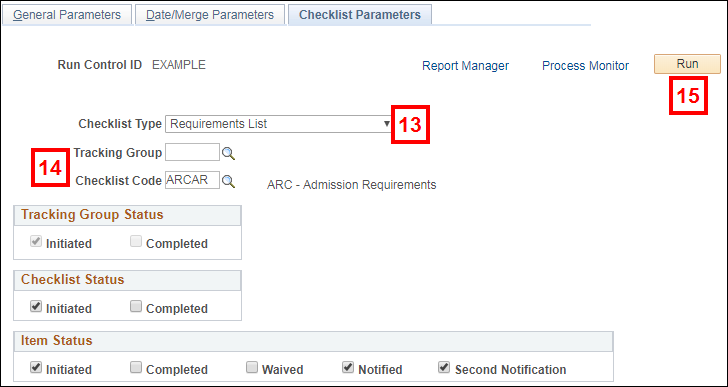
- Based on your office's business process, do ONE of the following:
- Enter or Lookup the Tracking Group, then check or uncheck the Initiated and Completed boxes in the Tracking Group Status section.
- Enter or Lookup the Checklist Code. Based on the expected status of the item being extracted, check or uncheck the Initiated and/or Completed boxes in the Checklist Status section, then check or uncheck the Initiated, Completed, Waived, Notified, and Second Notification boxess in the Item Status section.
- Click Run.
- The Run button is available on all of the tabs.
- Select PSUNX from the Server Name drop-down list.
Process Scheduler Request Page Screenshot
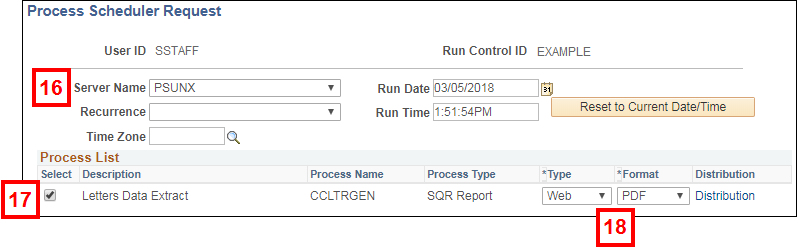
- Verify the Letters Data Extract box is checked in the Process List section.
- Verify Web displays in the Type field and CSV or PDF displays in the Format field.
- Click OK to run the extract.
- Click Process Monitor to view the status of your extract.
- It is highly recommended you view the Process Monitor status to verify your extract file status is Posted before going to the Report Manager to view your extract file.
Screenshot of Process Monitor Link

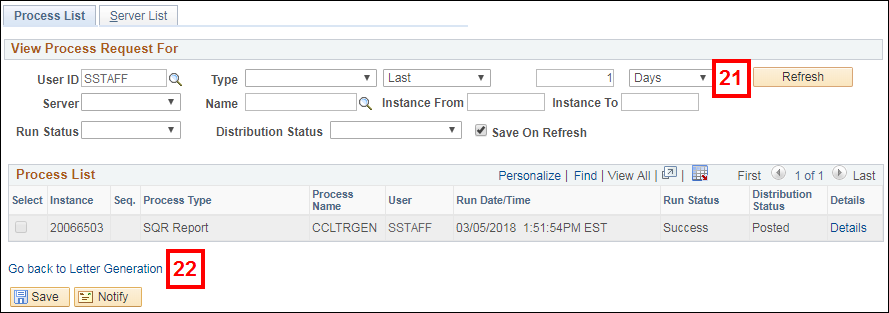
- Click Refresh to view the current Run Status of the file.
- The extract file goes through several processing statuses (such as Queued, Initiated, Processing, and Success).
- When the Run Status field displays Success for the CCLTRGEN process, the extract file is ready.
- You must save the data extract to your hard drive. It does not automatically save to your hard drive.
- Click Details to go to the Process Detail page.
- The extract file can also be accessed by clicking Go back to Letter Generation and clicking Report Manager.
- Click View Log/Trace to view your extract results.
Screenshot of Process Detail page

- Click the extract file link to view your extract file. The name of the extract file link varies based on the Letter Code you entered on the Letter Generation component, where xxx = the Letter Code and zzzzzzzz = the Process Instance number.
Notes:- CC Letter Generation produces several files:
- The two files ending with .TXT are designed to be used with Microsoft Word mail merge. The file named CCLTRxxx_zzzzzzzz.TXT is the full letter extract file.
- The file named CCLBLxxx.TXT is a limited version of the file that includes only the merge fields necessary to print mailing labels.
- The file ending with .out is the Trace File, which shows any errors.
Note: Do not open your Microsoft Word template until AFTER you have saved the extract file. If your template is open when you try to save the file, you may receive an error.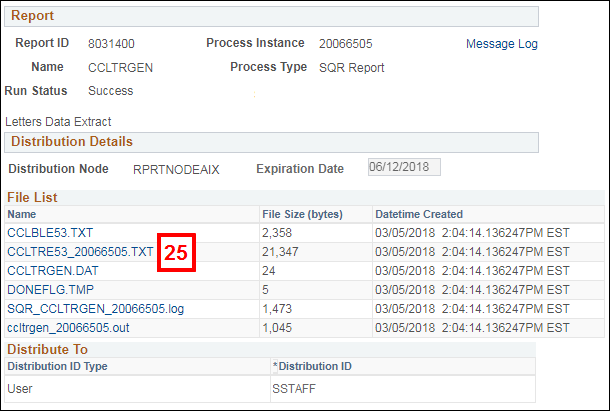
- CC Letter Generation produces several files:
- Save your file using the browser Save As function, or the Save function in whichever application your extract file opened in.
- This step cannot be completed in Google Chrome, as the file will not save properly. It is recommended you use Internet Explorer.
- It is recommended you save the extract files using a consistent naming convention and to a consistent location. The recommended naming format is CCLTRxxx.txt, where xxx = the letter code (e.g., CCLTRC14.txt).
- Each time you run letter generation, the previous extract file name may display. Overwrite the file name that displays with the new file name.
- Make sure to save the file in Text (.txt) format.
| Produce Communication Checkbox |
Complete Communication Checkbox |
Result |
|---|---|---|
| Recommended Setting: Not Checked |
Recommended Setting: Checked |
Only communications with no errors are extracted. |
| Checked | Checked |
All communication data is extracted, including communications with errors. |
| Checked | Not Checked |
All communication data is extracted, including communications with errors. |
| Not Checked | Not Checked |
Only communications with no errors are extracted. |
Note: After you have saved your extract file, launch Microsoft Word and perform the mail merge based on your office procedures. Refer to Create a Mail Merge Document Using the Mail Merge Wizard or Create a Mail Merge Document Using the Mail Merge Toolbar for more information.