Overview
This procedure explains how to merge an existing template with a data file using the Mail Merge Wizard in Microsoft Word 2016 to produce a finished communication. The steps are similar in other versions of Microsoft Word, but the screens and some of the steps may differ. Refer to Using Mail Merge in Microsoft Word for more information about using mail merge functionality in Microsoft Word 2016.
To create a Mail Merge document using the Mail Merge Toolbar, refer to Create a Mail Merge Document Using the Mail Merge Toolbar.
Navigation
To prepare for this procedure, locate and open Microsoft Word on your computer.
Step-by-Step Process
Note: This procedure assumes you already have an existing template and an extract file from the Letter Generation process.
- Open the template you want to use for the mail merge.
- When you open a template, you may receive a warning message, “Opening this document will run the following SQL command.” Click Yes to open the document with a data source already attached, or click No to remove the data source. If you click Yes, perform step 2-4 and then go to step 9.
- Click the Mailings tab.
Mailings Tab Toolabar Screenshot
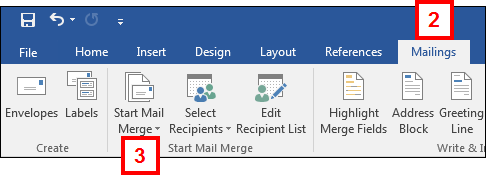
- Click Start Mail Merge.
- Click Step-by-Step Mail Merge Wizard...
- Note: The Mail Merge Wizard task pane displays on the right side of the Microsoft Word window.
- Click the applicable Select document type radio button.
Mail Merge Wizard - Step 1 of 6 Screenshot
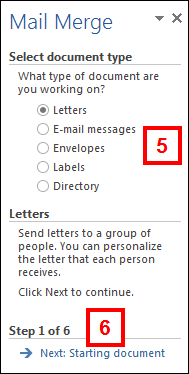
- Click Next: Starting document.
- Verify Use the current document displays in the Select starting document section.
Mail Merge Wizard - Step 2 of 6 Screenshot
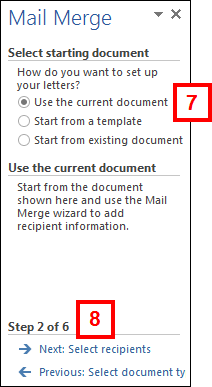
- Click Next: Select recipients.
- Verify Use an existing list displays in the Select recipients section.
Mail Merge Wizard - Step 3 of 6 Screenshot
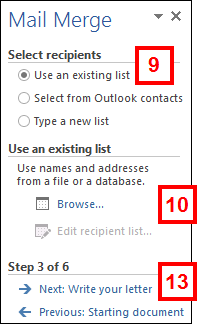
- Click Browse... to select the extract file containing the list of individuals you want to use in the mail merge.
- Navigate to and open the data source (extract file) you want to use in your mail merge in the Select Data Source window.
- The recommended format for Letter Generation extract files is CCLTRxxx.txt, where xxx = the letter code (e.g., CCLTRADM.txt).
- Click OK if your list of recipients is correct on the Mail Merge Recipients window that displays; otherwise make the necessary edits, then click OK.
- Click Next: Write your letter.
- If applicable, make changes to your template by clicking directly in your document or by selecting from the list of items in the Mail Merge Wizard task pane.
- Click More items on the Mail Merge Wizard task pane to insert a field from the extract file into your document.
Mail Merge Wizard - Step 4 of 6 Screenshot

- Click Next: Preview your letters.
- Note: Based on the recipient list, a letter is created for each recipient.
- Press Alt+F9 (or Option+F9 on a Macintosh) to toggle between the field codes and a preview of the first record.
- Click Next
 to view the next letter.
- You are not able to use the Preview Results arrows when the field codes are visible.
Mail Merge Wizard - Step 5 of 6 Screenshot
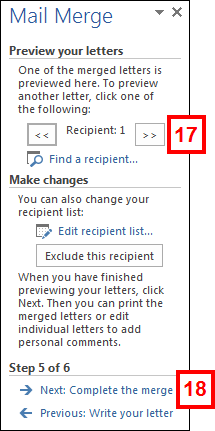
- After you have viewed all of the letters, click Next: Complete the merge.
- (Recommended) If you need to make a change to any of the letters or personalize them, locate the letter(s) and make the edits by clicking Edit individual letters.
- If you click Edit individual letters, you must print by clicking File > Print.
Mail Merge Wizard - Step 6 of 6 Screenshot
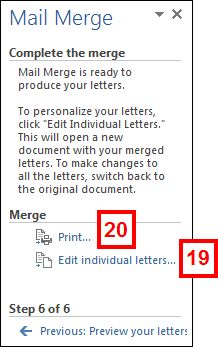
- Click Print to print your letters directly to the printer.
- With this option, your letters are merged directly to the printer and you are unable to view your letters on the screen.
Note: Complete steps 10-12 only if the extract file was not attached in step 1 or the attached extract file requires edits.
Note: Complete either step 19 or step 20, not both.