Important Information
Before you begin, navigate to the User Defaults component (NavBar > Navigator > Set up SACR > User Defaults, click the Communication Speed Keys tab) to enable the Communication Speed Key(s) you want to use. You must enable a speed key via the User Defaults component before you can use it to assign a communication. This is a one-time setup for your ID. Refer to Enable Communication Speed Keys and User Defaults for instructions on setting Communication Speed Keys.
Navigation
Click Add a New Communication  from certain M-Pathways pages
NavBar > Navigator > Campus Community > Communications > Person Communications > Communication Management
Step-by-Step Process
- Click the Add a New Value tab.
- Enter or Lookup the individual’s ID.
- Click Add.
- Enter or Lookup the Function.
- The Administrative Function may already be populated depending on how you navigated to the page.
Person Communication Page Screenshot
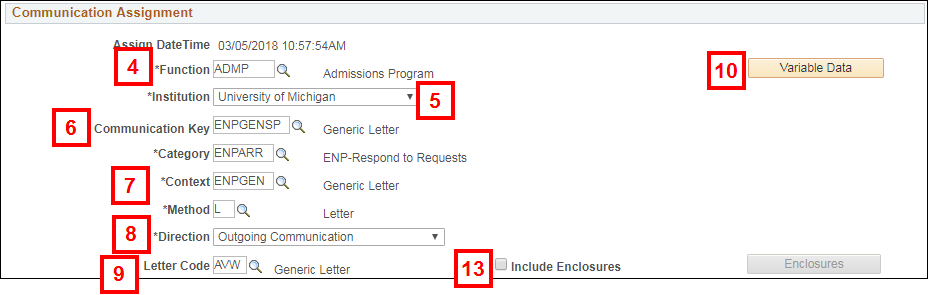
- Verify University of Michigan displays in the Institution field.
- If you have previously set up a Communication Speed Key on the User Defaults component, enter or Lookup the Communication Key. When you press Tab to move out of the field, additional values such as Context and Letter Code populate, based on the speed key. Verify the values, then go to step 10.
- If you have not previously set up a Communication Speed Key, enter or Lookup the following:
- Category
- Context
- Method
- Select the Direction from the drop-down list.
- Enter or Lookup the Letter Code.
- Outgoing communications almost always require a Letter Code, but incoming communications do not.
- Click Variable Data.
- Variable Data may already be populated depending on how you navigated to the page.
- Variable Data fields differ based on the Function selected. For example, a Function of ADMP requires Academic Career, Student Career Nbr, Application Nbr, and Application Program Number; and a Function of PROS requires only Academic Career.
- Enter or Lookup values in the Variable Data fields.
- Click OK.
- If you want enclosures included with the communication, check the Include Enclosures box and click Enclosures. Otherwise, go to step 18.
- Enclosure codes are used to indicate what materials need to be packaged with the letter for mailing.
- The Enclosures button is not active until you check the Include Enclosures box.
- Enter or Lookup the Enclosure Code.
- Enclosure codes must be previously set up with ITS. Contact your unit’s 3C Coordinator to set up enclosure codes.
- Most enclosure codes start with the letter ‘x.’ Type an ‘x’ in the Enclosure Code field and click Lookup to search for codes that begin with ‘x.’
Communication Enclosure Page Screenshot
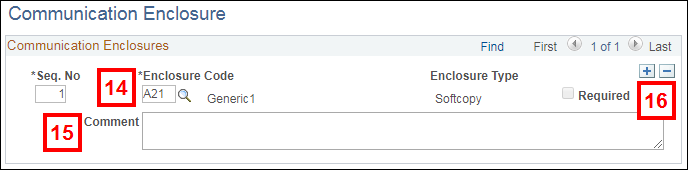
- If applicable, enter a Comment.
- The enclosure Comment field is included in the letter generation/CommGen data extract.
- To add another enclosure, click Add Row
 and repeat steps 14-15.
 - Click OK.
- Enter or select the Communication Date.
- By entering a future date, you can delay extracting the communication until you run a letter generation process that includes the future date.
- Enter a previous date if the communication has already been sent and you are now recording it.
Person Communication Page Screenshot
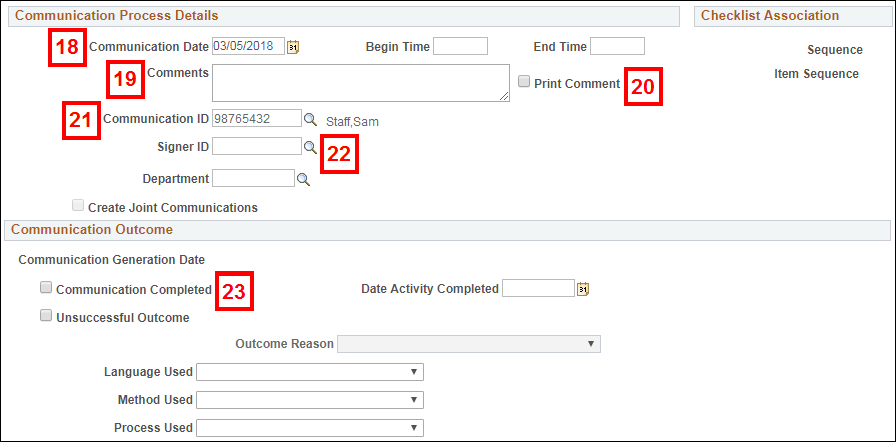
- If applicable, enter Comments.
- If you entered a comment and want to include it in the communication, check the Print Comment box.
- Verify your ID defaults in the Communication ID box.
- Enter or Lookup the individual who is signing the communication in the Signer ID field.
Notes:
- The signer’s name and title associated with the ID you entered in the Signer ID field should display. If no title displays, the signer ID you selected has not been set up as a signer by your unit’s 3C Coordinator or the ITS Service Center. The communication can be processed using Letter generation, but no signer title will be included in the mail merge.
- The Department field is optional. Depending on your security access and office business process, you can enter or Lookup the Department responsible for assigning the communication.
- Check the Communication Completed box if the communication has already been sent and you are now recording it.
- The Communication Completed checkbox should be turned on if you added an incoming communication code.
- Click Save.