Overview
Logos, signatures or other images that are used in multiple communications can be saved in a Content Library. When drafting a communication, code is inserted to call the image from the library, rather than placing the logo directly in each communication. This ensures that if you update an image in the Content Library, all communications automatically display the updated image.
You can preview the letter from within M-Pathways Student Administration (SA) to see the images. Note: Attempting to preview the image from Microsoft Word results in an error.
There are three main steps involved in using the Content Library - creating an .rtf document, saving the document into the library, and using the image in a communication. To begin, your image needs to be created and saved in any format recognized by Microsoft Word (.jpg, .png, .gif, etc.).
Step-by-Step Process
Create the .rtf document
- Open a new blank document in Microsoft Word.
- From the Insert menu, select Picture. Navigate to and select your image.
View the Word toolbar
- You cannot copy and paste the image into the document; you must use the Insert > Picture function.
- Before the image, enter this code: <?template:imagename?>, replacing imagename with the name of your image. It is recommended that you save the image file with a name relevant to the functional purpose of your image.
- After the logo, enter this code: <?end template?>.
View image with coding
- Save the document in .rtf format, using the same image name you used in step 3 as the file name. For example, WolverineAccessLogo.rtf.
Save document
- Navigate to Reporting Tools > BI Publisher > Maintain BIP Sub-Templates.
- Click Add a New Value.
- Enter a name for your image in the Sub-Template ID field.
- Use the naming convention M<FunctionalArea>_<School/College/OfficeAbbreviation>_<ImageDescription>. For example, MRA_OUA_WALOGO or MRA_BUS_HEADER.
- Functional Areas for Student Administration include:
- RA = Recruiting and Admissions
- FA = Financial Aid
- SR = Student Records
- SF = Student Financials
- HE = Cross Student Administration
- Enter a Description of the image.
View the Sub-Template Properties section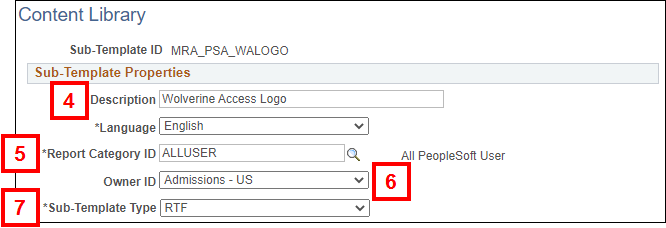
- Enter or look up your office in the Report Category ID field.
- Verify the Owner ID populates with the appropriate functional category.
- Verify the Sub-Template Type is RTF.
- Click Upload in the Sub-Template File section, then navigate to and select your file.
View the Sub-Template File section
- Select Active from the Status drop-down list.
- Click Save.
Use image in a communication
When creating a CommGen template, enter the following code where you want the image to display:
<?import:psxmlp://subtemplateid?>
<?call-template:rtfname?>
For example:
<?import:psxmlp://MRA_PSA_WALOGO?>
<?call-template:WolverineAccessLogo?>