Overview

Review the entire document, or click a link below to go to a specific section in the procedure.
Navigation
NavBar > Navigator > Accounts Payable > Vouchers > Load SUB File
Step-by-Step Process
Upload the SUB Data File
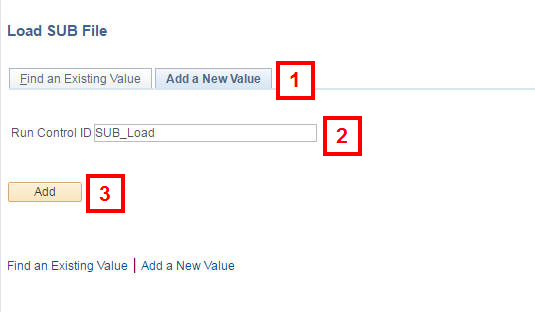
- Click the Add a New Value tab.
- Enter a name for your Run Control ID in the Run Control ID field.
Note: Use the following guidelines to name your Run Control ID:
- Use meaningful abbreviations to easily identify the Run Control ID for reuse.
- The maximum length is 30 characters.
- Use an underscore to indicate a space (e.g., SUB_Load).
- Do not use punctuation, spaces, or symbols.
- Click Add.
Note: Re-use the Run Control ID you created for each subsequent time you load an SUB file. Search for and select the file using the Find an Existing Value tab.
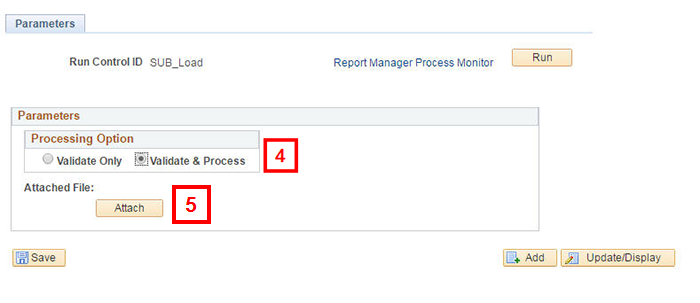
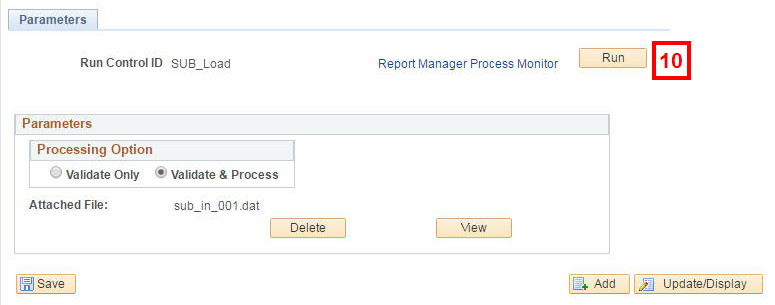
- Select a Processing Option.
- Validate Only: Validates the file and generates an error report.
- Validate & Process: Processes the file in the system and generates an error report.
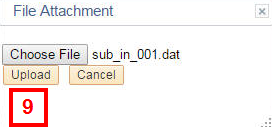
- Click Attach.
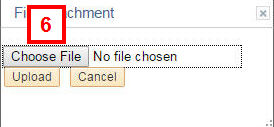
- Enter the file path for your saved SUB data file or click Choose File to search for and select the applicable file.
Note: The SUB data file must have a .dat file extension in the file path (e.g., sub_in_003.dat).
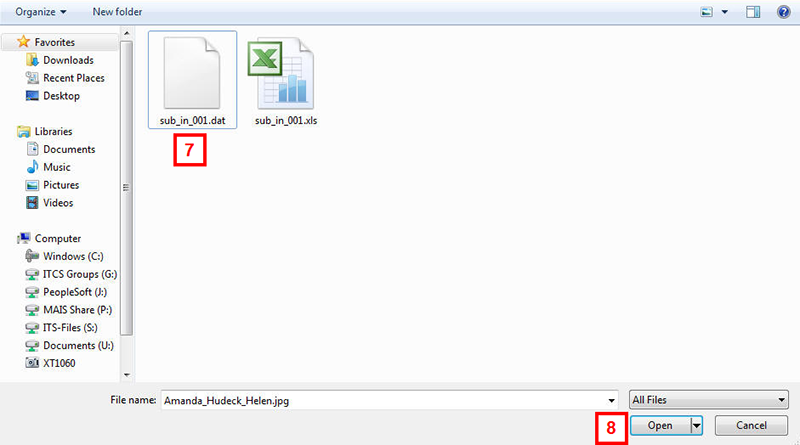
- Select the SUB data file to process from the network location in which you saved it.
- Click Open.
- Click Upload to retrieve the file.
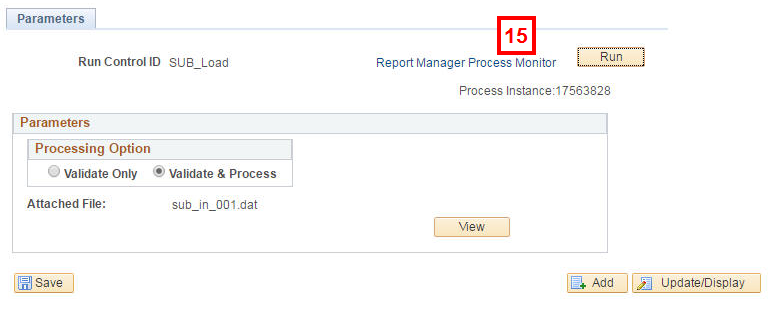
- Click Run.
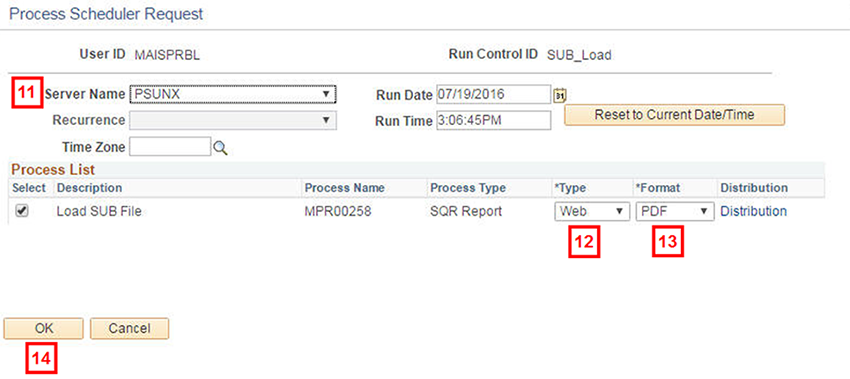
- Select PSUNX from the Server Name drop-down list.
Note: All reports with a Process Type of SQR Report are run using the PSUNX server.
- Select Web from the Type drop-down list to have the status report run to the Report Manager.
- Select PDF from the Format drop-down list.
- Click OK.
Note: The system returns to the Parameters page while the upload process is running and creating the status report.
- Click Process Monitor to verify that the upload process was successfully completed.
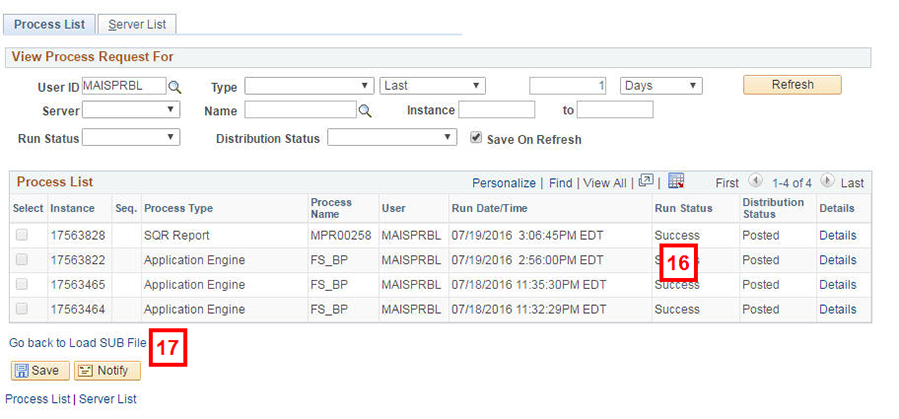
- Verify the Run Status field displays a value of Success.
Note: You may need to click Refresh to update the page if the Run Status field displays a value of Queued or Processing.
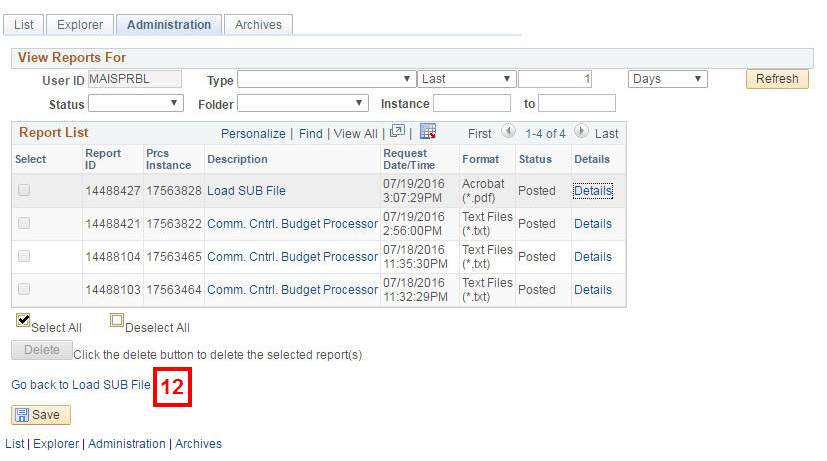
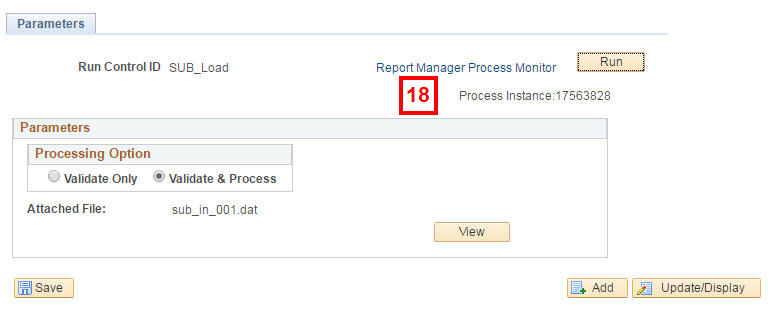
- Click Go Back to Load SUB File.
Note: Complete the data file upload prior to loading another SUB file. If you attempt to load another file before the current upload is complete, the system stops processing the current file.
Note: The system checks the data file for errors for ChartField Combination, data entry, etc. Refer to SUB File Error and Warning Message Descriptions if errors occur.
View Parameters Page Screenshot
View Choose File Page Screenshot
View Upload Page (cont.) Screenshot
View Parameters Page (cont.) Screenshot
View Process Scheduler Request Page Screenshot
View Parameters Page (cont.) Screenshot
View Process Monitor Screenshot
Important Information
After the SUB upload process is complete, you receive one of two possible system e-mails containing transaction and/or error details.
- Processing Status for your SUB file – this email indicates that you ran the upload process without attaching the data file. Repeat the process by attaching the data file and uploading it.
- Processing status for your SUB file sub_in_xxx.xxx (file name) – this email indicates that a data file has been uploaded. It doesn’t mean that errors didn’t occur with the transactions.
- If no errors occurred, the email summarizes the transactions processed.
- If errors occurred, the email states “No transactions have been processed successfully.” Follow steps 18 -22 to retrieve the SUB Status and Error Report to identify the transaction errors and then correct them following the steps in Correct SUB Load File Processing Errors.
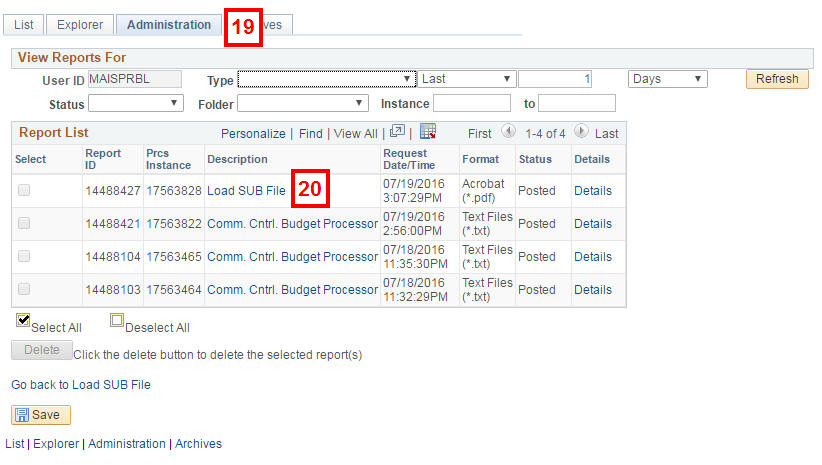
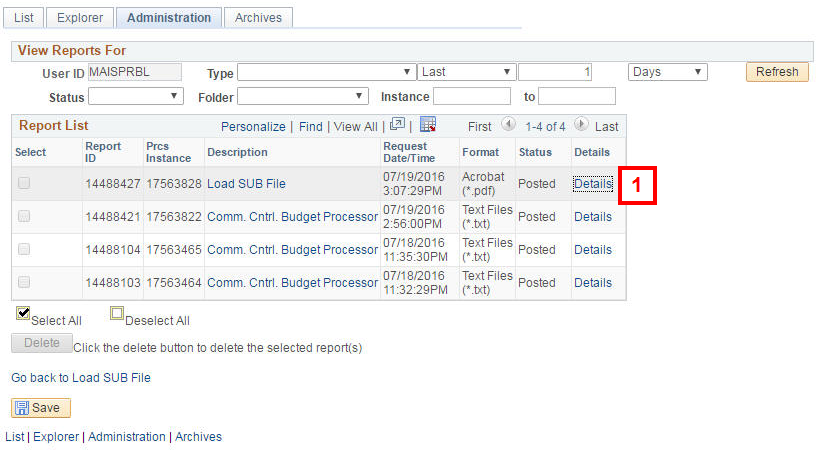
- Click Report Manager to locate and open the SUB Error, Warning & Load Status Report.
- Click the Administration tab.
- Click the applicable Load SUB File link in the Description field to open the status report in a window on your desktop.
- Review the SUB Error, Warning & Load Status report to verify:
- If the SUB vouchers have errors.
- The number of SUB vouchers created and their Voucher ID numbers.
- Click Close to close the report and return to the Report Manager.
- If errors occurred, continue with the steps in the Correct SUB Load File Processing Errors.
- If you see Transaction lines with errors row equals zero, the upload was successful.
Note: Click Refresh if you do not see the report in the list.
View Click Report Manager Screenshot
Note: Identify the report to open using the Prcs Instance, Description, or Request Date/Time field values.
View Report Manager Page Screenshot
Note: An error file (e.g., sub-err_#####.dat) is created only when the SUB vouchers have errors.
View Report Manager Page Screenshot
Correct SUB Load File Processing Errors
This procedure assumes you are continuing from Upload the SUB Data File. When you close the SUB Error, Warning & Load Status report window, the system returns to Report Manager tab (e.g., Administration tab) from which you opened the report.
Alternate Navigation to the Report Manager: NavBar > Navigator > Reporting Tools > Report Manager
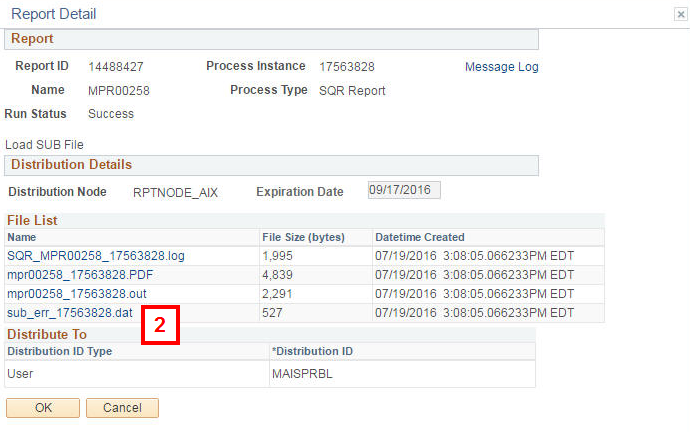
- Click Details for the applicable Load SUB File.
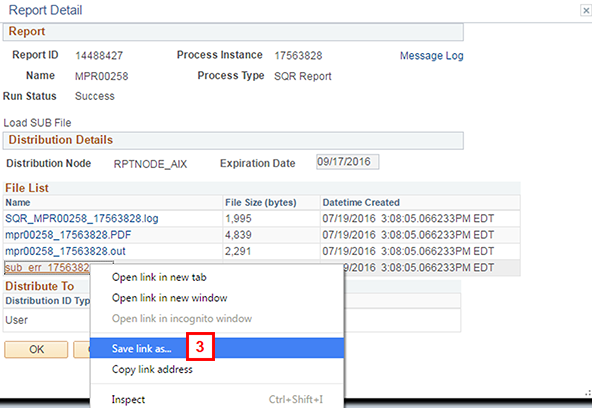
- Right-click the sub error file link (sub_err_xxxxxx.dat) to open the pop-up menu.
Notes:
- Macintosh users: simultaneously press the Apple key, Control key, and the mouse to do the equivalent of a right-click.
- ###### in the file name reflects the process instance (e.g., 734470).
View Report Detail Page Screenshot
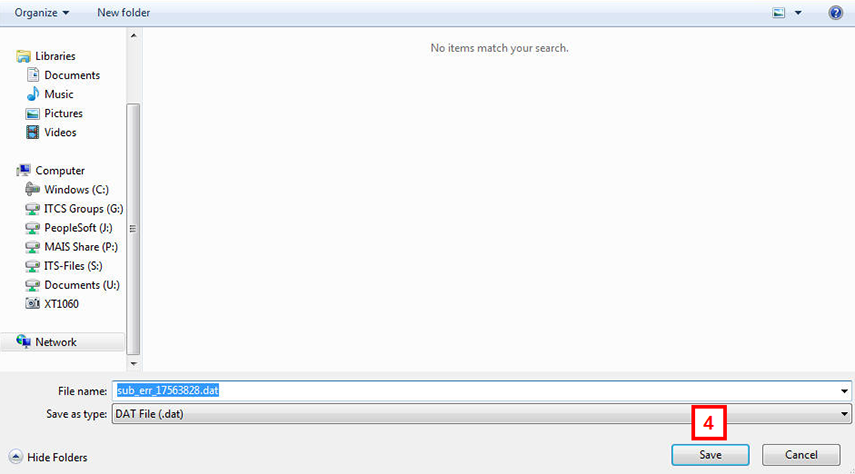
- Click Save Target As in the pop-up menu.
- Click Save.
Note: If the Download Complete dialog box appears, click Close to exit it.
- Open the SUB Excel Loader Template from the location where you stored it.
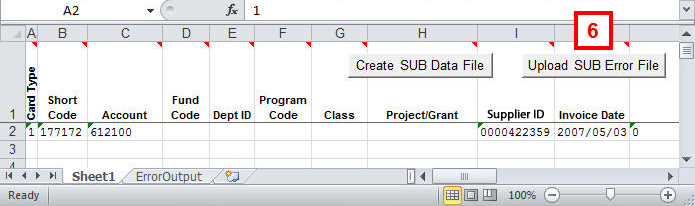
- Click Upload SUB Error File.
Note: If the file already contains data, the following message appears in a dialog box (not shown):
Click OK to overwrite existing data on the template OR click Cancel and rename the SUB Excel Loader file.
If you continue you will overwrite any existing data. Are you sure you want to do this? - Select sub_err_#######.dat file from the location where you saved it.
Note: ###### in the file name reflects the process instance (e.g., 2466431).
- Click Open. The spreadsheet is populated with all lines that did not originally get loaded because of errors.
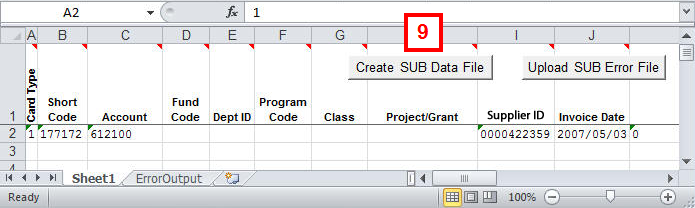
- Correct each error, then click Create SUB Data File.
Note: Refer to Create the SUB Excel Loader Data File to run the macro and complete the data file.
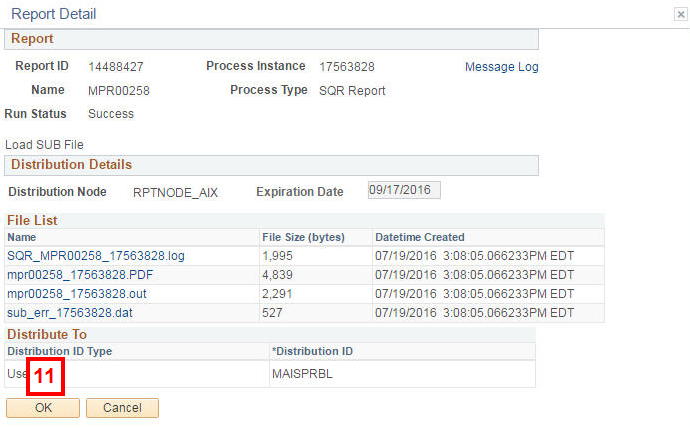
- Return to the Report Detail page.
- Click OK.
- Click Go back to Load SUB File. This returns you to the Parameters page.
- Repeat steps 4 – 22 of Upload the SUB Data File to upload the corrected data file.
View Administration Page Screenshot
View Report Detail Page (cont.) Screenshot
View SUB Excel Loader Screenshot
View Create SUB Data File Screenshot
View Click OK Report Detail Screenshot
View Go Back to Load SUB File link Screenshot