Overview

To upload Service Unit Billing (SUB) vouchers into M-Pathways, you first obtain a copy of the SUB Excel Loader Template, and then use it to create a data file to upload. This document contains information and instructions for the first step in the SUB process shown above, creating the SUB Data File.
Review the entire document or click a link below to go to a specific section in the procedure.
Navigation
Go to the Forms page on the Shared Services Center website.
Click the Service Unit Billing Template link to open the spreadsheet.
Step-by-Step Process
Download the SUB Excel Loader Template
You only need to download the Service Unit Billing Template from the Shared Services Center website once. Subsequent data files can be created from the template you store on your computer.
- Click Save.
Notes:
- If you check the Always ask before opening this type of file box, you will receive the File Download dialog box if you re-download the SUB template.
- If you uncheck the Always ask before opening this type of file box, the Security Warning dialog box displays if you re-download the SUB template (step 2 of Complete the SUB Excel Loader Template).
- Save the template file (subdoc-template.xls) to your computer.
Note: The c:\temp directory is used as an example. You can save the template and Excel spreadsheet to any directory folder to which you have access.
Complete the SUB Excel Loader Template
After you have initially downloaded the template, follow the steps in this procedure to complete your first and subsequent SUB spreadsheets and data files.
Notes:
- Do not re-format any columns.
- Leave unused fields in the spreadsheet blank. Do not enter “none” or “N/A.” You may hide unused columns, but do not delete them.
- Enter the full value in a field, including any leading zeroes (e.g., Supplier ID). Leading zeroes are necessary for the value to be loaded correctly into the system.
- See SUB Excel Loader File - Field Descriptions for complete information about the data fields in the spreadsheet, including usage information.
- Fields marked with an asterisk (*) in the instructions below are required fields.
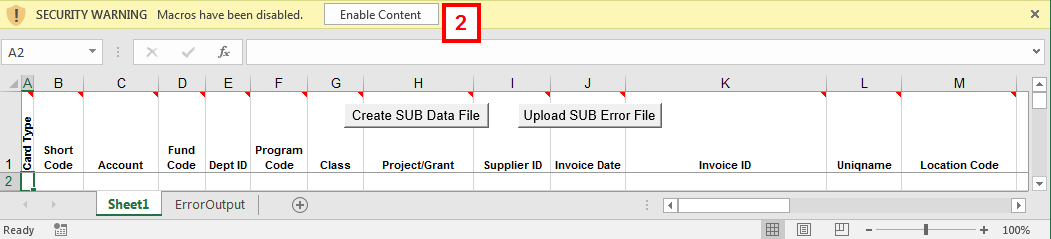
- Open the SUB Excel Loader Template (subexcelloader.xlt) from the location where you stored it on your computer.
- Click Enable Content.
- Click OK to enable Macros.
Note: You will need to complete steps 2-3 every time you open the SUB Excel Loader Template.
- Enter 1 in the Card Type field.
Note: You must enter 1 for every transaction line.
View SUB Excel Loader File Screenshot
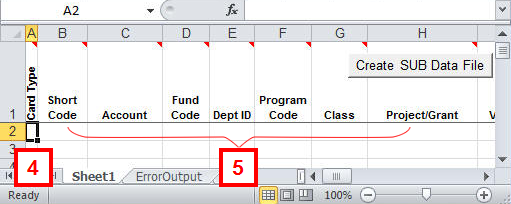
- Enter applicable information in the following fields to indicate how the service or product is being billed:
- ShortCode and *Account
- *Account
- *Fund Code
- *Dept ID
- Program Code
- Class
- Project/Grant
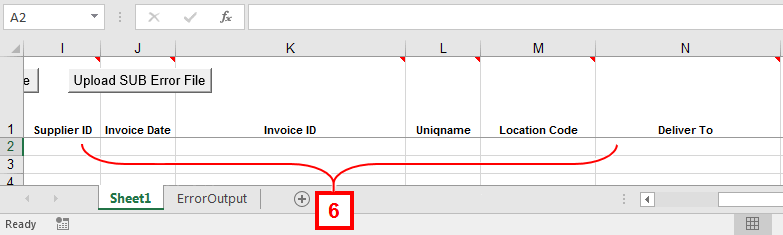
- Enter voucher line information in the following fields:
- *Supplier ID
- *Invoice Date
- Invoice ID
- Uniqname (strongly encouraged)
- Location Code
- Deliver To
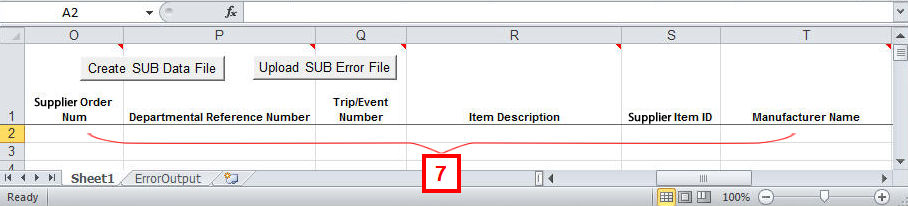
- If applicable, enter voucher line information in the following fields:
- Supplier Order Num
- Departmental Reference Number
Note: An Invoice ID or Departmental Reference Number is required. Enter both if available.
- Trip/Event Number (not used at U-M)
- *Item Description
- Supplier Item ID
- Manufacturer Name
- Enter the applicable voucher line information in the following fields:
- Model Num
- Serial Num
- UM Tag Num
- *Quantity Vouchered
- Unit of Measure
- *Unit Price
View SUB Excel Loader File Screenshot
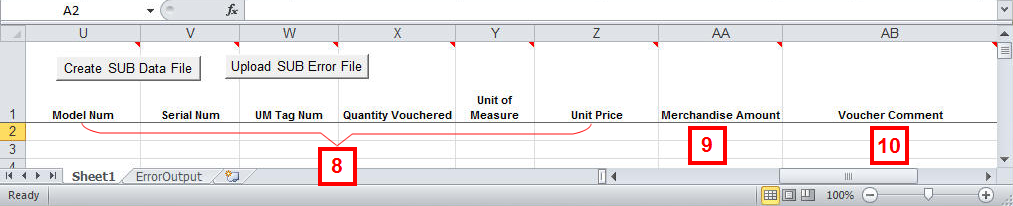
- Enter the *Merchandise Amount.
- If applicable, enter a comment for the line in the Voucher Comment field.
Note: Repeat steps 4-10 for each voucher line.
View SUB Excel Loader File Screenshot
Note: An Invoice ID or Departmental Reference Number is required. Enter both if available.
View SUB Excel Loader File Screenshot
View SUB Excel Loader File Screenshot
Create the Data File
After you have filled out and saved the spreadsheet with data, follow the procedure in this section to create the data file (DAT file) from the spreadsheet. The DAT file is generated using an Excel macro process.
Important Information
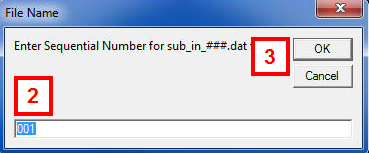
The SUB Excel Loader Data File must use the following name format in order for it to be uploaded successfully into the system: sub_in_###.dat.
- “###” represents a number you assign as you create the data file. It is a three-digit batch number required to uniquely identify the file. Use a new and sequential batch number for each SUB Excel Loader file you create (i.e., 001, 002, 003) You will receive an error message if you try to load the same file name twice within three months.
- When uploading error corrections in a new data file, you need to provide a different batch number from the original file.
- The file name must be in lower case with the underscores (not a dash).
- With the template filled out, click Create SUB DATA File.
View Create SUB DATA file Screenshot

- Enter a unique, sequential, three-digit batch number for the sub_in data file.
Note: If the batch number already exists, a File Already Exists error message appears to prompt you to assign a different number.
- Click OK.
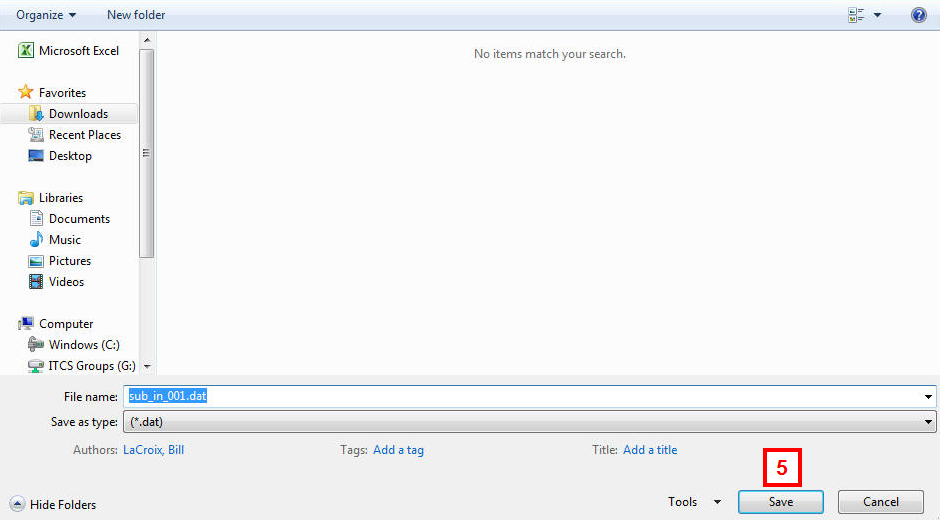
- Navigate to the location where you want to save the DAT file.
Note: By default, the macro automatically opens the c:\temp directory as the save location for the data file. You can change this default location, but take note of it for future reference.
- Click Save.
- Click OK.
- If desired, click Save.
Notes:
- The XLT file is being saved as an XLS file with the batch number attached.
- By default, the Save in field defaults to the location where you saved the DAT file.
View File Name Dialog Box Screenshot
To upload the DAT file, see Upload an SUB File Using the File Attach Process.
Additional Information
After you run the macro process, an Audit Control line is automatically added to the XLS spreadsheet. This line contains the following:
- A Card Type value of 2, so that this Audit Control line will not be entered in the system.
- A Total Voucher value displayed in the Fund Code field. This value equals the total number of transaction lines in the file.
- A Total Merchandise Amount value for the transaction lines in the file. This value displays in the Merchandise Amount field.
See Upload an SUB File Using the File Attach Process to upload the data file into the system.