Overview
Two procurement reports are useful in tracking an ePro req from submission through payment to the supplier.
- The Req/PO Status Report displays the details and processing status for an ePro req and the corresponding Purchase Order (PO), including the PO number, PO status, budget check status, approvals, dispatch method, and change request details.
- The Scheduled PO Voucher Report lists the PO vouchers for your department that are scheduled to be paid. Use this report to track your order through payment. It also helps you identify the PO vouchers that require approval prior to payment.
Important Information
The steps to run and print these reports are the same except for the data you enter on the reports Parameters page. The Parameters page for each report is shown below, but most illustrations show only the Req/PO Status Report.
The following instructions are written for Windows machines. Mac users should refer to the following document for general instructions after step 8 in this procedure: Run a Report to the Report Manager.
You must create a Run Control ID for the Scheduled PO Voucher Report. You may use this Run Control ID to run the Req/PO Status Report.
Navigation
NavBar > Navigator > Reporting Tools > PR Reports > Req/PO Status Report or Scheduled PO Voucher Report
Step-by-Step Process
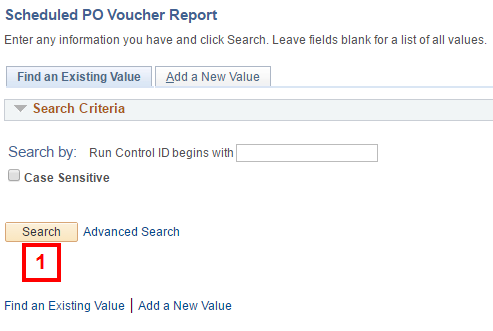
- Click Search.
Notes:
- If you do not have a Run Control ID, refer to M-Pathways Run Control ID Information for more information.
- If you only have one Run Control ID, the system automatically selects it when you click Search.
- If you have multiple Run Control IDs, select the applicable value from the Search Results.
Find an Existing Value Page Screenshot
For Req PO Status Report:
- Verify UMICH defaults in the Business Unit field or enter it.
Req PO Status Report Page Screenshot
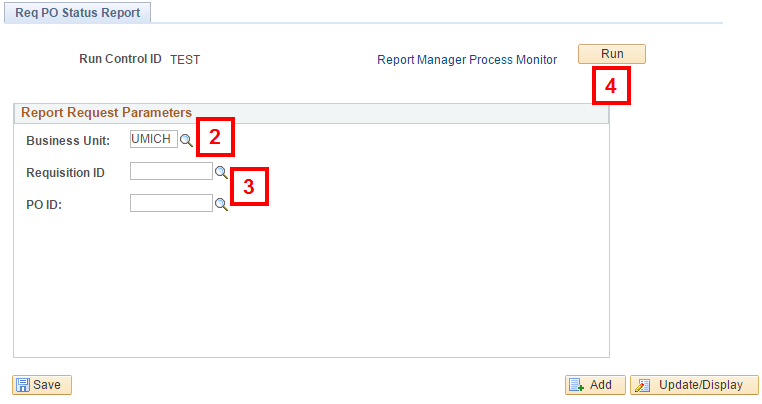
- Enter or Lookup
 the Requisition ID or PO ID.
 - Click Run and go to step 9.
For Scheduled PO Voucher Payments:
- Enter or Lookup the Department.
Scheduled PO Voucher Payments Page Screenshot
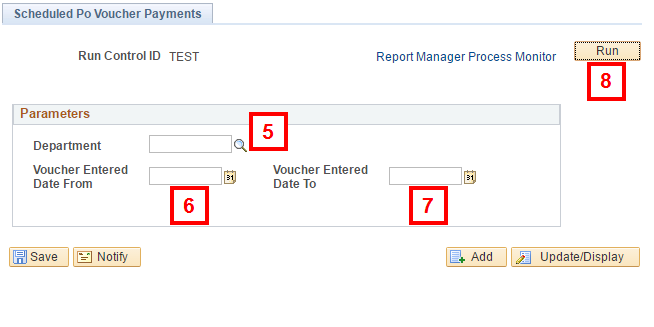
- Enter or select the Voucher Entered Date From.
- Enter or select the Voucher Entered Date To.
- Click Run.
- Verify or select PSUNX from the Server Name drop-down list.
Process Scheduler Request Page Screenshot
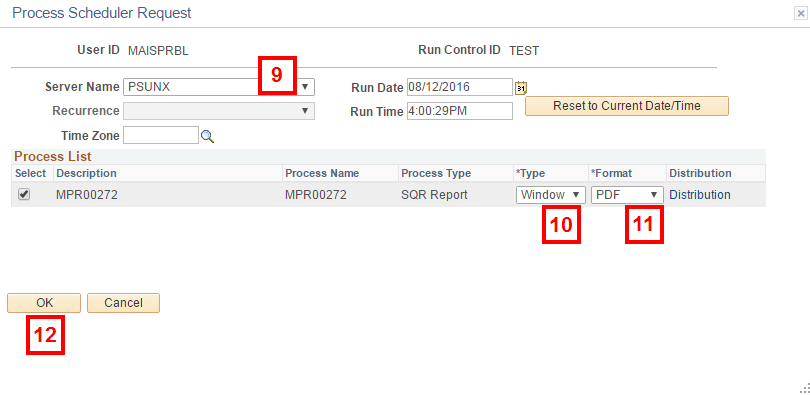
- Verify or select Window from the Type drop-down list.
- Verify or select PDF from the Format drop-down list.
- Click OK.
- The following status pop-up windows appear:
- Queued
- Processing
- Success (or Error)
Note: You must enable pop-ups for this site in your browser for this step to work.
- Print or save the report as desired.
Notes:
- Reports run to the Window are stored in and can be retrieved from the Report Manager for 60 days. Refer to M-Pathways Report Manager - Field Descriptions for more information.
- To run the report on a Mac or to open and view it at a later date, run it directly to the Report Manager by selecting Web from the Type drop-down list on the Process Scheduler Request page.