Overview
To obtain funds to pay human subjects participating in a University of Michigan study, researchers (including Study Team members) complete an HSIP (or ISR) Payment Request. Funds can be obtained in cash, by check, by gift card, or by payment coupon.
This procedure demonstrates key tasks, such as:
- Complete and Submit a Request
- Obtain the Payment Receipt Form
- Complete the Subject Information Template
- Submit Receipts and Completed Templates
Optional tasks, such as:
- Assign Alternate Approver(s) for a Request, such as Approvers or Fund Custodians (Pickup)
- Update and Submit a Returned HSIP Request
Before you begin an HSIP request, gather the following information:
- The study’s HUM Number (if one exists) and Title
- The Institutional Review Board (IRB) approval dates and approval number for the study (as applicable)
- Tier (if no HUM Number exists) to identify subject payment threshold and documentation requirements
- Uniqnames of key personnel (study’s Principal Investigator, unit Approver for the request)
- (Optional) ShortCode value(s) to which the incentive payments will be charged
The study’s project administrator can assist you with this information.
Refer to the Human Subjects Incentives Program website to:
- Register for instructor-led training
- Obtain templates to submit subject details
- Review payment options
- Obtain data entry instructions by payment type (e.g., gift cards) and distribution option
- Find HSIP Office contact information
Navigation
Wolverine Access > Faculty & Staff > Human Subject Incentive Payment Request
Complete and Submit a Request
Identify Key Personnel on the Request
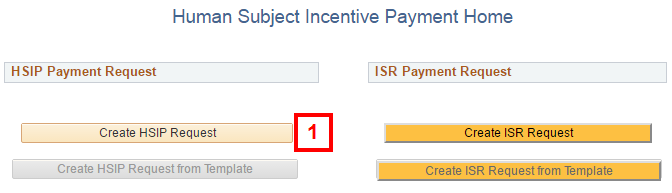
- Click Create HSIP Request.
Note: ISR Business Office, click Create ISR Request. Follow the remaining steps in this procedure to complete the request.
Human Subject Incentive Payment Home Page Screenshot
- Enter or Lookup
 the Principal Investigator’s (PI) Uniqname.
Note: This is the PI on the study in the eResearch system.
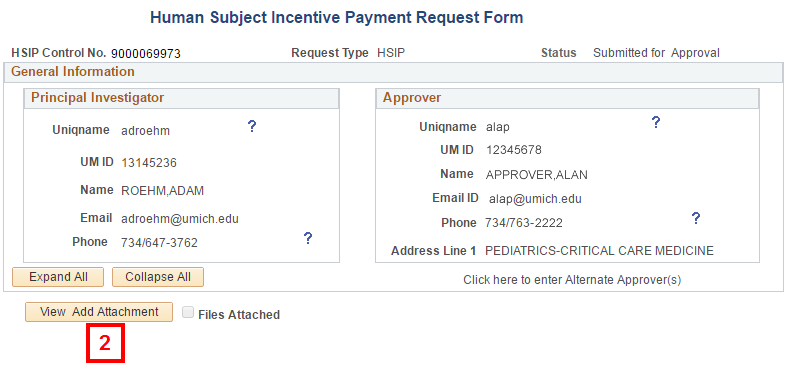
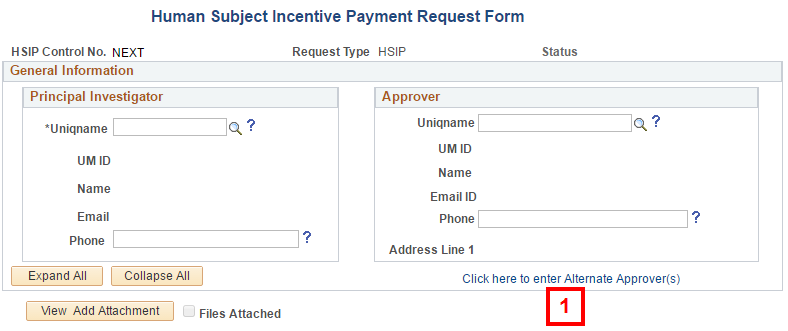
Human Subject Incentive Payment Request Form - General Information Group Box Screenshot
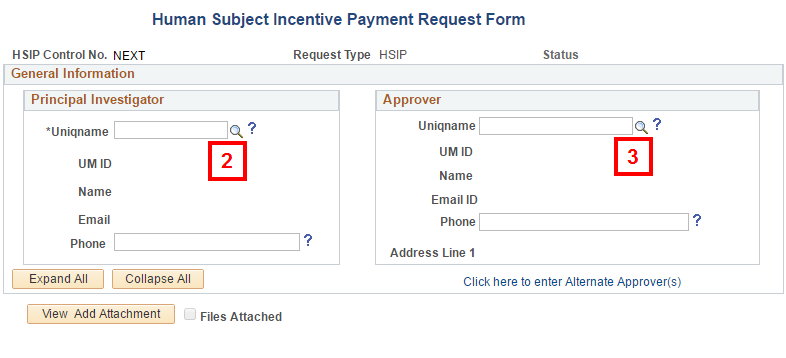
- Enter or Lookup the Approver's Uniqname.
Note: The remaining fields default based on information in the HRMS system. If applicable, enter an alternate Phone number for the PI or Approver, but make sure that it is for that employee.
At this time, you may also choose to add optional Alternate Approvers. Refer to the (Optional) Assign Alternate Approver(s) section of this document for more information.
Enter Study Information Based on Type of Study
If you do not know whether the study has a HUM Number, contact the HSIP Office.
The fields displayed in the Study Information section vary depending on the Tier value that defaults/is selected and whether the study is Non-Regulated.
To view incentive thresholds and documentation requirements by Tier, click Tier Information. You must have pop-up blockers turned off for your web browser to view this information.
Study with HUM Number
- Enter the rest of the study’s HUM Number (e.g., HUM00054321).
Note: This field automatically populates with HUM000
.
Human Subject Incentive Payment Request Form - Study Information Group Box Screenshot
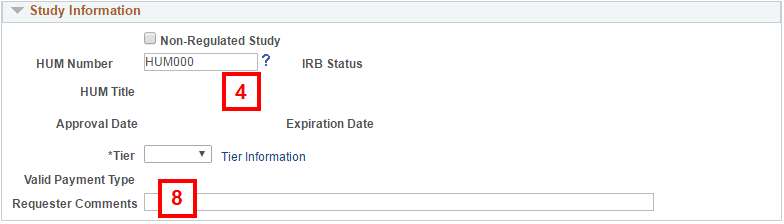
- Verify that the study information displays in the following fields:
- IRB Status
- HUM Title
- Approval Date and Expiration Date
- Tier (required)
- Valid Payment Type
- For exempt studies, a Tier value doesn’t default. Select Tier 1, 3, or 5, as applicable. You must have special permission from the HSIP Office before selecting Tier 2 or 4.
- If the Tier is 2 or 4, select an exception reason from the Exception Type field.
Note: For multi-tier studies, you must enter exception information in this field.
- If applicable, enter Requestor Comments.
- Go to step 11.
Non-Regulated Study
- Check the Non-Regulated Study box.
Human Subject Incentive Payment Request Form - Study Information Group Box Screenshot
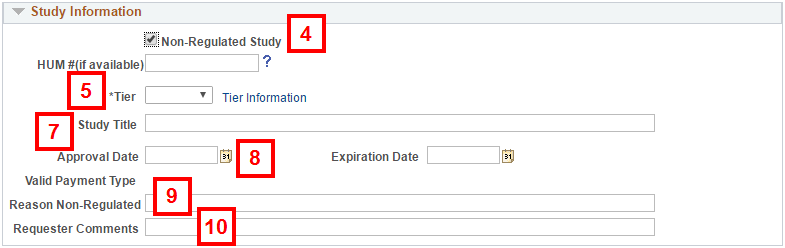
- Select a value from the Tier drop-down list.
- If the Tier is 2, select an Exception Type from the drop-down list.
Note: For multi-tier studies, you must enter exception information.
- Enter the Study Title.
- Enter or select the following dates:
- Approval Date – the date the study was approved
- Expiration Date – the date the study expires
- Enter the Reason Non-Regulated.
- If applicable, enter Requestor Comments.
Enter Distribution Information for the Request
- Enter or Lookup the Uniqname of the person who is responsible for the funds.
Note: The Phone field populates based on the Uniqname. Overwrite if necessary.
Human Subject Incentive Payment Request Form - Distribution Information Group Box Screenshot
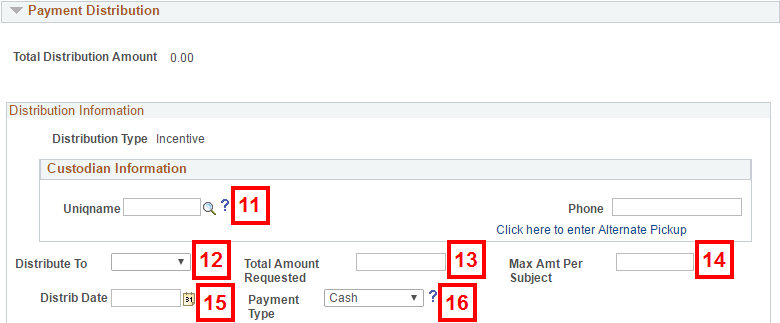
- Select who will receive the funds from U-M (e.g., Cashier’s office) in the Distribute To field:
- Researcher – custodian or alternate pickup
- Subject
- Enter the Total Amount Requested.
- Verify a default value based on the study’s tier has populated in the Max Amt Per Subject field. (Manually enter the amount each subject will receive for Non-regulated studies).
Note: The HSIP Office requires time to process each request.
To enter an appropriate Distrib Date, view the timeframe/cutoff information in the Payment option guide or in the payment type instructions on the Treasurer’s Office website.
- Enter or select the date the funds will be received/picked up in the Distrib Date field.
- Select the format of the funds (e.g., card) in the Payment Type field.
Note: Payment Type options may be restricted depending on the Distribute To field value.
Note: This field automatically populates with HUM000
.
Human Subject Incentive Payment Request Form - Study Information Group Box Screenshot
- IRB Status
- HUM Title
- Approval Date and Expiration Date
- Tier (required)
- Valid Payment Type
Note: For multi-tier studies, you must enter exception information in this field.
Human Subject Incentive Payment Request Form - Study Information Group Box Screenshot
Note: For multi-tier studies, you must enter exception information.
- Approval Date – the date the study was approved
- Expiration Date – the date the study expires
the Uniqname of the person who is responsible for the funds.
Note: The Phone field populates based on the Uniqname. Overwrite if necessary.
Human Subject Incentive Payment Request Form - Distribution Information Group Box Screenshot
- Researcher – custodian or alternate pickup
- Subject
Note: The HSIP Office requires time to process each request.
To enter an appropriate Distrib Date, view the timeframe/cutoff information in the Payment option guide or in the payment type instructions on the Treasurer’s Office website.
Note: Payment Type options may be restricted depending on the Distribute To field value.
The Payment Type Details group box displays for each Payment Type, except Check. The fields vary depending on the Payment Type. Steps 17-19 show entering a request for Cash.
- Enter the number of bills or coins required for a particular denomination in the Number Requested field.
Human Subject Incentive Payment Request Form - Payment Type Details Group Box Screenshot

- Enter or Lookup the Denomination.
Note: For coins, type the decimal point in front of the denomination to indicate cents (e.g., .25).
- If applicable, click Add a new row
 to enter additional denominations, then repeat steps 17 and 18.
Note: The Total Denomination Amount must match the Total Amount Requested.
Variations are:
- For Cards, select the Card Type (e.g., Gift Card, Virtual Payment, and Card Reload). Then follow similar steps to request the number of cards by card amount.
- For Payment Coupons, enter the Number Requested. The requested amount will be distributed evenly among the number of coupons.
Refer to the Treasurer’s Office website for specific data entry instructions based on Payment Type and distribution method.
- Select a Delivery Type from the drop-down list.
Note: The options vary depending on values entered in the Distribute To and Payment Type fields. In general, these are:
- Cashier’s Office (for cash requests)
- Courier
- HSIP Office (for non-cash requests)
Human Subject Incentive Payment Request Form - Delivery Information Group Box Screenshot

- Complete the address fields, if applicable.
- For delivery to a campus location, type or look up and select the Location Code associated with the university building and/or room in the Deliver To field. The address fields will populate automatically.
- Enter address information for courier and mail deliveries to the Researcher only. Subject addresses are submitted on the receipt/template.
- Refer to the Treasurer’s Office website for specific data entry instructions based on the form of incentive and who it will receive it (researcher or subject).
- If applicable, enter mailing or pickup instructions in the Special Instructions field.
The Requestor OR the Approver can enter the Accounting Details (ShortCode or ChartField combination that shows who is charged for the subject incentive). Accounting Details are not required for request submission, but are required for approval. Complete steps 23-25 if you want to enter the accounting information, otherwise go to step 26.
- Enter a Shortcode value to auto-populate the corresponding ChartFields
OR
Enter or Lookup applicable values in the Fund, Department, Program, Class, and Project/Grant fields.
Human Subject Incentive Payment Request Form - Accounting Details Group Box Screenshot

- Enter the Amount.
- If more than one ShortCode/ChartField combination will be used to fund the incentive, click Add a new row , then repeat steps 23 and 24.
Note: For courier deliveries, a unit surcharge is applied when the request is approved. The Approver provides the accounting information for the surcharge.
Upon submission, the system sends the identified Approver(s) an email alert. You can’t edit the request, unless the Approver returns it to you. Contact the Approver if you need to make changes after submission. If you are not ready to submit the request, click Save for Later.
- Click Save & Submit.
Note: By submitting the request, you are agreeing to use and document the distribution of the funds appropriately.
Human Subject Incentive Payment Request Form Screenshot
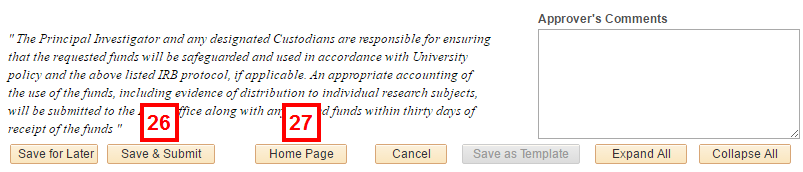
- Click Home Page.
- Record the HSIP Control No that was assigned, and verify that the Status is Submitted for Approval.
Human Subject Incentive Payment Request Form Screenshot
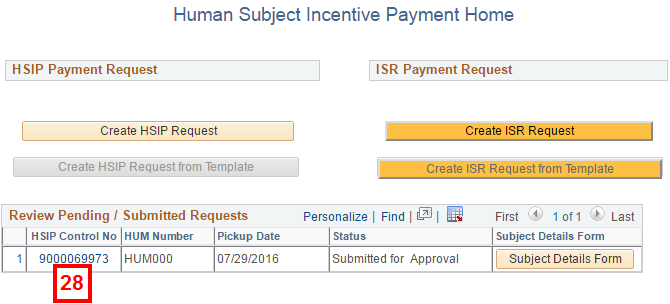
- If you have requested funds be sent to the Researcher (Custodian), go to Obtain the Payment Receipt Form.
OR
If you have requested funds be sent directly to subjects, go to Complete the Subject Information Template.
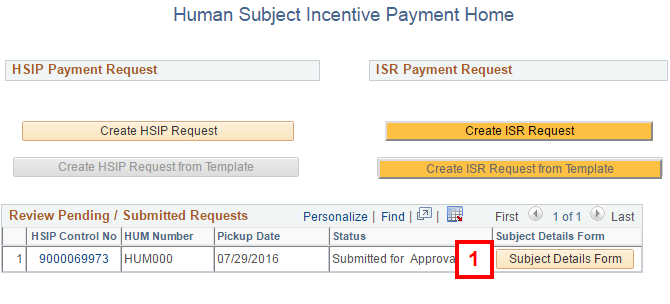
Obtain the Payment Receipt Form
Distribution of the incentive funds to human subjects may require documentation for audit purposes. The information required by the HSIP Office is determined by the Tier value. Refer to the Payment options guide found on the Treasurer’s Office website for details and requirements.
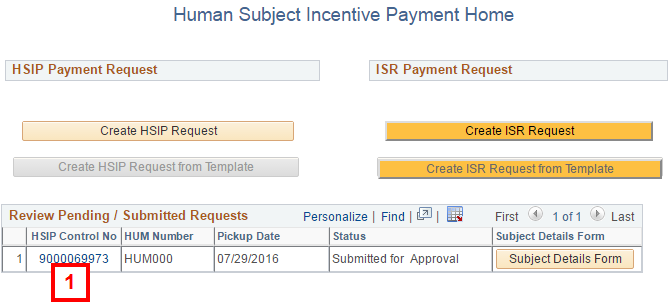
- Click Subject Details Form for the applicable request (identified by HSIP Control No).
Human Subject Incentive Payment Request Form - Delivery Information Group Box Screenshot
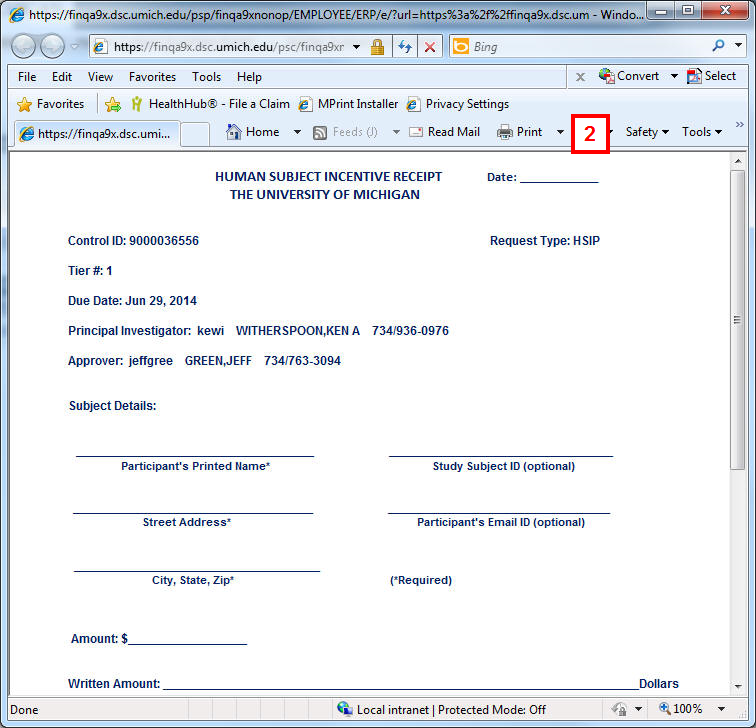
- Print the document from your browser.
The system HSIP Receipt is formatted for the Payment Type and Tier and pre-filled with the request information, such as:
- Control ID
- Tier number
- Due Date
- Principal Investigator
- Approver
Human Subject Incentive Receipt Screenshot
- Custodians are responsible for collecting signed receipts from subjects and submitting them to the Treasurer’s Office once payments have been distributed.
Do not re-use receipts for other requests.
Receipts are used with Payment Types of cash or card, as well as checks when distribution is made to the researcher.
Blank HSIP receipt forms by Tier are available on the Treasurer’s Office website.
Complete the Subject Information Template
When payments are to be sent directly to subjects, you must submit a Subject information template by attaching it to your HSIP Payment Request. Subject information templates are used with Payment Types of cash, check, and card when the University distributes funds directly to subjects.
- Download the correct Subject information template (based on payment type) from the Treasurer’s Office website (or click the Subject Details Form button on the HSIP Home page).
Human Subject Incentive Payment Home Page Screenshot

- Enter information for all subjects receiving payment.
Subject Information Template Screenshot

- Save the completed document to your computer.
Because subject information is sensitive data, do not save the template as a Google Doc. Only save to a secure location on your computer or to the your network drive.
Submit Documentation Forms (Receipts and Completed Templates)
There are two options to submit required documentation to the Treasurer’s Office: Campus mail and file attach from within the HSIP request. Because subject detail data is confidential, file attach is the preferred method of submission as it offers more security than mail. You can attach PDF, XLS, XLSX, DOC and DOCX files.
- Click the applicable HSIP Control No.
Note: You cannot attach files if the HSIP request has the following Status:
- Completed
- Cancelled
- Paid (distribution to subject)
- Released for Payment (distribution to subject)
Human Subject Incentive Payment Home Page Screenshot
- Click View Add Attachment.
Human Subject Incentive Payment Request Form Screenshot
- Click Add Attachment.
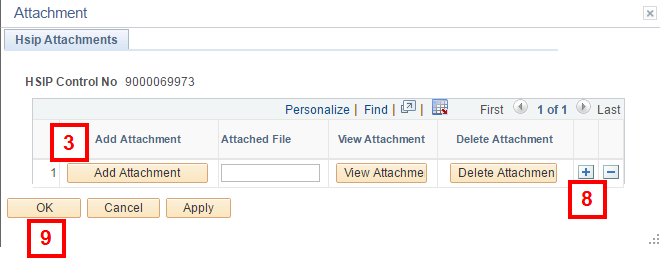
- Click Choose File.
- Navigate to and select the file.
- Click Open.
- Click Upload.
- Click Add row to add additional files.
Note: If applicable, click Delete row
 to delete files.
 - Click OK to return to the request form.
(Optional) Assign Alternate Approver(s)
In addition to the primary Approver and Custodian you enter on the HSIP request form, you can designate alternates. The system steps are the same for both, after clicking the applicable link to open the page. The Alternate Approver(s) page is shown as an example.
- Click Click here to enter Alternate Approver(s) in the General Information group box.
Human Subject Incentive Payment Request Form Screenshot
- Enter or Lookup the Uniqname.
Note: The remaining fields default based on information in the HRMS system. If applicable, enter an alternate Phone number.
Enter Alternate Approver(s) Information Screenshot
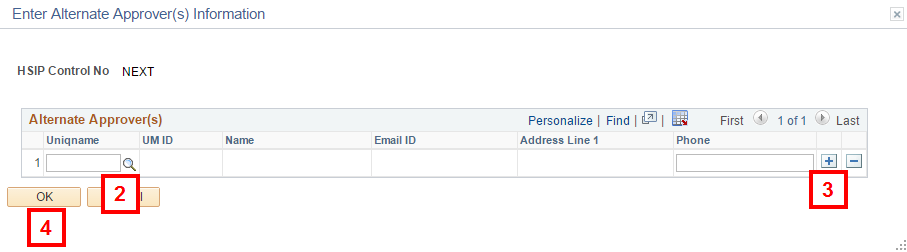
- If applicable, click Add a new row , then repeat step 1.
Note: Click Delete row
if you want to delete a row that you already entered. - Click OK.
Note: Alternate Approvers must have the appropriate M-Pathways system access to view the HSIP request. Alternate Pickup (custodians) should be on the study team.
(Optional) Update and Submit a Returned HSIP Request
Requesters are sent a system email when an Approver returns a request. The email contains the HSIP Control No. that needs additional information for approval.
- Click the HSIP Control No. for the request identified in the email.
Note: The request Status will be
More Information Needed.
Human Subject Incentive Payment Home Page Screenshot

- Scroll down to the bottom of the request.
- Review the Approver’s Comments to identify what changes are needed.
- Correct the HSIP form.
- Click Save & Submit.
Additional Resources
- To create an HSIP template, refer to the How to save a template procedure on the Requester page of the Treasurer’s Office website.
- Complete this guided simulation to practice creating an HSIP request.
- Principal Investigators and Custodians receive email alerts about their HSIP request status. Refer to the Generated e-mail information on the Treasurer’s Office website to view details about these emails.