Overview
There are 2 parts to creating a PAR (Personnel Action Request):
Part 1: Create a PAR: The first steps that all PAR transactions begin with.
Part 2: Individual PAR Transaction Type: Steps vary by the type of PAR transaction being created.
This procedure is Part 1: Create a PAR. It outlines the first steps that all PAR transactions begin with. Links to Individual PAR Transaction Types (Part 2) are provided at the bottom of this document.
Important Information
- A transaction must be initiated and approved by all unit approvers by the payroll cutoff.
- Draft transactions and associated attachments are deleted after 48 business hours.
- (blank) transactions and associated attachments are deleted nightly.
- The transaction's status is (blank) when it is closed without clicking Save & Submit, Save as Draft, or Delete Transaction. See the Save, Validate, or Delete a PAR step-by-step procedure for more information.
- If a transaction with a Draft, Pending, or Denied status exists, creating another workflow transaction is not possible.
- If the employee has multiple appointments with different final approvers, coordinate with the final approvers before beginning this transaction. See the PAR Final Approvers for Job Updates worksheet located in the HRRIS Job Aids for more information.
- For Temporary appointments, only Comp Rate Change, Reclassification, Transfer or Promotion, Appointment End Date, Supervisor ID or Unit PCN Change, Correction or Deletion of Data, Termination or Retirement, Additional Pay Change, DBE Change, and Add Workstudy are available using PAR.
Navigation
Homepage: Workforce Administration; Tile: Personnel Action Request > Create PAR
NavBar > Navigator > Workforce Administration > Job Information > Personnel Action Request (PAR) > Create PAR
- Enter search criteria in one or more of the following field(s).
- Empl ID
- Last Name
- First Name
- Campus ID
- Click Search.
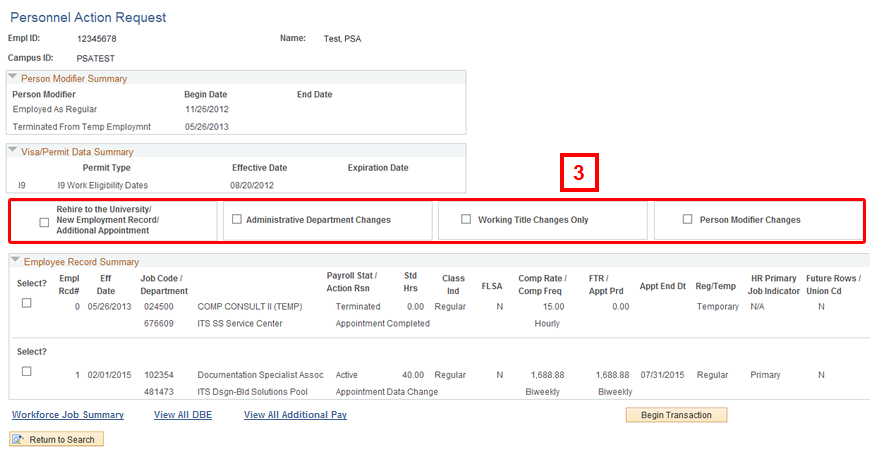
- Check the applicable employee level transaction type box(es).
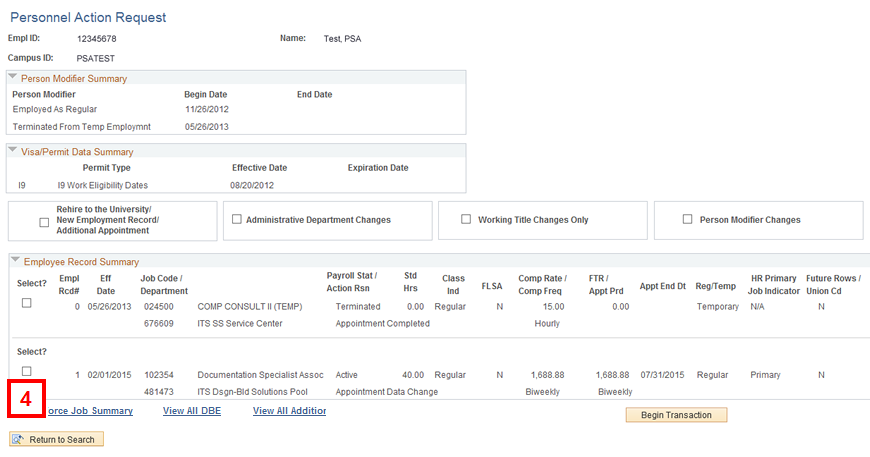
- Check the Select? box(es) for the appointment(s) that is(are) changing.
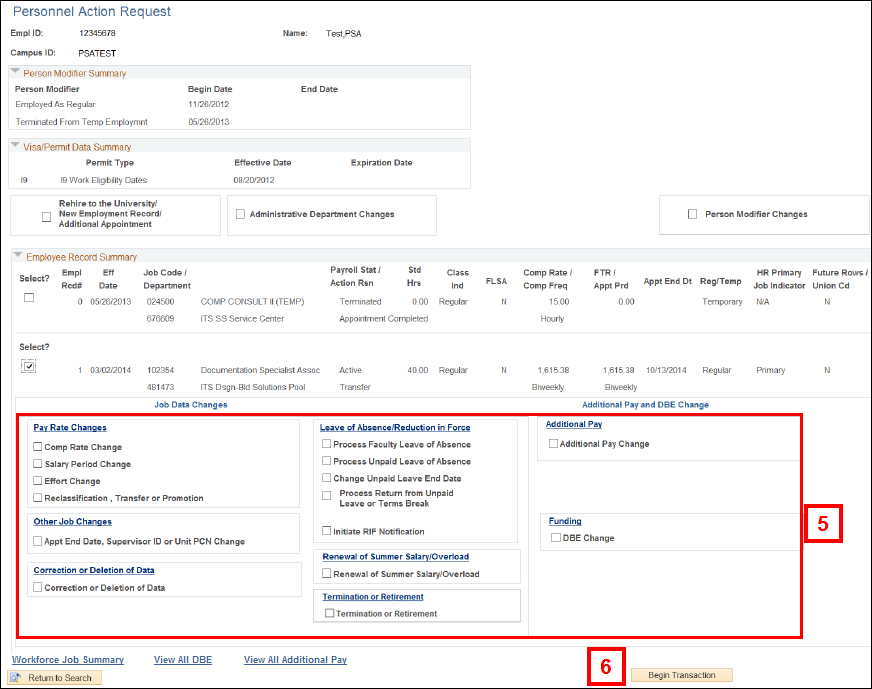
- Check the box(es) for the PAR transaction type(s) you would like to complete.
- Additional fields may display below transaction type checkboxes to aid in the creation of the transaction (i.e., Effective Date).
- You can select multiple PAR transaction checkboxes at one time. However, certain PAR transaction combinations are incompatible/not allowed. Incompatible checkbox options are hidden from view.
- If different transaction types are selected for multiple appointments, the Shared Services Center HR group will be added as the final approval in order to manually enter the transactions.
- If a department, funding, or effort change is required with a Job Data Change, the DBE Change checkbox and Change Effective On fields will populate automatically.
- Click Begin Transaction.
- Continue to the applicable individual PAR transaction type procedure(s) below.
Note: Searching by Last Name and First Name may return multiple employee records in a search results list. Verify that you are choosing the correct employee record from the search results list.
Personnel Action Request Page - Employee Level Changes Screenshot
Note: If you are making Working Title Changes Only, go to step 6.
Personnel Action Request Page - Select? Checkbox Screenshot
Personnel Action Request Page Expanded Screenshot
Notes:
Note: Fields available for editing will vary by PAR transaction type.
If you are making changes to multiple employee records or PAR transactions, see the Navigate Between Multiple Employee Records/PAR (Personnel Action Request) Transactions step-by-step procedure for more information.
Employee Level Changes
- Rehire to the University/New Employment Record/Additional Appointment
- Administrative Department Changes
- Working Title Changes Only
- Person Modifier Changes
Pay Rate Changes
Other Job Changes
Correction or Deletion of Data
Leave of Absence/Reduction in Force
- Process Faculty Leave of Absence
- Process Unpaid Leave of Absence
- Process Return from Unpaid Leave or Terms Break
- Change Leave End Date
- Initiate RIF Notification