Overview
This document provides details about the fields on the Enter Time page for electronic timekeepers. For complete information on the electronic time entry process, see the supporting documentation, procedures, and simulations available in My LINC.
Some details about the Enter Time page are that:
- It is the primary method used to report biweekly and monthly time in M-Pathways for the current pay period and for normal prior period adjustments.
- It displays Reported Time for a pay period – two weeks for biweekly employees and one month for monthly employees.
- Timekeepers generally report biweekly time on the Enter Time page by:
- Applying an employee's schedule (regular and shift premium hours),
- then changing time as necessary.
- Timekeepers manually enter an employee's time on the Enter Time page when:
- Reporting time for regular or temporary employees with frequent schedule changes.
- Reporting Monthly employees' variances.
- Interface Timekeepers use the Enter Time page to:
- Make last-minute changes to employees' time that is loaded onto the timesheet via an interface.
- Manually enter time for an employee not included in the interface.
- When you enter or change time on the Enter Time page and click Submit:
- It checks to see if the TRCs, quantities, and combination codes that you entered are valid values.
- If a value is not valid, it is highlighted in red.
- In this case, you must correct the error and then submit again.
For details on using the search page, refer to the Manager Search Options – Support Material document in My LINC.
Navigation
Homepage: Payroll or HRMS, Tile: Time Entry Pages > Enter Time
or
Homepage: Payroll or HRMS, Tile: Time & Labor WorkCenter > Enter Time
Enter Time Page
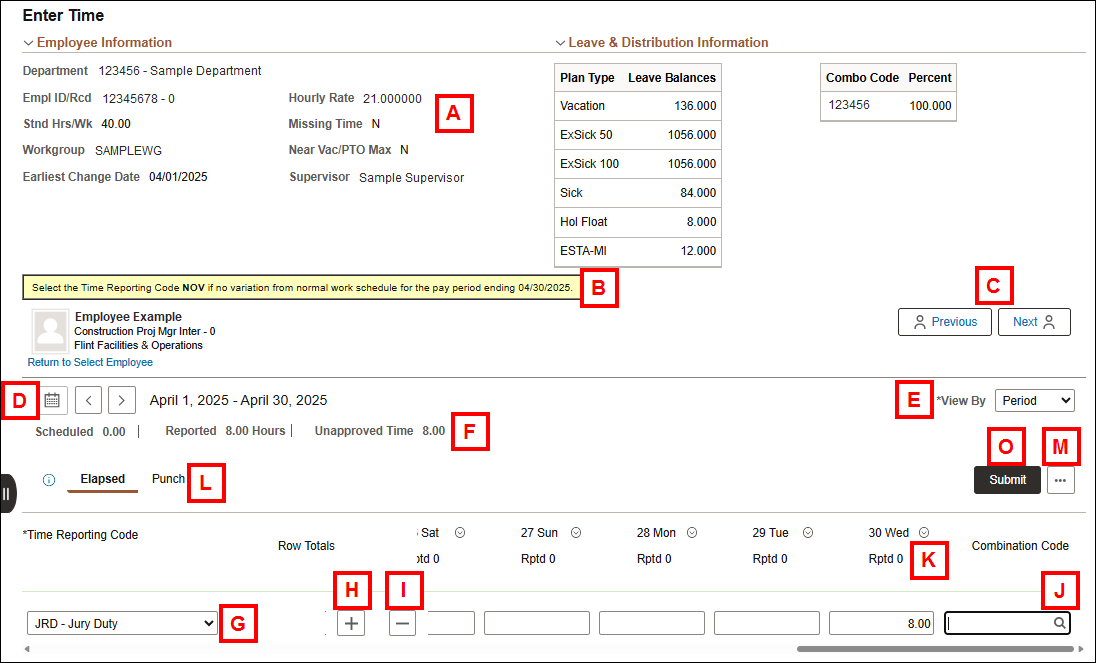
The primary time entry method for timekeepers is the Enter Time page. It opens to the current biweekly or monthly pay period, depending on the employee.
Note: The example shown here is of a monthly employee. A portion of the date fields have been cropped from this example to improve readability. Biweekly examples are shown on the following pages.

| Letter | Field/Button | Description |
|---|---|---|
| A | Employee Information Leave & Distribution Information |
Use the arrows to expand and collapse Employee Information and Leave & Distribution Information. |
| B | Select the Time Reporting Code NOV if no variation from normal work schedule | This displays only for monthly employees. The TRC can be selected to report no exceptions to the employee's regular schedule/hours. |
| C | Previous Employee and Next Employee | Use the buttons to change the page to the previous or next employee in the search results sequentially. |
| D | Previous Period and Next Period |
Use the arrows to navigate to different pay period or week. |
| E | View By | Use the drop-down menu change to Weekly.
|
| F | Scheduled and Reported | This displays both under the pay period and the week within the pay period.
|
| G | Time Reporting Code | This field includes a drop-down list that displays both the TRC and description. You can either:
|
| H | Add New Row | Use this button to add a row for an additional TRC and Combo Code, if required. |
| I | Delete Row | Use this button to delete a TRC row. |
| J | Combination Code | A six-digit value, which represents a Financials Chartfield combination. Also know previously as an Account Code or ShortCode. |
| K | Comments | Add comments, if applicable, for any date shown. Comments may be added to any date of reported time by clicking Related Actions and Add/View Comment. Comments added are permanently added to the employee's record in the system. |
| L | Elapsed/Punch | Toggle button to switch between Elapsed and Punch timesheets, if applicable. |
| M | ... (Action Changed Flag) | Use this button for additional timesheet actions (e.g., Save for Later, Print Timesheet). |
| N | Apply Schedule | If available, this button reports the employee's schedule assignment. It does not save the reported time. After clicking this button, make sure you to click the Submit button before exiting the page, or after making changes. Clicking Apply Schedule a second time clears any changes you may have made and reapplies the schedule. |
| O | Submit | Use this button to submit. |
Manage Approvals
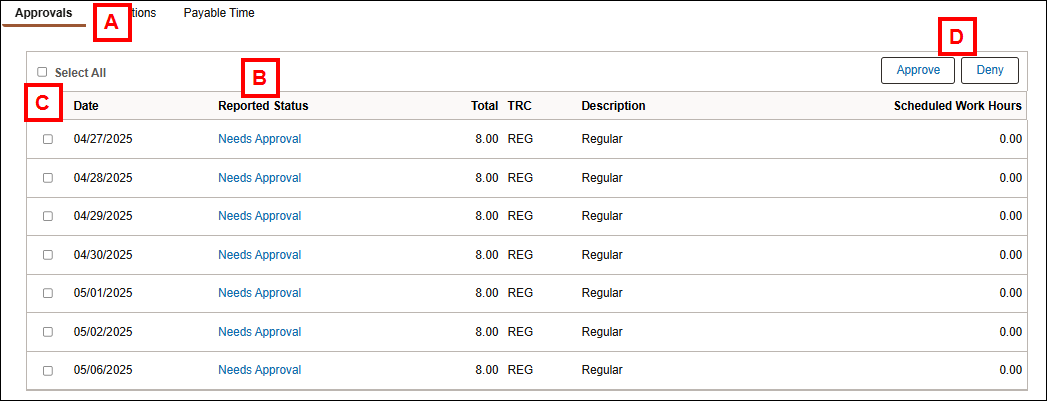
The information in the list is updated by clicking Submit after entering time, applying a schedule, or changing reported time.

| A | Manage Approvals | This list displays a row for each date and TRC combination that includes the:
|
| B | Reported Status | Click the link in the Reported Status column to open the Approval Monitor.
If applicable, click Multiple Approvers link to view the list of approvers. |
| C | Checkboxes | Click on the individual checkboxes to approve line-by-line or click the checkbox at the top of column to select all. |
| D | Approve/Deny | Use these buttons to either approve or deny the lines checked. |
Reported Time Period Summary

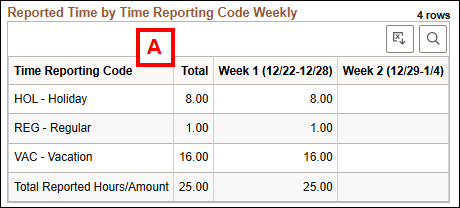
| A | Reported Time Period Summary | This list displays a row of information for each category of time. It includes total hours by week and pay period. |
Training and Support
Documentation is available in My LINC: