Important Information
- In general you will review, update (if applicable), and approve Reported Time.
- Reported Time must be approved by the 10:00 a.m. approver deadline.
- An employee's Reported Time must be approved, otherwise they may not be paid correctly.
- To correct an employee's Reported Time once it has been approved; change the reported time, submit it, and approve the updated Reported Time.
- There are a number of queries that may be helpful to you when reviewing Reported Time. These are described in detail in the Queries for Approvers document.
- The time approval deadlines for biweekly and monthly payrolls are posted in the Payroll Cutoffs/Deadlines section of the Payroll website at https://finance.umich.edu/finops/payroll/forms/cutoffsdeadlines.
Navigations
There are two ways to approve time in M-Pathways:
Time and Labor WorkCenter:
Homepage: Payroll or HRMS, Tile: Time and Labor WorkCenter > Approvals by Employee section (default start page)
Homepage: Payroll or HRMS, Tile: Time and Labor WorkCenter > Approvals section
Enter Time page - timesheet view
Homepage: Payroll or HRMS, Tile: Time & Labor WorkCenter > Enter Time
or
Homepage: Payroll or HRMS, Tile: Time Entry Pages > Enter Time
Step-by-Step Process
Approve Reported Time - Time and Labor WorkCenter
Two sections are available in the Time and Labor WorkCenter to approve time:
- Approvals by Employee - allows you to approve time by employee. Upon selecting this option, all time that needs to be approved displays to the right.
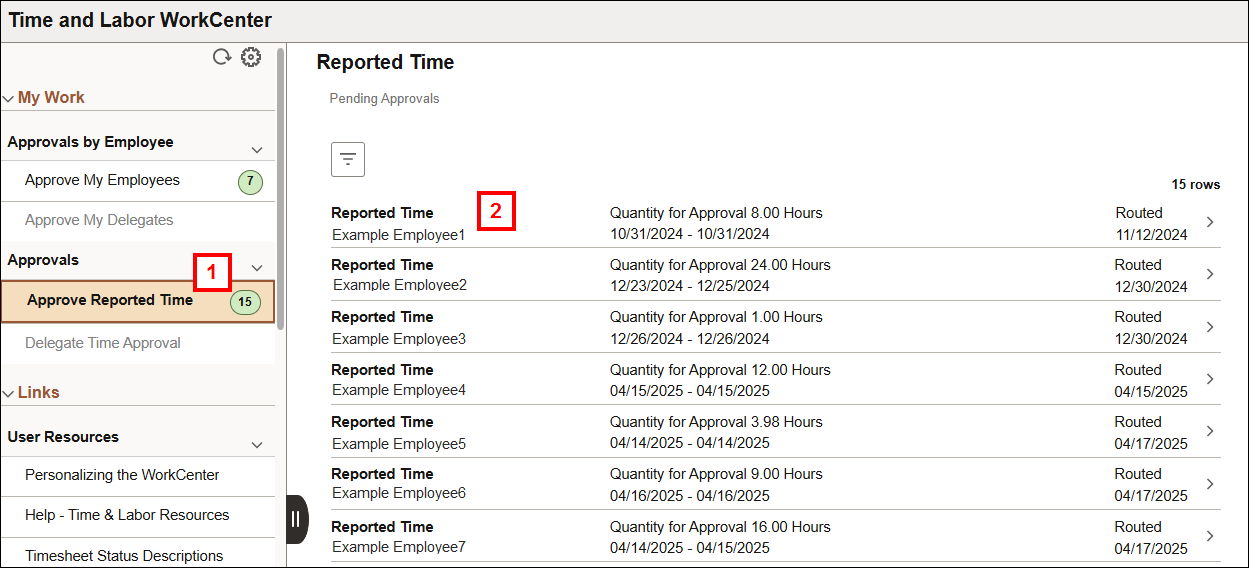
- Approvals - displays a line for each time the employee clicked 'Submit' on a timesheet (oldest first).
Approvals by Employee Section
- If you are a primary time approver, click Approve My Employees. OR
- Click on the line/employee to be approved.
- Review the employee's Enter Time page.
- The Enter Time page opens the oldest time period that has time that needs to be approved.
- Review the employee's Approvals section.
- Check the Select box for each approved row, or click Select All.
- If applicable, add Approver Comments.
- Click Approve.
- Click Yes to confirm the status change.
If you are a delegate time approver, click Approve My Delegates.
Approve Employee Reported Time Screenshot
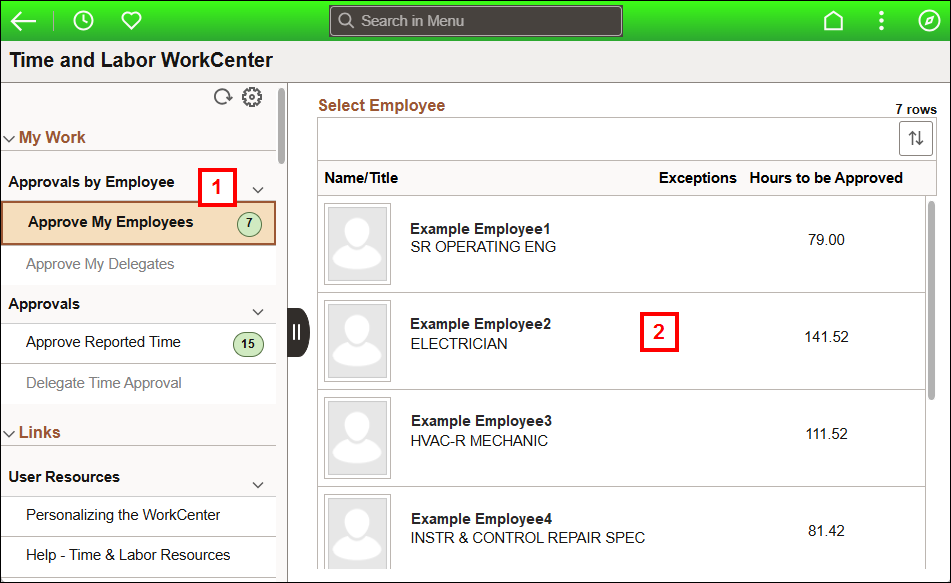
Employee Reported Time Screenshot
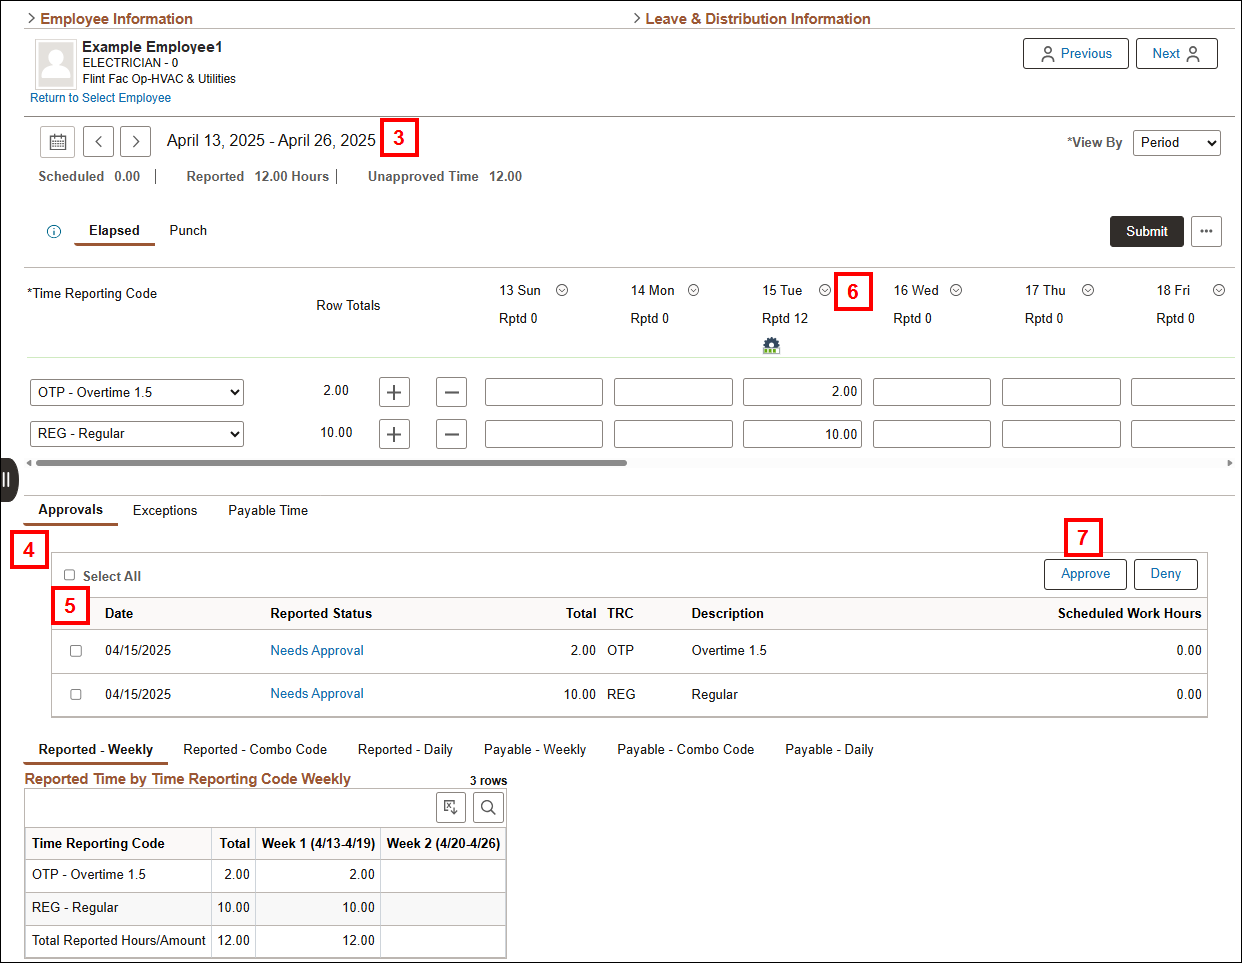
Approvals Section
- If you are a primary time approver, click Approve Reported Time. OR
- The Pending Approvals show based upon submit date/time not per employee (oldest first).
- Click on the line/employee to be approved.
- If an employee submitted their time multiple times, multiple rows appear.
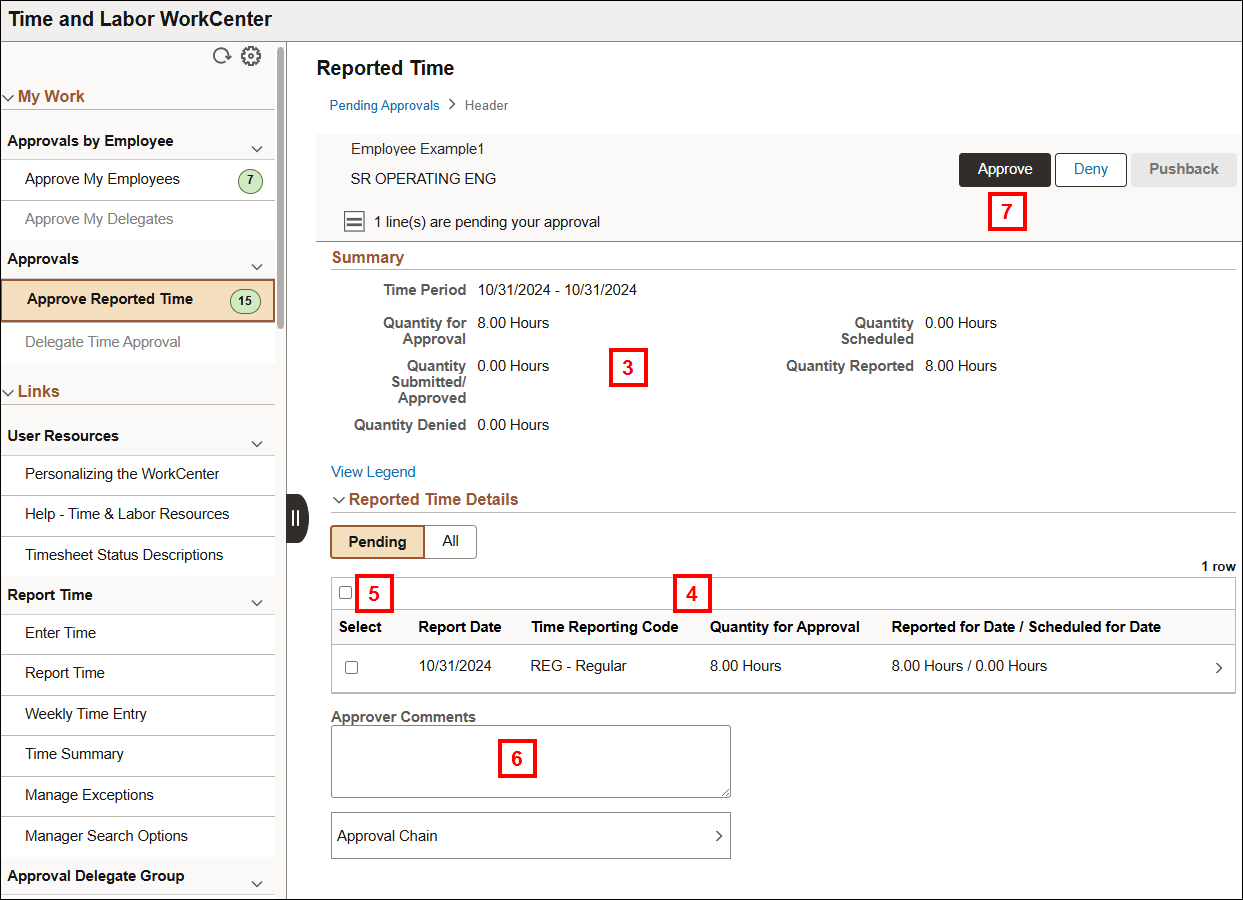
- Review the employee's Summary.
If you are a delegate time approver, click Delegate Time Approval.
Approve Reported Time Screenshot
- Review the employee's Reported Time Details section.
- Check the Select box for each approved row, or click Select All.
- If applicable, add Approver Comments.
- Click Approve.
- Click Yes to confirm the status change.
Approve Reported Time - Enter Time page
- Find employee/groups of employees.
- Filter allows you to enter specific filters (Time Reporter Group, Supervisor ID, Employee IDs, etc.) to retrieve employees when the Get Employees button is clicked. To skip this step, click Manage Search Options and enter your specific filters so you can skip Filter and click Get Employees to go directly to entering, reviewing and approving time.
- To sort the search results by Name,Title, Exceptions, or Hours to be Approved, click Sort. Otherwise, the system sorts the employees by submit date and time.
- Click the applicable line under the Name/Title column.
Notes:- Several rows may display for an employee. You may select any row with the correct Employee ID/Empl Record.
- For biweekly employees, the search automatically accesses the biweekly pay period that includes the search date.
- For monthly employees, the search automatically accesses the pay month that includes the search date.
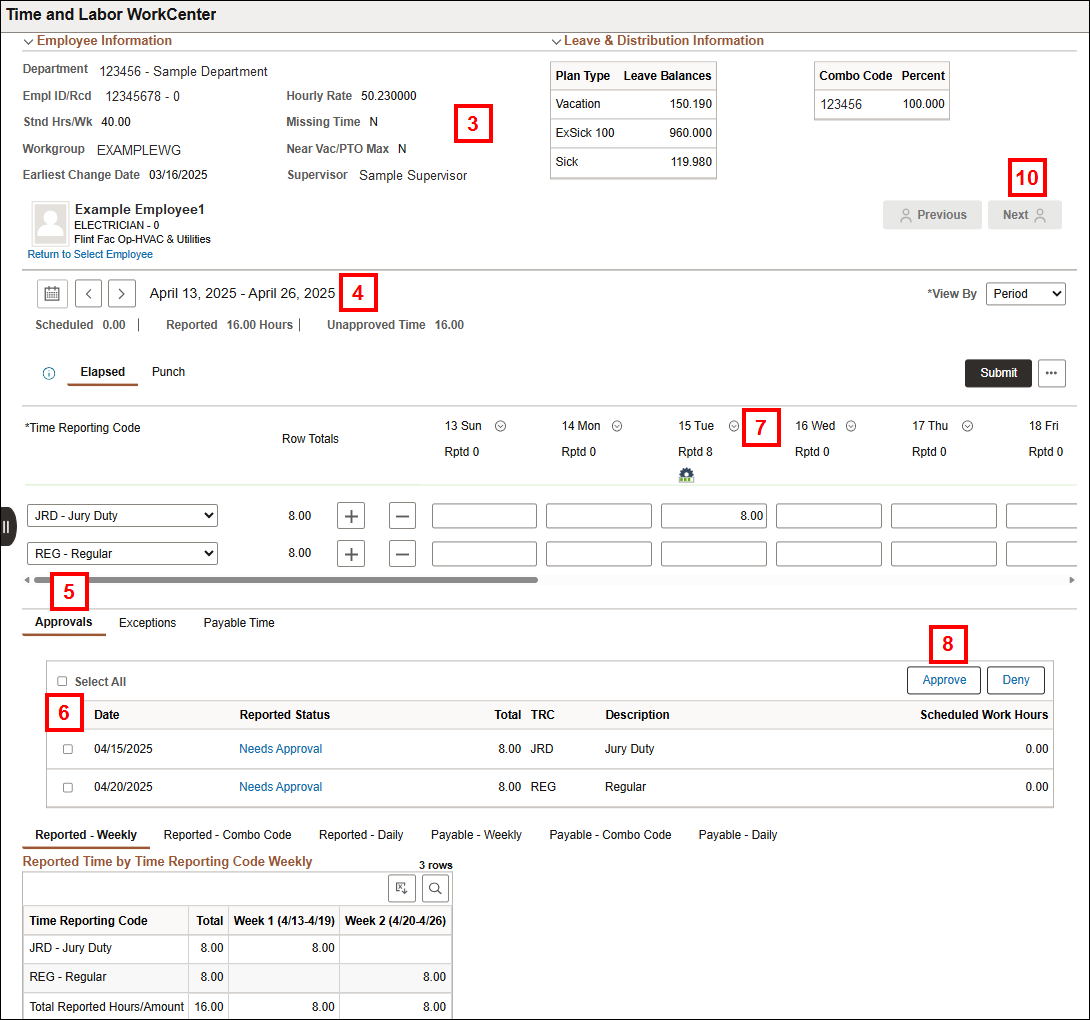
- Review the employee's information and leave and distribution information to ensure leave time is not over reported.
- By default, the current pay period/week displays upon entering the page.
- To change:
- Click the applicable Next or Previous arrows.
- Select Weekly in the View By field to view the page by week.
- Use the calendar to pick a date to display the week/period associated with that date.
- You can start the week view with any day of the week, select Weekly from the View By drop-down list and select the date from the calendar.
- To change:
- Review the Approvals section.
- Check the Select box for each approved row, or click Select All.
- If applicable, add Approver Comments.
- Click Approve.
- Click Yes to confirm the status change.
- If there are more employees who need your approval, click Next, or if applicable.
Edit or Correct Reported Time
If an employee's reported time needs to be corrected, contact the employee to do so or follow the steps below:
- To change hours or amounts, overwrite the existing value(s) with appropriate one(s).
- To change a Time Reporting Code (TRC):
- Click Add Row and enter the applicable values in the date and TRC fields for the correct TRC.
- Then click Delete Row to delete the row with the incorrect TRC.
- If applicable, click Yes - Delete on the Delete Confirmation page.
- This does not save the deletion; it only confirms that you want to delete the row. You will have to save the deletion using the Submit button on the page.
- For each additional TRC, click Add Row and enter the appropriate values in the date and TRC fields.
- Click Submit, and if appropriate, then approve the time.
Approval Workaround When Employees Report Time Into the Future
Reported time can be approved only by the individuals who were the Primary Time Approver or Delegate Time Approver(s) at the moment the employee reported the time.
When an employee reports time into the future, the employee may get a new approver or move to a unit that is not a self-service time entry department. In these cases, the time cannot be approved by the new approver or by the new department unless the following workaround steps are completed:
- Insert a new row(s) and re-enter the reported time.
- Delete the original row(s) of reported time and click Submit.
- Approve the time if the employee is still in a self-service time entry unit.
Time and Labor WorkCenter - Mobile
Approvals are available on a mobile device (i.e., phone). All other WorkCenter options are not available at this time. Approving employee time is similar to approving time using the Time and Labor WorkCenter on a desktop (shown above).
No App needed, simply open a web browser and proceed to Wolverine Access as usual.
- The number of approvals needed is listed in the Approvals section. The number displays based upon submit date/time not per employee.
Time and Labor WorkCenter - Mobile Screenshot
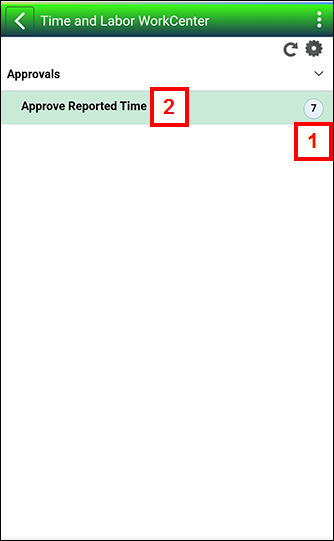
- Tap Approve Reported Time to start reviewing and approving time.