Overview
This procedure demonstrates how to update the Room Characteristics and associated contact information for a room in M-Pathways. As the Room Characteristics Maintainer for your unit, you are expected to promptly update the data for classrooms any time there is a change (or a classroom is added). Maintaining data for non-classrooms is optional, and can be done based on the needs of your unit.
Note: Room Characteristics are tracked for classrooms in order to facilitate departmental scheduling as well as the Shared Scheduling process conducted by the Registrar’s Office.
Refer to the Working with Room Characteristics document for additional information.
Important Information
It is strongly recommended you read the Working with Room Characteristics document before working with room characteristics. It contains detailed information about the reminders below.
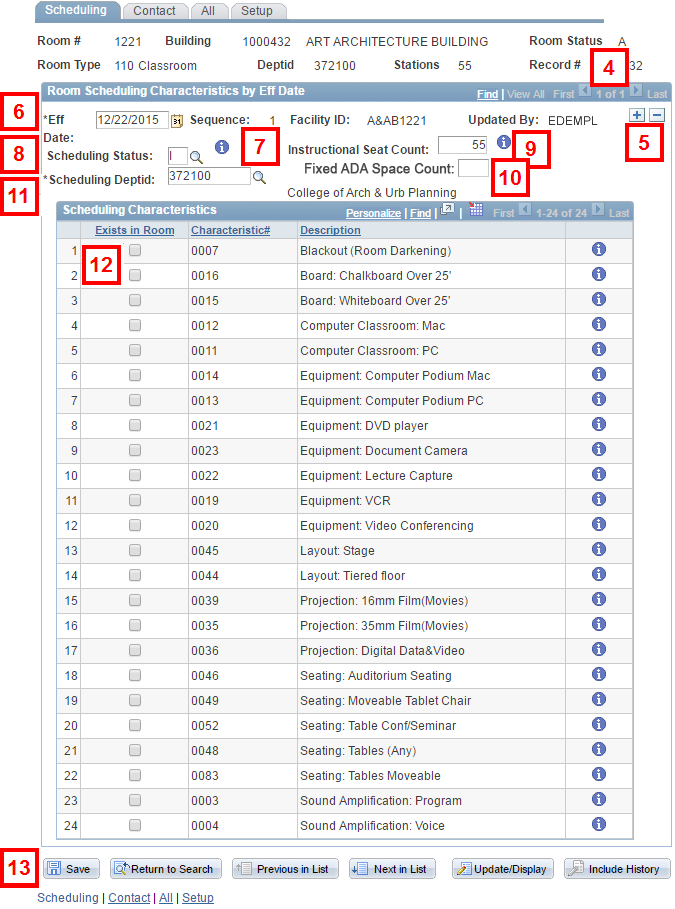
- Carefully review the value in the Effective Date field. Each set of characteristics is contained in an effective-dated record, with the latest effective-dated set being displayed when you first open the Scheduling or All pages.
- To ensure that sets of room characteristics are copied accurately to new effective-dated records, add a new effective-dated record from the correct record by clicking Add Row
 . The new record contains the same set of characteristics as the record from which you clicked Add Row
  . The effective date can be overwritten.
 - If multiple records exist with the same effective date, refer to the one with the highest effective sequence number (this record contains the most accurate data for the effective date).
- You may need to carry a change forward to any record(s) with a greater effective date.
- Updating non-scheduling characteristics for any rooms (on the All page) is optional.
Navigation
NavBar > Navigator > Space Management > Rooms > Room Characteristics
Step-by-Step Process
- (Optional) Enter additional search criteria.
- Set ID = UMICH
- Room Type = 110 (the room type for classrooms)
- Room Effective Status = Active
- Click Search.
- If the search data you entered in Step 1 is unique to a single room, the Scheduling page for that room displays. If the data you entered applies to more than one room, a Search Results list displays.
- The rooms you see in the Search Results list are based on your departmental security in M-Pathways.
- If applicable, click the Search Results row for the desired room.
- Verify the effective date of the record that displays, scroll to the appropriate record before adding a new record, if applicable.
- The system allows future-dated records, and the record that displays by default is the one with the greatest effective date.
- To scroll to other effective-dated records, click previous or next in the Room Scheduling Characteristics by Eff Date group box. To see all records at once, click View All.
- To add a new effective-dated record, click Add Row
 in the Room Scheduling Characteristics by Eff Date group box.
 - If applicable, overwrite the value in the Effective Date field.
- Note the value in the Sequence field.
- If applicable, change the value in the Scheduling Status field.
- If applicable, overwrite the value in the Instructional Seat Count field.
- If applicable, enter or overwrite the value in the Scheduling Deptid field with the DeptID for the department who has scheduling authority for this room.
- In the Scheduling Characteristics group box, check the Exists in Room box for each Scheduling Characteristic contained in this room. Uncheck any boxes for characteristics that are no longer present in the room.
- Click Save.
- If necessary, repeat steps 4-12 for any new records you need to add.
- Click the Contact tab.
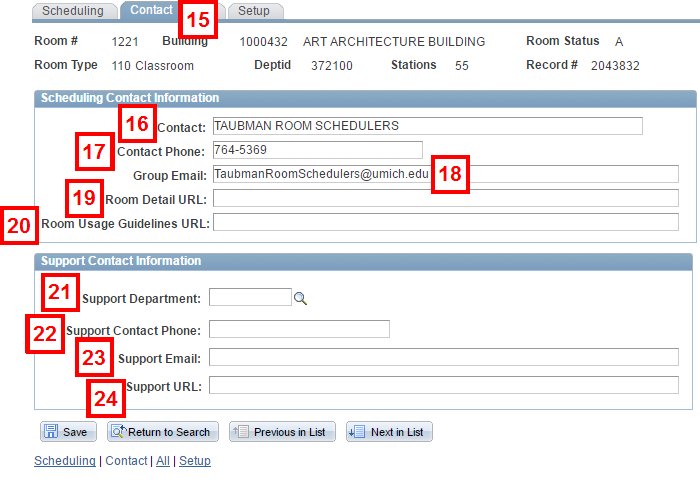
- Enter the name of the department responsible for scheduling the room in the Contact field.
- Enter the Contact Phone.
- Enter the group email address to which scheduling questions should be directed, in the Group Email field.
- It is strongly recommended you enter a group e-mail address rather than a personal e-mail address in the Group Email field on the Contact page. This is especially helpful during times of employee transitions.
- Group Email is required for all rooms with a Scheduling Status of A (Active) on any current or future rows.
- If available, enter a web address in the Room Detail URL field. The web page should provide additional details about the room.
- If available, enter a web address in the Room Usage Guidelines URL field.
- Enter or Lookup
 the Support Department.
 - Enter the Support Contact Phone.
- Enter the Support Email.
- If available, enter a web address that provides room support guidelines or information in the Support URL field.
- Click the All tab to track non-scheduling characteristics. Go to step 25.
OR
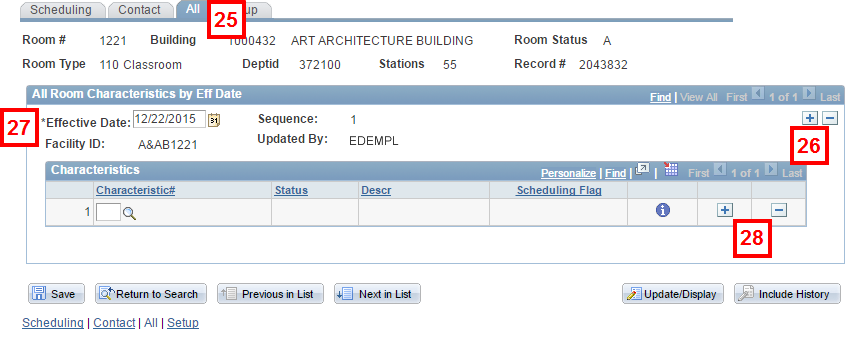
Click Save. Stop. - If applicable, scroll to the correct effective-dated record, and then click Add Row
 in the All Room Characteristics by Eff Date group box.
 - If you added a record in the previous step, overwrite the value in the Effective Date field, if applicable.
- To add a characteristic: Click Add Row
 from any of the rows in the Characteristics group box. Then, enter or Lookup
  the Characteristic#.
To remove a characteristic: Click Delete Row for the row to delete and then click OK in the confirmation box.
 - Repeat the previous three steps for any other rows you need to add on the All page.
- After you have made all of your additions or deletions, click Save.
Note: The fields that are populated by default will always display the following values. You can overwrite them if desired.
Notes:
Notes:

Note: If you have a room that did not previously have any characteristics assigned to it, the system populates this field with I (Inactive). If you want to use the system for class/event scheduling, change the value to A (Active).
Note: Instructional Seat Count is different than Station Count. For a definition, click the information button next to the Instructional Seat Count field.
Note: For an explanation of a particular characteristic, click the information button within the row to open the Review Explanation page. Click OK to return to the Scheduling page.
Note: Remember to carry any changes forward to future rows, as appropriate.
Note: Enter as much contact information as possible.

Notes:
Note: Include http://
or https://
in the web address.
Note: Include http://
or https://
in the web address.
Note: The Support Department is the department responsible for supporting the room (e.g., for audio-visual equipment assistance).
Note: It is strongly recommended you enter a group e-mail address rather than a personal e-mail address in the Support Email field on the Contact page. This is especially helpful during times of employee transitions.
Note: Include http://
or https://
in the web address.
Note: If you did not already add an effective-dated record on the Scheduling page, and you need to make a change on the All page, you can add the new record on this page. If you added a record on the Scheduling page, DO NOT add another one here.
