Overview
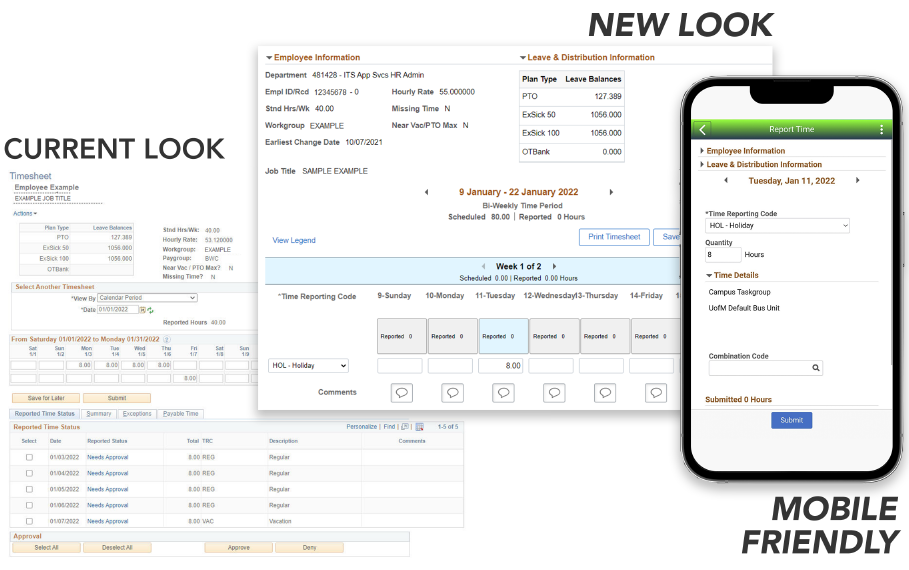
Time reporting for payroll in M-Pathways will have a new look and feel starting February 23, 2022. This upgrade will impact all employees who report, approve, or modify time in M-Pathways.
Information and Technology Services (ITS) is working with partners in schools, colleges, and across the university's three campuses and Michigan Medicine to roll out a new design and additional functionality to time reporting.
The upgrade will impact all employees who report, approve, or modify time. The upgrade will support a more mobile-friendly (no app needed) time reporting experience and ensure that the university maintains vendor support.
What will change?
- The Timesheet is no longer one page.
- New options have been added to report time.
- Your method of time reporting (Punch User, Web Clock, Biweekly/Monthly, etc) will determine which tiles you see.
- Your device (desktop, mobile etc.) will also determine which tiles you see.
- The Time and Labor WorkCenter has also been updated (this is primarily for managers and timekeepers).
- Personalized Homepage tiles or Favorites to the current Timesheet
What will not change?
- Processes and procedures
- Time reporting dates and pay cycles
- Time Reporting Codes (TRCs) and Static Groups
- Queries
This document is broken up into sections by time reporting role and approver type to help navigate the new look and feel.
Timekeeper/Approver/Supervisor/Manager
Presentation and system demonstration videos are listed below. The presentation videos include a recent presentation to campus, Q&A that occurred during the meeting, and a system demonstration. If you'd like to view just the system demonstration, click the appropriate link below the presentation video.
- Overview - New Time Reporting - presentation video
- Employee Self Service (Biweekly/Monthly) - New Fluid Time Reporting - presentation video
- Desktop/Laptop/Tablet - system demonstration
- Mobile - system demonstration
- Web Clock - New Fluid Time Reporting - system demonstration
- Time and Labor WorkCenter - Manager and Timekeepers - New Fluid Time Reporting - presentation video
- New Time Entry Pages tile - system demonstration
- Desktop/Laptop/Tablet - Time and Labor WorkCenter - system demonstration
- Mobile - Time and Labor WorkCenter - system demonstration
Employee Time Reporting
How do I choose a tile to report my time?
New tiles have been added after you click the Time Reporting tile on the Employee Self Service homepage. Availability of the tiles depends on your time reporting role and which device you are using.
Below is a guide to help you get started.
This describes me...
Use this tile...and Why? | |
I don't know where to start, I don’t like change, or I don’t like using my phone.
Enter Time | It’s the most similar to the current timesheet and only available on desktop/laptop/tablet. |
I like using my phone to do everything.
Weekly Time or Report Time | |
I need to report all of my time and it’s usually the same time week to week.
Weekly Time | |
I just need to report one day of time or a few days.
Report Time | |
I like seeing everything that I reported already for the time period.
Time Summary |
Multiple Jobs?
Employees with multiple jobs can select the appropriate job from the Select a Job drop-down menu and then click the Apply button. This is available on desktop, laptop, tablet, and mobile.

Employee Self Service - Time Reporting - (Biweekly/Monthly)
The following pages are available for Employee Self Service (Biweekly/Monthly) employees. They are broken up by device (i.e., Desktop/Laptop/Tablet vs. Mobile).Timesheet User
Desktop/Laptop/Tablet
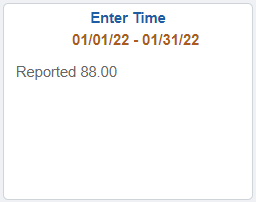
To get started, the Enter Time tile is the most similar to the current Timesheet.- Enter Time
Note:
- Totals display in the tile(s) only after time is submitted for the time period.
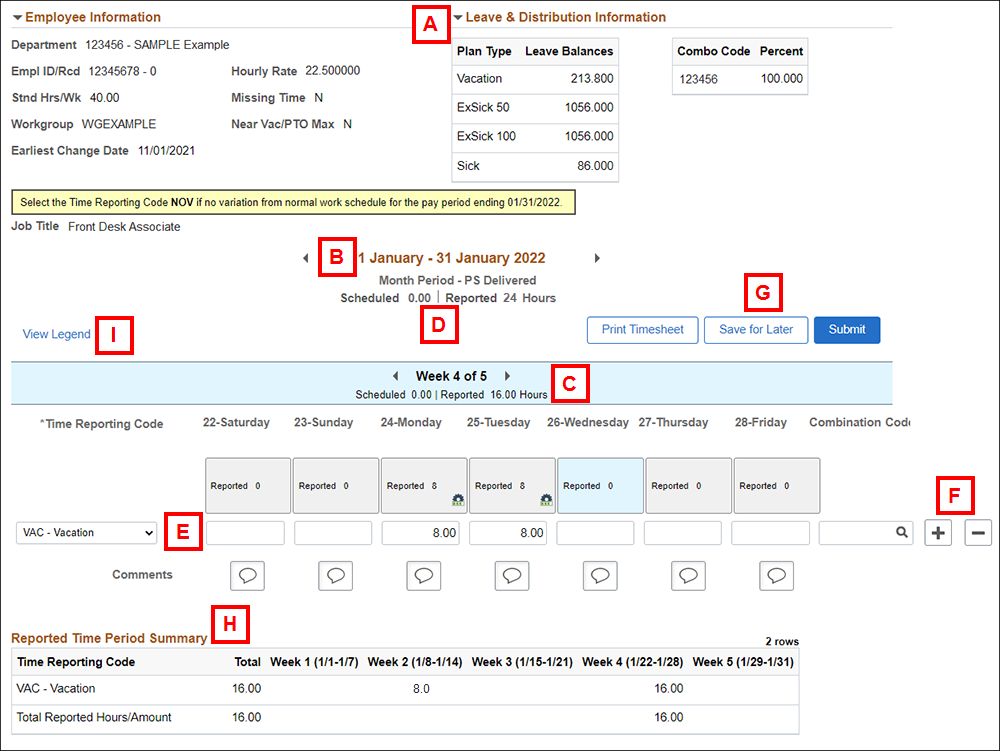
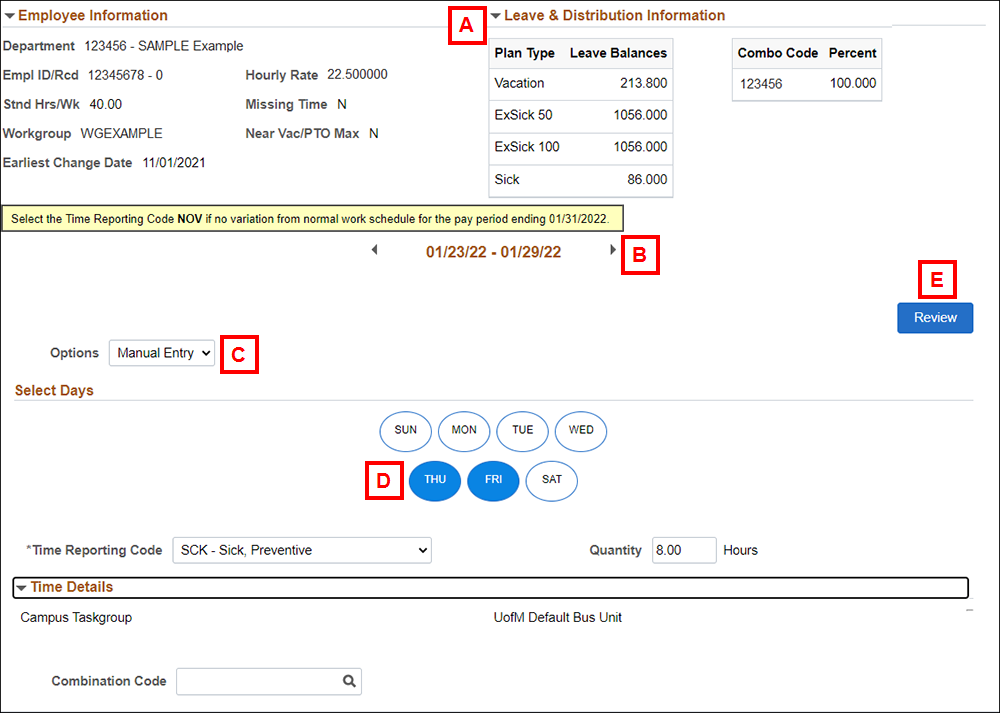
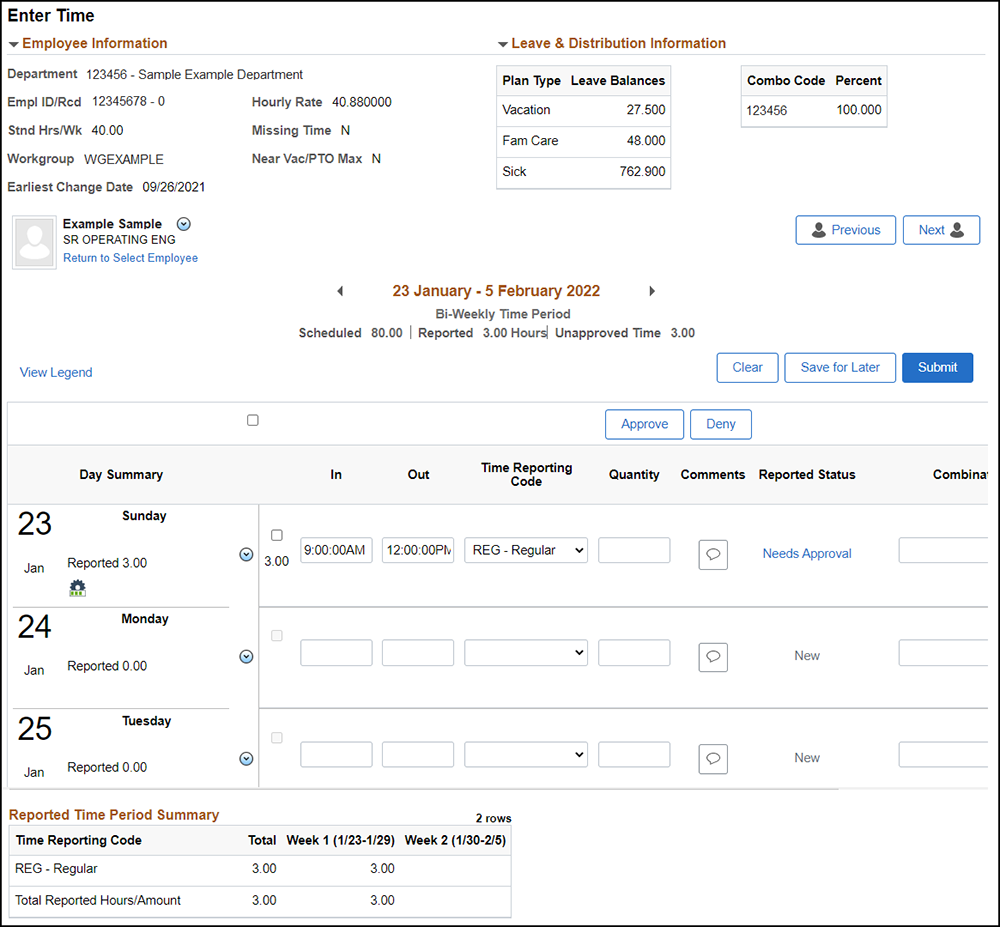
The Enter Time page is available for Employee Self Service (Biweekly/Monthly) employees on a desktop/laptop/tablet. The page has changed but the same rules and policies still apply, see Help: Report Time - Self Service Time Entry for more information (updates to this page still need to be completed).
A
Expand and collapse Employee Information and Leave & Distribution Information using the arrows. | |
B
Upon entering the page, the current pay period (biweekly/monthly) displays (in this example, 1 January -31 January 2022). Use the Previous Period and Next Period arrows next to the pay period to navigate to different pay periods. Click under the pay period field (in this example, 1 January -31 January 2022) to select a date from a calendar. Based on the date selected, the applicable pay period displays. | |
C
The Enter Time page displays by the week within the pay period listed above. Use the View Previous Week and View Next Week arrows to navigate different weeks within the pay period. Click on the week (in this example, Week 4 of 5) to select a different week within the pay period. Note: For Monthly time reporting, Week 1 is the first week of the month, not the calendar week. For example, Week 1 could be a Wednesday to Tuesday, December 1-7. For Biweekly time reporting, it will be Sunday to Saturday. | |
D
Scheduled and Reported time display both under the pay period and the week within the pay period.
| |
E
Select a Time Reporting Code at the beginning of each line. | |
F
Add a Row and Delete a Row are located at the end of each row (you may need to scroll right if using a desktop). | |
| G | Save for Later and Submit buttons have moved to the upper-right side of the page and work the same. Print Timesheet is now a button. |
| H | The Reported Time Period Summary section displays at the bottom. This section only appears after time has been entered and either the Save for Later or Submit button is clicked. |
| I | View Legend displays a list of possible icons and their descriptions. |
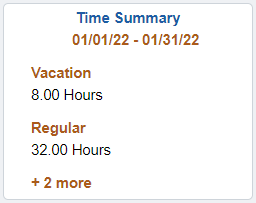
- Time Summary
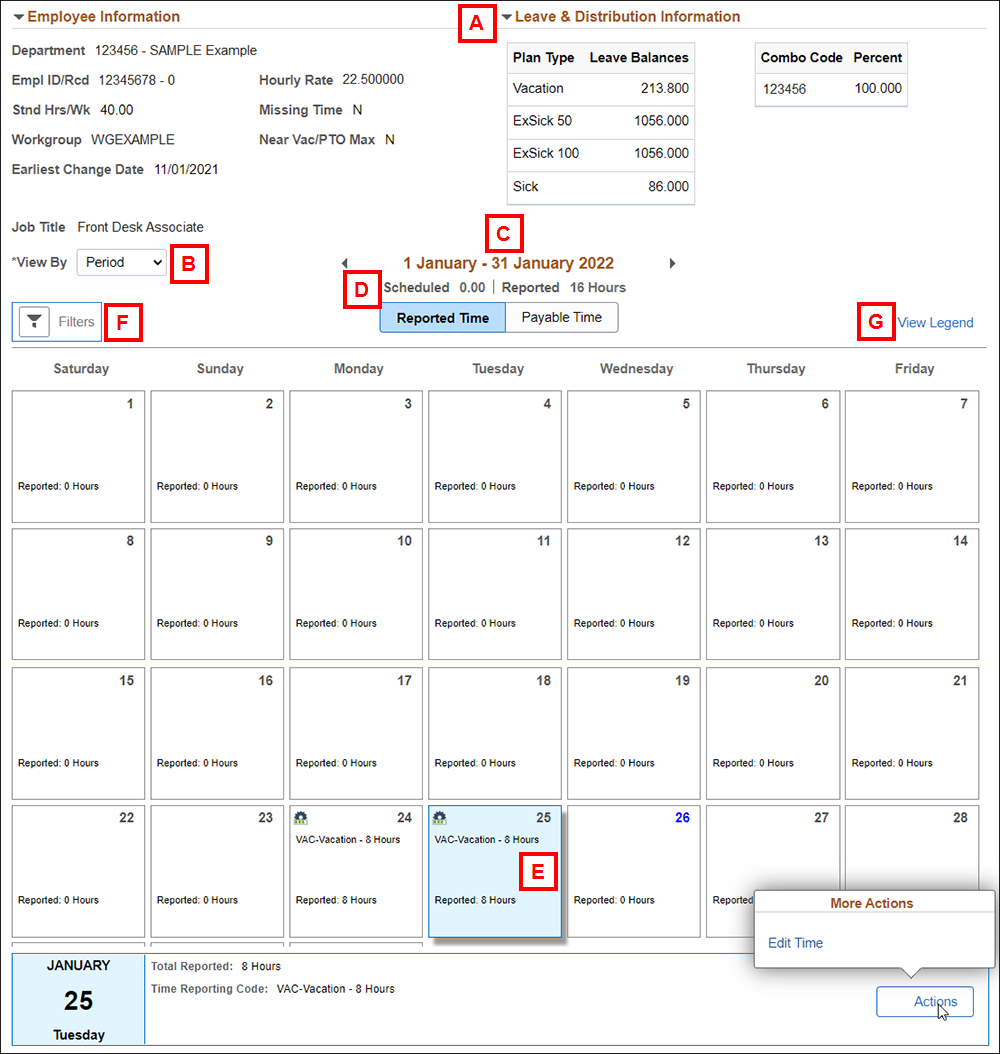
A
Expand and collapse Employee Information and Leave & Distribution Information using the arrows. | |
B
View By defaults to your pay period. You can select a different view using the drop-down list. | |
C
Upon entering the page, the current pay period (biweekly/monthly) displays (in this example, 1 January -31 January 2022). Use the Previous Period and Next Period arrows next to the pay period to navigate to different pay periods. Click under the pay period field (in this example, 1 January -31 January 2022) to select a date from a calendar. Based on the date selected, the applicable pay period displays. | |
D
The Scheduled and Reported time displays the total for the pay period (biweekly/monthly). | |
E
Click a specific date to view additional information on the time reported for the day in the box below. To change the reported time, click Actions. Depending on the time already reported, the Actions button allows you to Edit Time or View Exceptions. | |
F
The Filter button (top-left of the page) allows you to to filter based upon certain parameters (e.g., University Holidays, Time Reporting Code, Reported status etc.) | |
G
View Legend displays a list of possible icons and their descriptions. In this example, the green check mark means Approved. | |
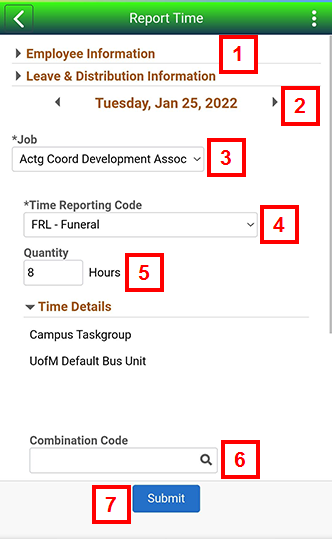
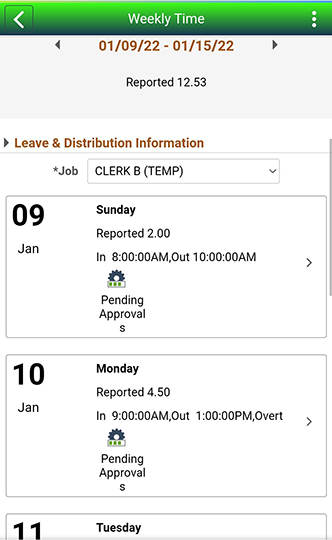
- Report Time
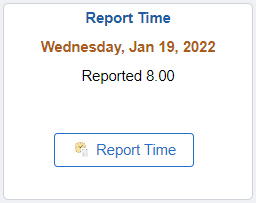
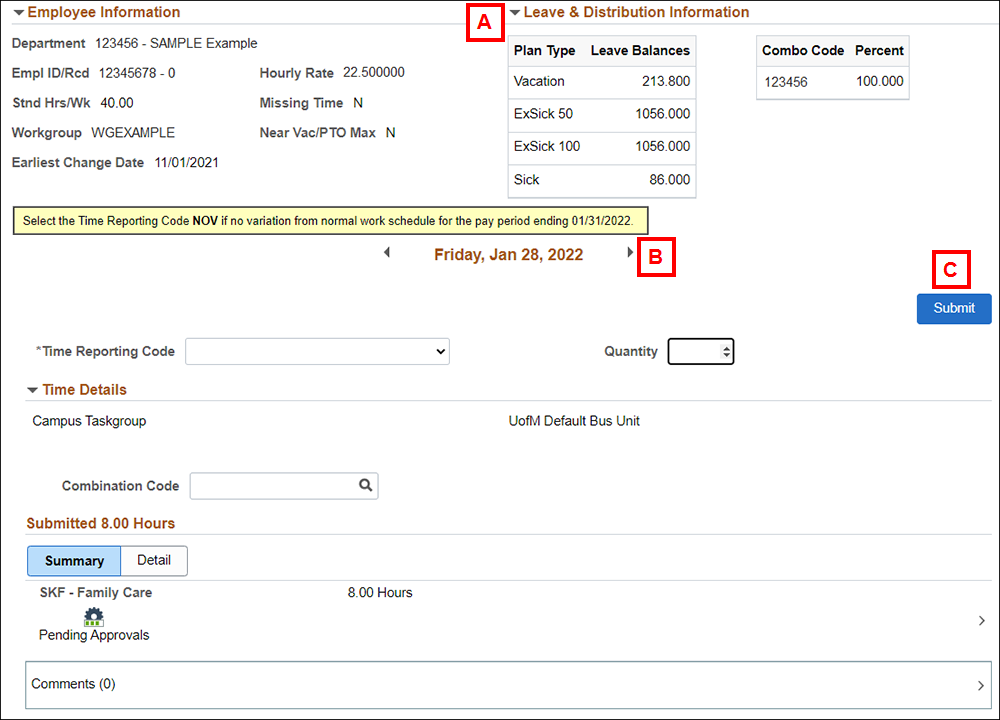
The Report Time page is used to report time for a specific date.
A
Expand and collapse Employee Information and Leave & Distribution Information using the arrows. | |
B
Displays the date. Use the Previous Date and Next Date arrows to navigate to other dates. Click on the date to select a date from a calendar. | |
C
When complete, click Submit. |
Notes:
- After the Submit button is clicked, the Summary and Detail buttons appear under Submitted X Hours with the applicable icon.
- To enter time for the same day with more than one Time Reporting Code (TRC), you must click Submit after selecting the Time Reporting Code and entering the Quantity for each TRC.
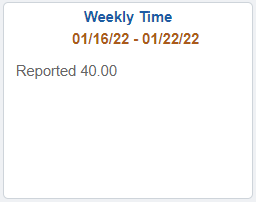
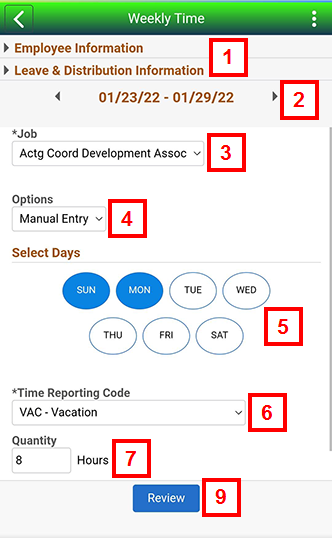
- Weekly Time
A
Expand and collapse Employee Information and Leave & Distribution Information using the arrows. | |
B
Upon entering the page, the current week of the pay period displays. Use the Previous Date and Next Date arrows next to the date to navigate to other weeks within the pay period. Click on the week (in this example 01/23/22-01/29/22) to select a date from a calendar. Based on the date selected, the applicable week displays. | |
C
The Options drop-down list allows you to Apply a Schedule, Copy from Previous Week, or Manual Entry. For example, if you are on vacation for two weeks, you can use Manual Entry for the first week and then Copy from Previous Week to populate the second week. Note: If time has already been entered for the week on any page, only Manual Entry is available. | |
D
Click the applicable day(s) button(s) (in this example Monday (MON) and TUE (Tuesday)), select the Time Reporting Code and enter the Quantity. | |
E
Click Review and then Submit (on next page) to complete. If Submit is not clicked, time reported on this page is not saved. |
Notes:
- To enter more than one Time Reporting Code (TRC) (e.g., VAC, SCK, etc) using the Weekly Time page, you must click Review and then Submit (next page) after reporting time for each code before entering additional days with a different time reporting code. Time entered but not reviewed and submitted will not be saved in the system.
- To make a comment, click Review and go to the selected day.
Mobile
No App needed, simply open a web browser and proceed to Wolverine Access as usual.- Report Time
 |
|
- Weekly Time
|
|
- Time Summary
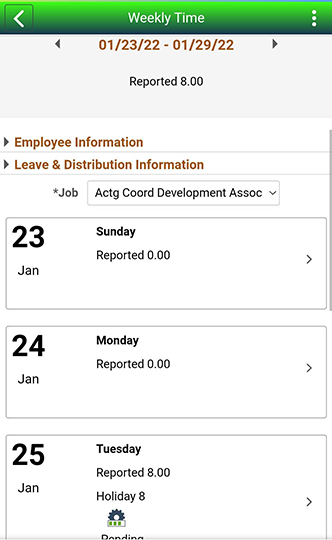
| This page is view-only but you can click on a date to view details. For more information, see Time Summary above. |
Punch Time User
Desktop/Laptop/Tablet
- Weekly Time

A
Expand and collapse Employee Information and Leave & Distribution Information using the arrows. | |
B
Upon entering the page, the current week of the pay period displays. Use the Previous Date and Next Date arrows next to the date to navigate to other weeks within the pay period. Click on the pay period field (in this example 12/26/21-01/01/22) to select a date from a calendar. Based on the date selected, the applicable week displays. |
Mobile
No App needed, simply open a web browser and proceed to Wolverine Access as usual.- Weekly Time
Weekly Time This page is view-only but you can click on a date to view details. For more information, see Weekly Time above. |
Web Clock User
Desktop/Laptop/Tablet - Only
- Report Time
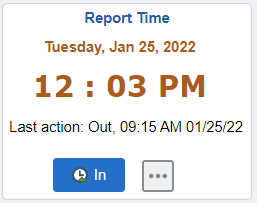
Notes:
- You can clock in or out by using the button displayed in the tile. In this example, the In button displays. You can also view the last action above the button.
- You can also click in or out and view the full site by clicking the ... button. The button takes you to the Report Time page displayed below.
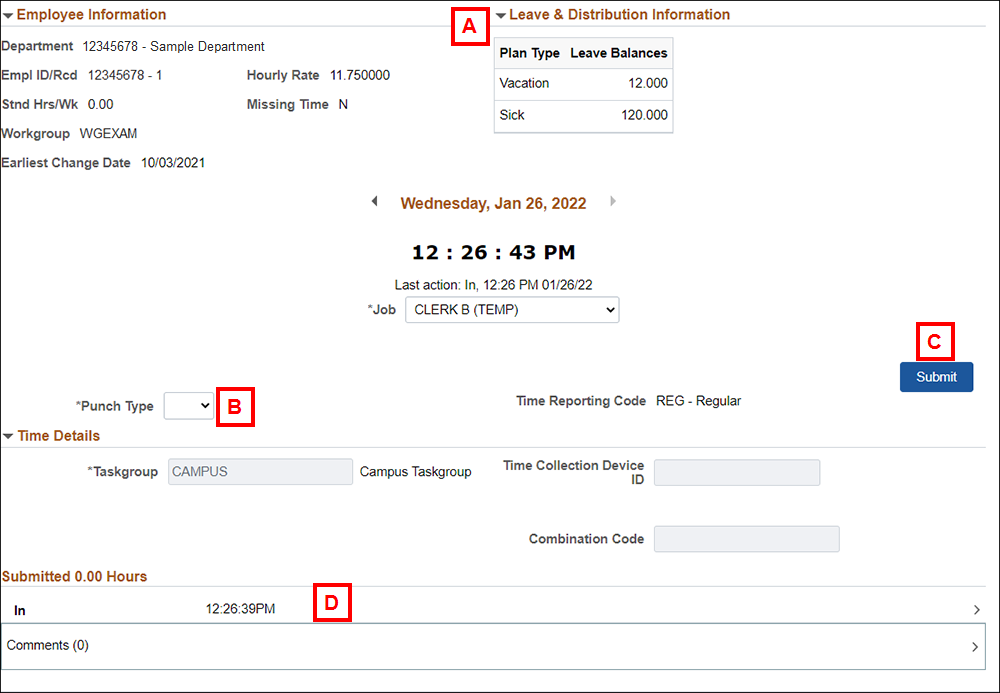
The Report Time page is used to report time for a specific date.
A
Expand and collapse Employee Information and Leave & Distribution Information using the arrows. | |
B
The Punch Type drop-down menu allows you to pick In or Out. | |
C
When complete, click Submit. | |
| D | Results of the Punch Type displays below after the Submit button is clicked. |
- Weekly Time
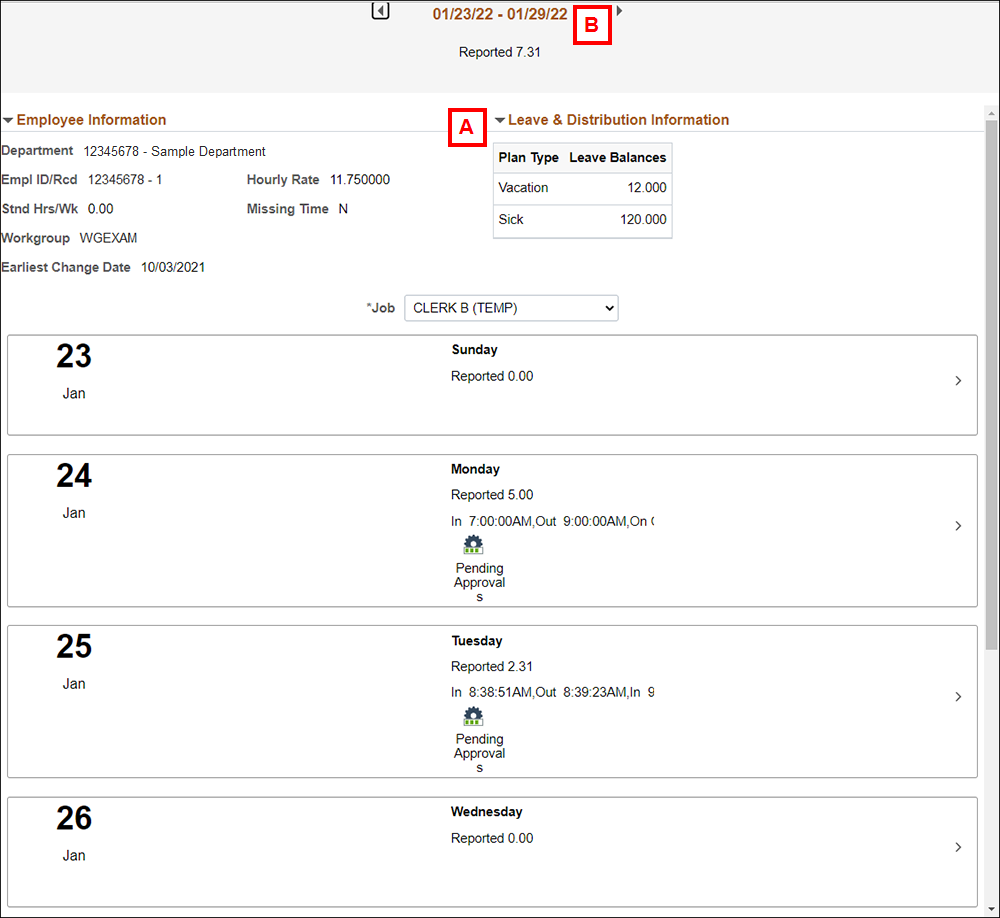
A
Expand and collapse Employee Information and Leave & Distribution Information using the arrows. | |
B
Upon entering the page, the current week of the pay period displays. Use the Previous Date and Next Date arrows next to the date to navigate to other weeks within the pay period. Click on the pay period field (in this example 01/23/22 - 01/29/22) to select a date from a calendar. Based on the date selected, the applicable week displays. |
Timekeeper/Approver/Supervisor/Manager - Approvals
Approvers who approve time for biweekly employees:
The change in the Approvals section may be significant to approvers who approve time for biweekly paid employees. If viewing the timesheet while approving is essential, you may find Enter Time under the Report Time section (in the Time and Labor WorkCenter) more efficient for the employees you need to approve. The same Enter Time page is also available in the new Time Entry Pages tile (described below).
Time Entry Pages Tile
A new tile named Time Entry Pages has been added to the Payroll and HRMS Homepages. This tile is a collection of the new pages listed above under Employee Self Service (Enter Time, Report Time, etc.) it also includes links to Manage Exceptions, Time and Labor WorkCenter and Manager Search Options.
The Time Entry Pages tile is specifically designed for users who enter, review, and approve time for employees at the university.
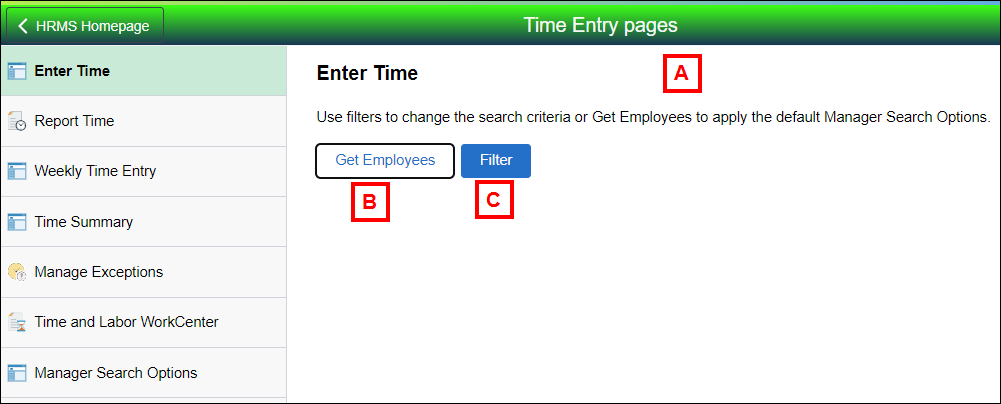
A
A new search page displays after you click Enter Time, Report Time, Weekly Time Entry or Time Summary (on the left). | |
B
Get Employees allows you to retrieve employees that are set up in your Manager Search Options. | |
| C | Filter allows you to enter specific filters (see below) to retrieve employees when the Get Employees button is clicked. To skip this step, click Manage Search Options and enter in your time reporting group, EmpIDs, etc. so you can skip Filter and click Get Employees to go directly to entering, reviewing and approving time. |
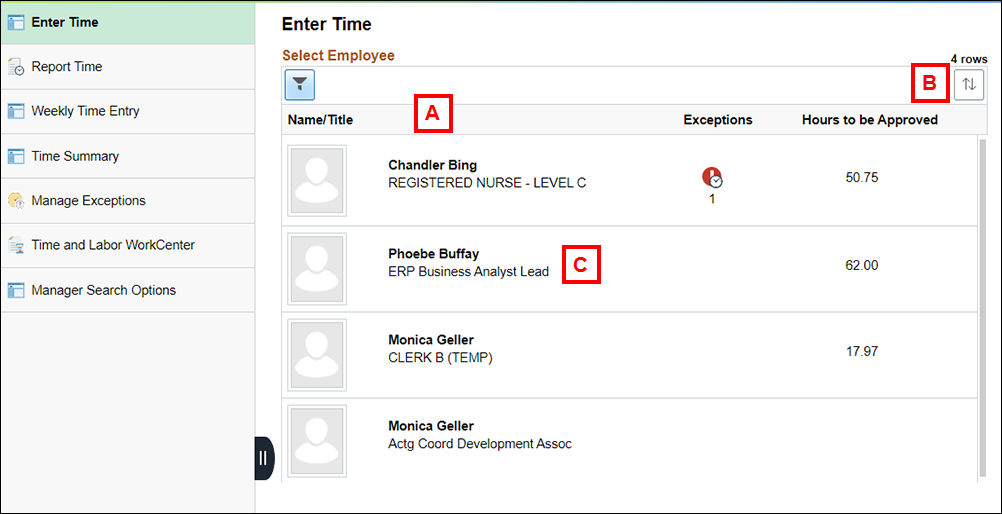
A
After the Get Employees button is clicked, employees display based upon your search options. | |
B
Use the Sort Select Employee button to pick an option to sort. Sort options include: Name, Title, Exceptions, Hours to be Approved. | |
| C | To review a specific employee, click on the applicable row. |
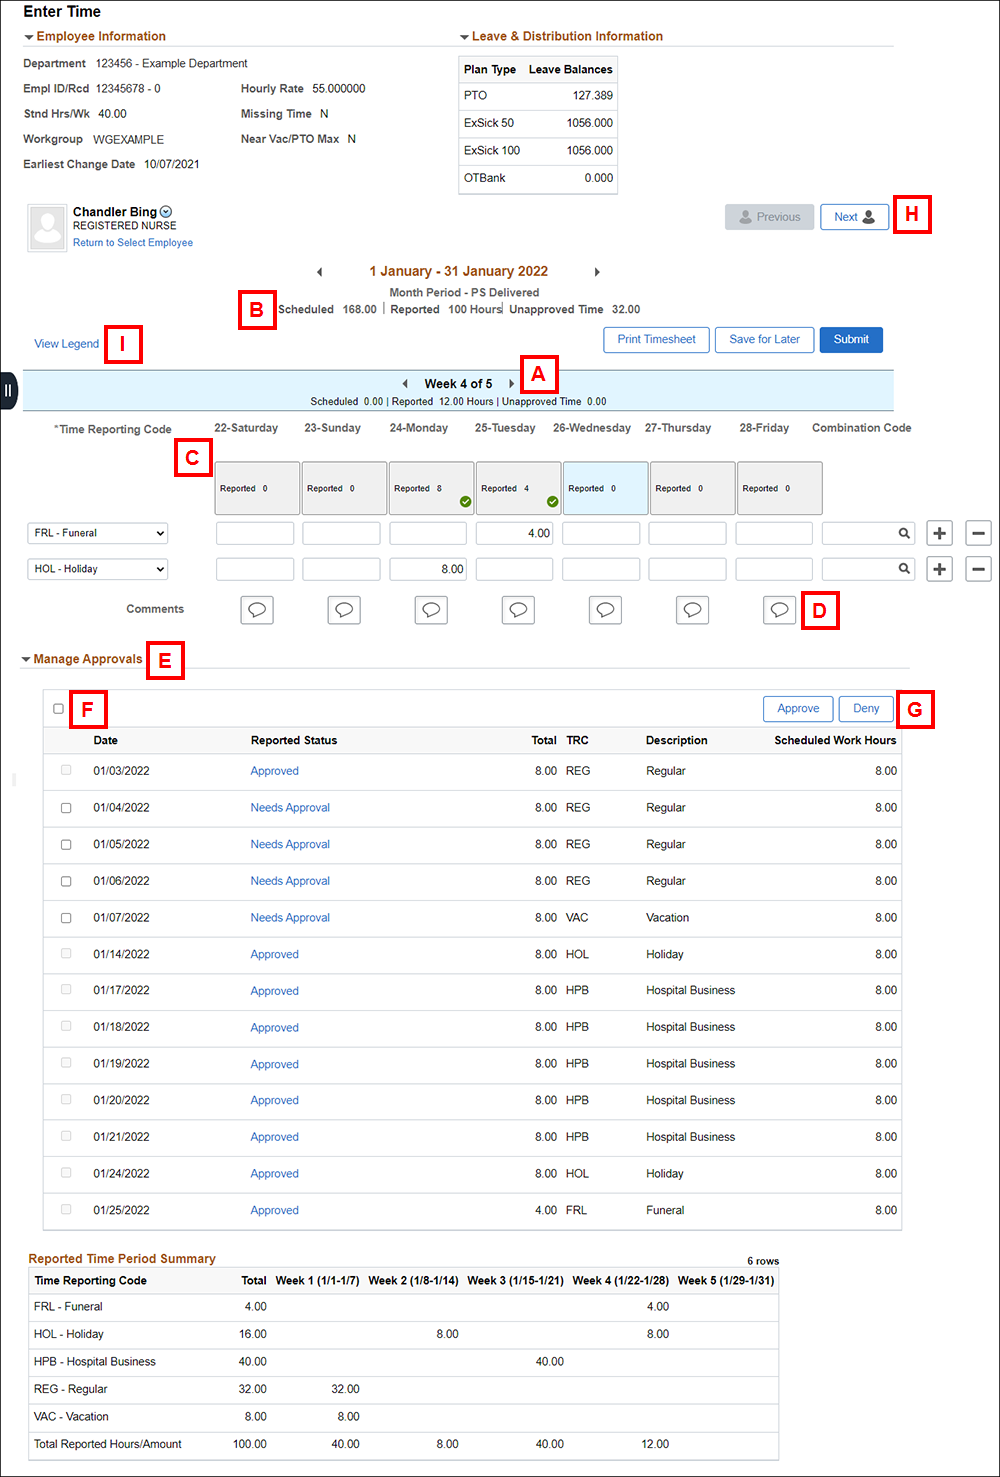
A
Upon entering the page, the current week of the pay period displays. | |
| B | Scheduled and Reported time display both under the pay period and the week within the pay period.
|
C
To enter or adjust time for an employee, select the correct week and enter time as usual (see Enter Time under Employee Self Service above for additional information). If you enter time for an employee on this page, the approvals rows will appear below, and you can manage your approvals. | |
| D | Approver Comments are available, if applicable. |
E
Under Manage Approvals, a list of all time reported for the pay period displays. | |
| F | To approve, click the applicable checkbox next to the row or to select all, click the checkbox at the top (the actual checkbox for select all does not have a label). |
| G | The Approve/Deny buttons are located in the upper-right. |
| H | Click Next or Previous to move to another employee in the list. |
| I | View Legend displays a list of possible icons and their descriptions. |
Punch Time and Web Clock Users - Enter Time
Time and Labor WorkCenter and Report Time
Notes:
- Approve time using the Approvals Section or Enter Time under the Report Time section.
- The rest of the Time and Labor WorkCenter page is unchanged.
- The Pending Approvals show based upon submit date/time not per employee.
Approvers who approve time for biweekly employees:
The change in the Approvals section may be significant to approvers who approve time for biweekly paid employees. If viewing the timesheet while approving is essential, you may find Enter Time under the Report Time section (in the Time and Labor WorkCenter) more efficient for the employees you need to approve. The same Enter Time page is also available in the new Time Entry Pages tile (described above).
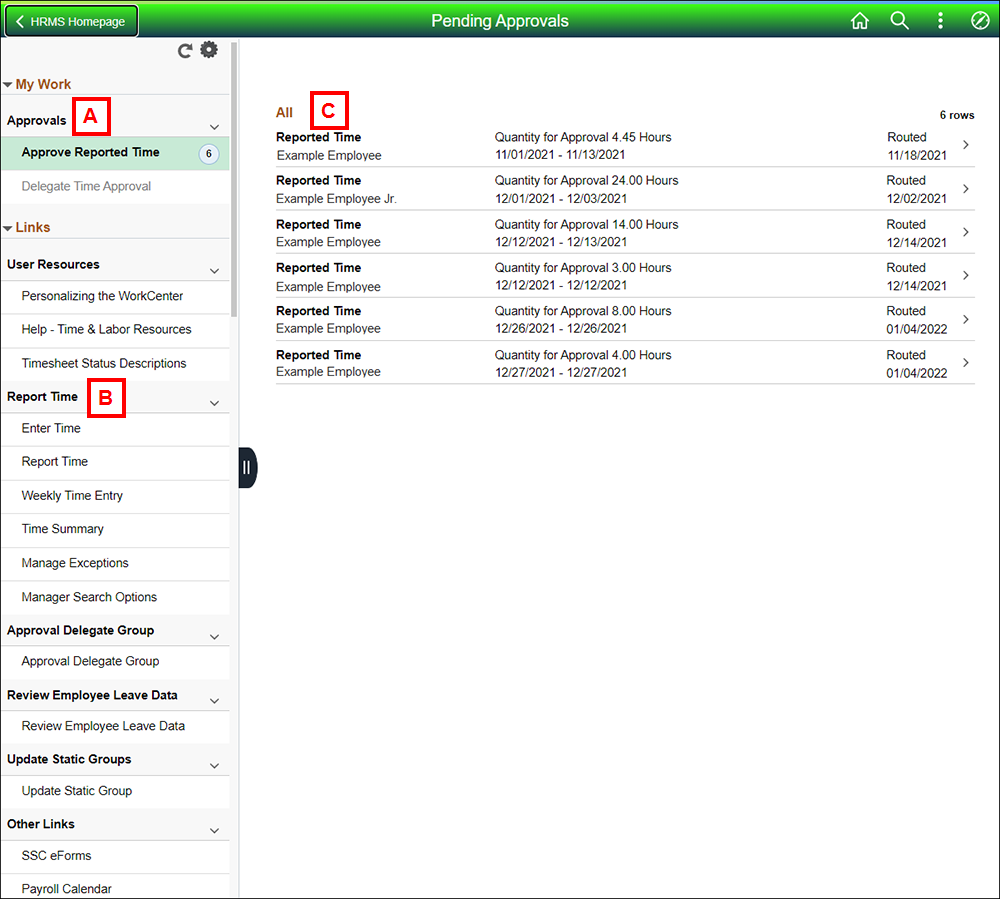
A
On the left, the Approvals section includes Approve Reported Time (employees for which you approve time) and Delegate Time Approval (employees for which you are a delegate and can approve time). | |
B
On the left, the Report Time section includes all of the new tiles available for time reporting (see above). In addition, Manage Exceptions and Manage Search Options are also available. | |
C
On the right, rows for approval review; in submitted order. Click on a line to get started. |
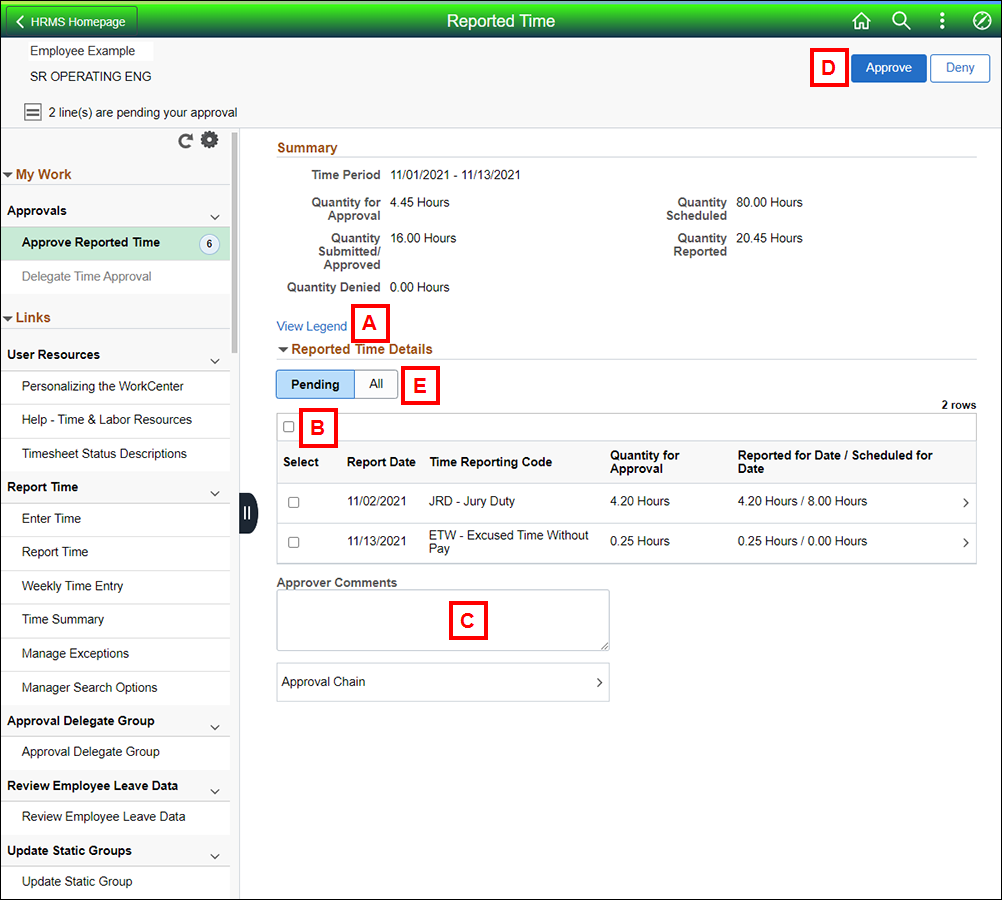
A
View Legend displays a list of possible icons and their descriptions. | |
B
To approve, click the applicable checkbox next to the row or to select all, click the checkbox at the top (the actual checkbox for select all does not have a label). | |
C
Approver Comments are available, if applicable. | |
| D | The Approve/Deny buttons are located in the upper-right. |
| E | Reported time for the pay period can be viewed by Pending or All. |
WorkCenter - Mobile
No App needed, simply open a web browser and proceed to Wolverine Access as usual.Approvals are now available on a mobile device. All other WorkCenter options are still not available at this time. Approving employee time is similar to above.
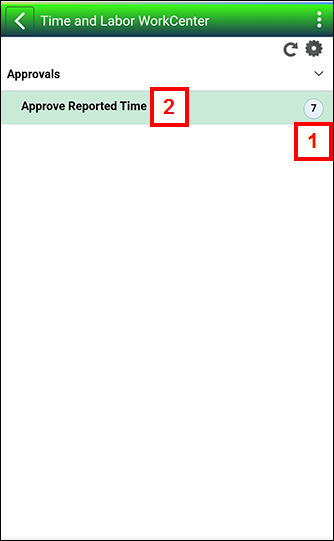 | Approvals
For more information, see the Desktop/Laptop/Tablet section of Time and Labor WorkCenter above. |