Overview
Important Information
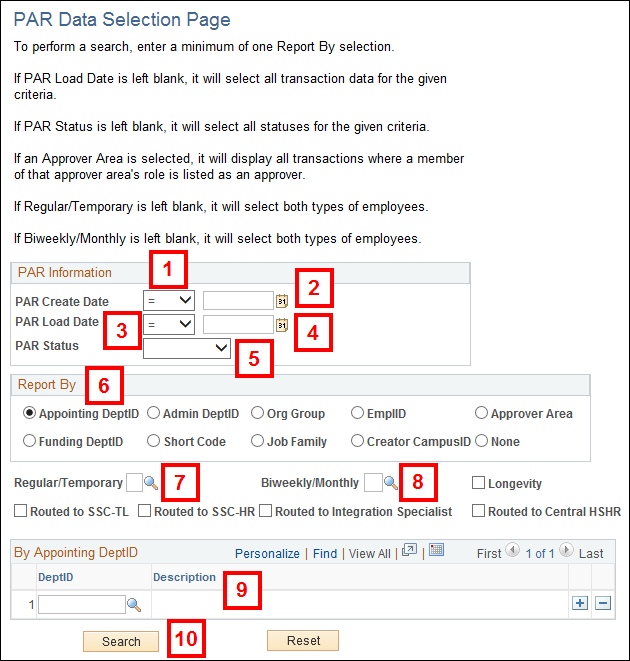
- The PAR Data Selection page is used to view information and track transactions. For example, in the report results, the Pending Approver displays for transactions with a Pending status. This includes the SSC Approval Group, if applicable.
- To perform a search for a PAR Transaction, enter a minimum of one of the following: Appointing DeptID, Admin DeptID, Org Group, EmplID, Approver Area, Funding DeptID, Shortcode, Job Family, Creator Campus ID or None.
- To perform a search for RIF Notification, enter a minimum of one of the following: Appointing DeptID, Admin DeptID, Org Group, EmplID, Creator CampusID, Approver Area or None.
Navigation
Homepage: Workforce Administration; Tile: Personnel Action Request > PAR Transaction Data Selection
NavBar > Navigator > Workforce Administration > Job Information > Personnel Action Request (PAR) > PAR Transaction Data Selection
Step-by-Step Process
- Accept the default of = (Equal To) or select a value from the Lookup
 in the PAR Create Date field.
 - Enter or select a date in the PAR Create Date field.
- Accept the default of = (Equal To) or select a value from the Lookup in the PAR Load Date field.
- Enter or select a date in the PAR Load Date field.
- Select the applicable PAR Status.
- Turn on the desired Report By radio button.
- There are ten Report By options. Not all options are available for each transaction type. The default selection is Appointing DeptID.
- PAR Create Date or PAR Load Date is required when None is selected in the Report By group box.
- Enter or Lookup a value in the Regular/Temporary field.
- Enter or Lookup a value in the Biweekly/Monthly field.
- If the field is left blank, both Biweekly and Monthly paid employees are included.
- Longevity checkbox is only used by Central Office.
- If Routed to checkboxes are turned on, results returned in the report reflect transactions that have been routed to the respective office. It does not mean the transaction is currently pending with the respective office.
- Based on the selection in Step 6, enter applicable values in the required field(s).
- Click Search.
- Click
 to download grid information to Microsoft Excel.
 - If applicable, click Find PAR to view more detailed information about the transaction.
Note: If the PAR Create Date is left blank, all transactions for the given criteria are included.
Note: The PAR Load Date is the date of the final approval and when the changes were posted to the employee’s record.
Note: If the Load Date is left blank, all transactions for the given criteria are included.
Note: If a PAR Status is not selected, all statuses for the given criteria are included.
Notes:
Note: If the field is left blank, both Regular and Temporary employees are included.
Notes:
Note: To add another value click Add Row  .
.

Note: See Download Grid Data to Excel – Step-by-Step Procedure for further information.
Note: The Summary tab displays high level information about the transaction. To view the transaction type, click the Transactions tab.