Overview
There are 2 parts to creating a PAR (Personnel Action Request):
Part 1: Create a PAR: The first steps that all PAR transactions begin with.
Part 2: Individual PAR Transaction Type: Steps vary by the type of PAR transaction being created.
This procedure is Part 2. It outlines the steps for completing a PAR: Reclassification, Transfer, or Promotion.
If you are making changes to multiple employee records or PAR transactions, see the Navigate Between Multiple Employee Records/PAR (Personnel Action Request) Transactions step-by-step procedure for more information.
Important Information
- This procedure includes a DBE change. The Is there a change to the Department, Effort or Funding? checkbox was selected on the PAR launchpad.
- Enter the Effective Date before any other fields. Many fields populate based on the Effective Date. Errors may occur (blank fields, etc.) if such fields as Job Code or Department are populated before the Effective Date.
- Prior to clicking the DBE link, the Department and Effective Date fields must be entered. When the DBE page is opened, the Department and Effective Date fields are set based on this entry and cannot be changed.
- Not all fields will be open/editable for Temporary appointments.
Navigation
This step-by-step procedure begins on the PAR Details Page within an existing PAR transaction.
Step-by-Step Process
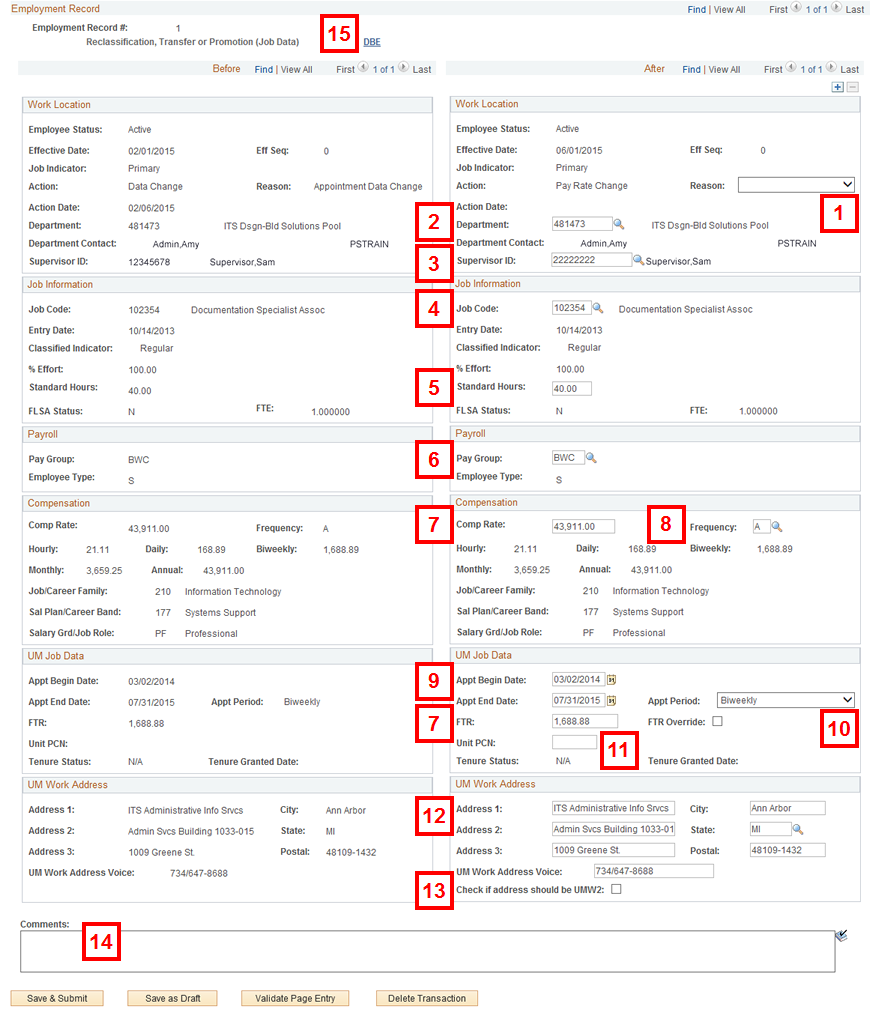
- Select a value from the Reason drop-down list.
- The PAR Details page is split into two columns. The left column displays the employee record Before changes. The right column displays the employee record After changes.
- Reason defaults for Tempoary appointments and cannot be changed.
- If applicable, enter or Lookup
 a new value in the Department field.
 - If applicable, enter or Lookup a new value in the Supervisor ID field.
- If applicable, enter or Lookup a new value in the Job Code field.
- If applicable, enter a new value in the Standard Hours field and then press tab.
- After pressing tab, the Comp Rate field automatically updates.
- Standard Hours are always zero Tempoary appointments.
- If applicable, enter or Lookup a new value in the Pay Group field.
- If applicable, enter a new value in the Comp Rate field and then press Tab.
OR
Enter a value in the FTR field and then press Tab. - Pressing tab automatically updates the other field.
- If you check the FTR Override box, you must enter the FTR field manually.
- FTR not applicable to Temporary appointments.
- If applicable, enter or Lookup a new value in the Frequency field.
- If applicable, enter or select new values in the Appt Begin Date and Appt End Date fields.
- If applicable, select a new value from the Appt Period drop-down list.
- If applicable, enter the Unit PCN.
- Update applicable fields in the UM Work Address group box.
- Address 1, Address 2, City, State, and Postal are required fields.
- If the UM Work Address Voice field is blanked out, then the existing work phone number will be deleted at the time of final approval.
- If applicable, check the Check if address should be UMW2 box to create or update the UM Work (Second) address and phone number.
- If applicable, enter Comments.
PAR Details Page - Reclassification, Transfer or Promotion Screenshot
Notes:
Notes:
Notes:
Notes:
Note: If this box is not checked, the UMW1 - UM Work (First) address and phone number will be updated.
Note: Complete steps 15-25 only if adding a DBE Change to the transaction. Otherwise, go to step 26.
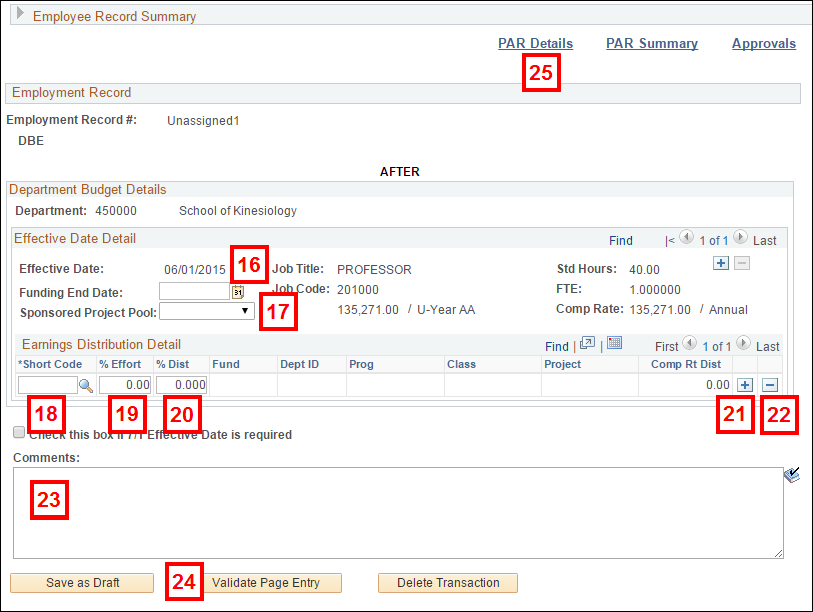
- Click DBE.
- If applicable, enter or select the Funding End Date.
- If applicable, select a value from the Sponsored Project Pool drop-down list.
- Enter or lookup the Short Code.
- Enter the %Effort.
- The sum of the %Effort field(s) must directly correlate to the standard hours in Job Data.
- %Effort = Standard Hours/40 x100.
- Enter the %Dist if different from the %Effort.
- To add a new Short Code, click Add row
 in the Earnings Distribution Detail group box and enter the new Short Code, %Effort, and %Dist.
 - To remove a Short Code row, click Delete
 in the Earnings Distribution Detail group box.
 - Enter Comments.
- Click Validate Page Entry.
- Click PAR Details.
- Complete the PAR:
Note: Adding a Funding End Date does not stop pay. The DBE details indicate the distribution of effort and compensation rate across shortcodes. The Payroll Status on Job Data indicates the beginning and ending of pay allocated to these shortcodes.
Notes:
Note: The sum of the %Dist field(s) across all short code rows must equal 100%.
Conclusion
This concludes the steps for completing a PAR: Reclassification, Transfer, or Promotion. If you would like to begin a new transaction, see the Create a PAR step-by-step procedure.