Overview
There are 2 parts to creating a PAR (Personnel Action Request):
Part 1: Create a PAR: The first steps that all PAR transactions begin with.
Part 2: Individual PAR Transaction Type: Steps vary by the type of PAR transaction being created.
This procedure is Part 2. It outlines the steps for completing a PAR: Process Unpaid Leave of Absence.
Important Information
- Before beginning this step-by-step procedure ensure you have collected the following information:
- Type of leave
- Begin date
- End date
- Required approvers
- Supporting documentation, if required
- See the Leaves of Absence Toolkit for more information.
- If the employee has multiple appointments with different final approvers, coordinate with the final approvers before beginning this transaction. See the PAR Final Approvers for Job Updates worksheet located in the HRRIS Job Aids for more information.
- For the following unpaid leave types, indicate if the leave is related to a birth or adoption and provide the birth or adoption date, if known.
- Childcare
- FMLA
- Family Care
- MNA Childcare Extended Benefit
- MNA Pers/Med Extended Benefit
- Personal Medical
- Personal Medical/Childcare
- For the following unpaid leave types, only the Empl Rcd# selected will be updated:
- Educational
- Personal
- Seasonal
- When Save & Submit is selected for this transaction, two approval groups are automatically added to the end of the approval workflow:
- The SSC TL Approval Group consists of representatives responsible for verifying the start date of an unpaid leave of absence when appropriate for regular staff who report time.
- If the employee does not report time or the start date is verified against leave balances, a member of the group approves the start date submitted.
- If the start date is not correct, a member of the group adds to the Comments field and denies the transaction. The denied transaction is sent back to the Creator for modification and resubmission, if appropriate.
- The SSC HR Approval Group consists of representatives responsible for verifying the unpaid leave type aligns with the type of appointment. The SSC HR Approval Group is the last approver.
- Upon last approval, M-Pathways updates the employee’s appointment information as follows:
- Updates the Additional Pay, Job, DBE, and Person Modifier rows to align with the type of leave, begin date, and end date.
- Allows another type of PAR transaction to take place for the employee, as needed.
- Employees with current Additional Pay are processed with the following parameters:
- Processed timely (today’s date < payroll confirm date in which the leave date falls in):
- If the End Date is open ended or has an End Date greater than today’s date, and the Additional Pay Effective Date is before today’s date, then the Earnings End Date is updated to the last day of the pay period prior to the leave date.
- If the Effective Date of the Additional Pay is after the month the employee is on leave, the Additional Pay row is deleted.
- If the Effective Date of the Additional Pay is after today’s date, then the Earnings End Date is updated to the end of the pay period for which the leave date falls.
- NOT processed timely (today’s date >= payroll confirm date in which the leave begin date falls in)
- If the End Date is open ended or has an End Date greater than today’s date, no additional pays are updated.
Note: All other selected unpaid leave types result in all active Regular Empl Rcd#s being updated by M-Pathways upon last approval.
Note: For Personal and Seasonal Leaves, the system automatically updates to return the employee from unpaid leave payroll status effective on the day after the leave ends.
Navigation
This step-by-step procedure begins on the PAR Details Page within an existing PAR transaction.
Step-by-Step Process
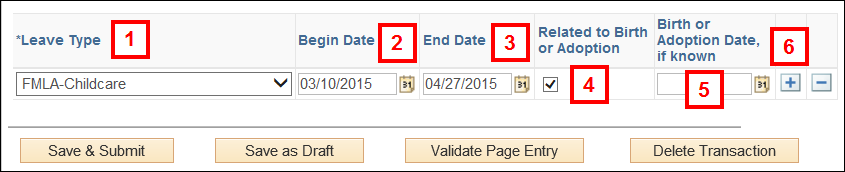
- Select a value from the *Leave Type drop-down list.
- Enter or select a date in the Begin Date field.
- Enter or select a date in the End Date field.
- If applicable, check the Related to Birth or Adoption box.
- If applicable, enter or select a date in the Birth or Adoption Date, if known field.
- If applicable, click Add Row
 to add additional unpaid leaves.
 - Complete the PAR:
PAR Details Page - Process an Unpaid Leave Screenshot
Note: Repeat steps 1-6 as necessary.
Conclusion
This concludes the steps for completing a PAR: Process Unpaid Leave of Absence. If you would like to begin a new transaction, see the Create a PAR step-by-step procedure.