Important Information
- Who can access the class roster:
- Instructors are given access to the class roster of each class they are assigned. Instructors can perform all class roster tasks except for assigning class permissions via the Faculty Business - Faculty Center.
- M-Pathways users with the SR CLASS ROSTER USER or SR INDEPENDENT STUDY USER role can access and perform all class roster tasks.
- M-Pathways users with the SR STUDENT RECORDS VIEWER or the SR CLASS MAINTAINER role can access the class roster and perform all tasks except for sending email and assigning class permissions.
- The Class Roster allows users to modify the list of students that displays. Before printing, sending emails from, or exporting the class roster, pay close attention to the selections made in the Class Roster Options section.
This document contains 7 sections:
Navigation for Operational Staff
NavBar > Navigator > Curriculum Management > Class Roster > Class Roster
Define Class Roster View Options
- Verify UMICH displays in the Academic Institution field.
- Enter the Term.
- Enter the Subject Area.
- Enter the Catalog Nbr.
- Enter the Class Nbr.
- If the Term, Subject Area, Catalog Nbr, and Class Nbr are unknown, enter available optional fields to narrow the search.
- Click Search.
- If applicable, click the link for the appropriate course.
- Select Class Roster Options.
- This section only – Class roster data appears for only the class selected. This is also the default value
- All course sections – Displays all class rosters for all sections for the course selected.
- All my sections – This option is available for faculty only. It allows them view all the sections of a course that they are assigned.
- Photos are not available when selecting the
All Course Section
option. - The Include Combined sections checkbox will be checked for any class that is cross-listed or is schedule to meet with another section. You may choose to uncheck the checkbox if you wish to see only one section of the combined class.
- If applicable, check the Expand Student Data checkbox to view additional student data, such as:
- Units
- Program, Plan, and Subplan
- Academic Level
- Student Groups
- Enroll Date
- Select the Enrollment Status.
- All – All students associated with the course by enrollment, waitlist, or permissions.
- Enrolled – All enrolled students. (This is the default.)
- Permissions – All students who have been issued a class permission to enroll but have not done so.
- Waiting – All students who are enrolled on the waitlist.
- Click Change to update the Class Roster results.
The Class Roster Options section allows you to choose the class section(s) that display in the class roster.
Valid Values include:
Notes:
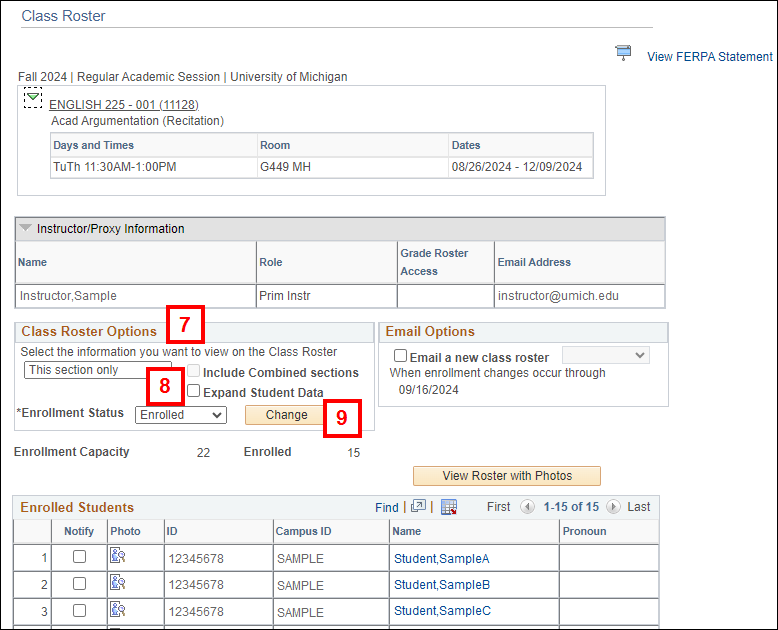
The Enrollment Status field allows you to choose the enrollment status of the students that display in the class roster.
Valid Values include:
Receive Updated Class Roster by Email
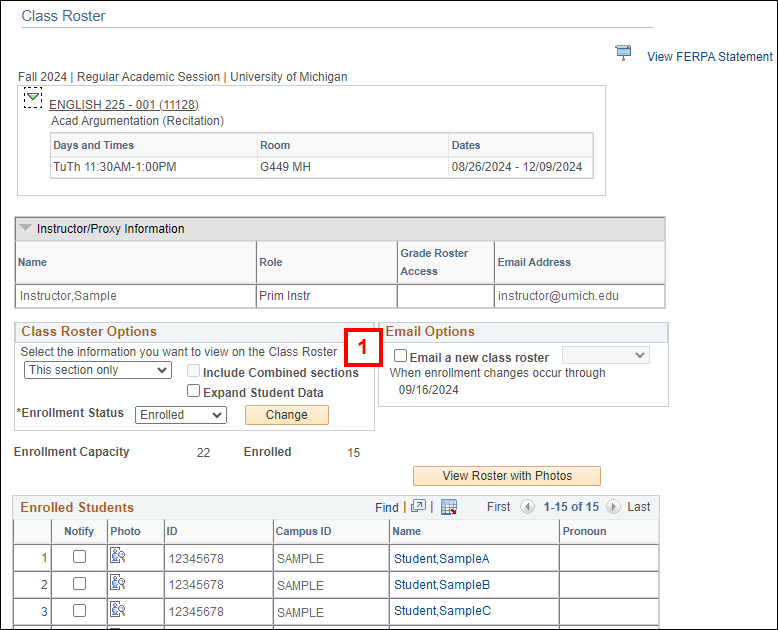
- If you would like to receive a new class roster via email when there are enrollment changes, check the Email a new class roster checkbox, and then select Daily or Weekly from the drop-down list.
- You will receive notice of changes from the first day class up to the drop/add deadline.
- For combined sections, you must set this option for each subject area or meet together section.
Notes:
Class Roster screenshot - Email
Print the Class Roster
- Select the Class Roster Options (refer to Define Class Roster View Options) and then click Change to update the Class Roster results.
- Click Printer Friendly Version.
- Use your Web browser's print function to Print the Class Roster (e.g., File > Print or press CTRL+P).
- Click Return to navigate back to the Class Roster.
Class Roster screenshot - Print
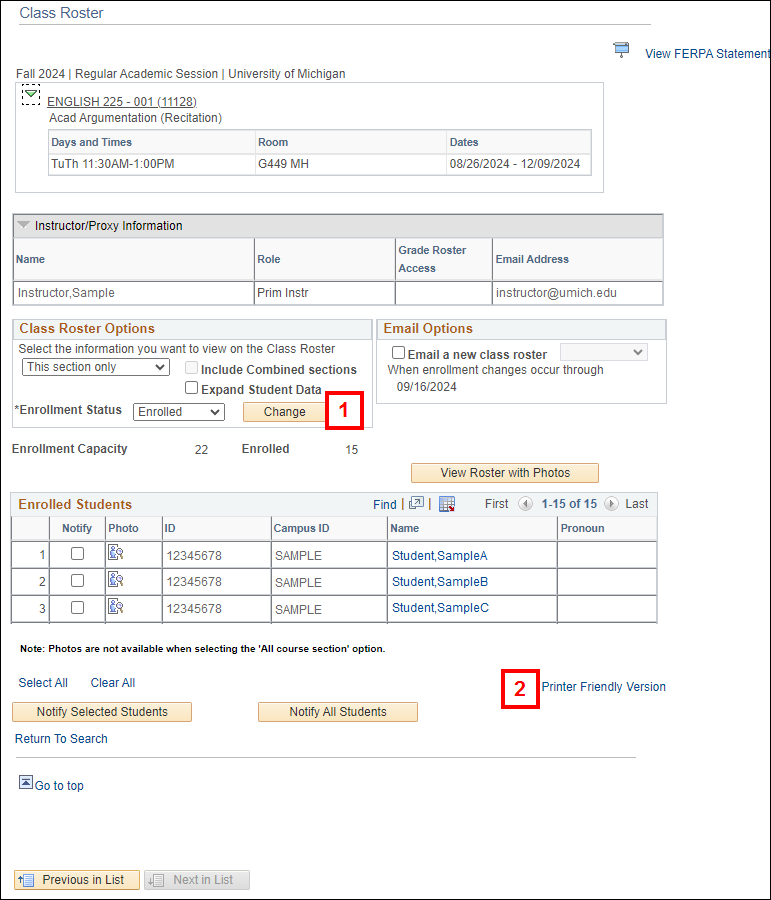
Note: Students from multiple sections will appear on this page if All Sections, All My Sections, and/or Combined Sections options are selected.
Send an Email via the Class Roster
Important Information
- The email address for each student selected on the Class Roster page appears in the Bcc: (blind carbon copy) portion of the message page. This ensures that students receiving the message do not see any other recipient’s email address.
- Users can send a message to additional email addresses beyond those selected from the Class Roster page by typing them in the Bcc: field. Email addresses must be separated by semicolons.
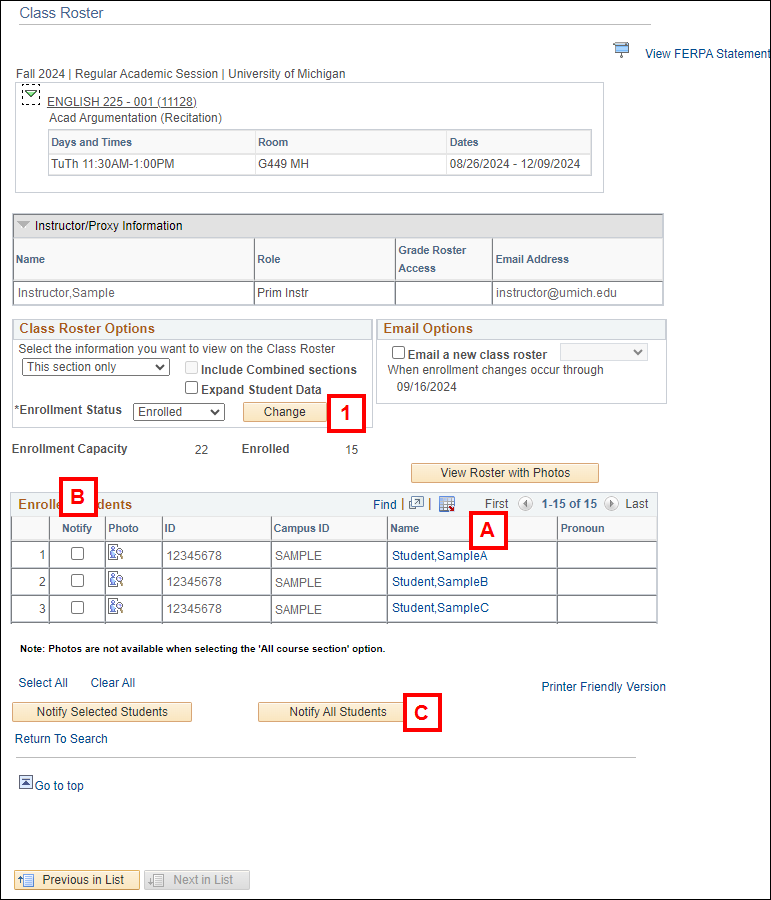
- Select the Class Roster Options (refer to Define Class Roster View Options) and then click Change to update the Class Roster results.
- Determine which students you would like to notify:
- Email Individual Students - Click on the student's Name. This option launches your system's default email provider.
- Email selected students - Check applicable boxes in the Notify field, and then click Notify Selected Students.
- Email all students who appear on the selected Class Roster - Click Notify All Students.
- Enter the Message Text.
- Click Add to add attachments.
- Multiple attachments can be added or deleted by clicking Add
 or Delete
  .
.
- Multiple attachments can be added or deleted by clicking Add
- Click Send Notification.
- Message box displaying the text
Your email was sent
appears after email has been sent. - Message box displaying text
Your email was not sent
appears after an email attempted to be sent with an invalid email address. - Instructors can send email via the class roster up to thirty days after the course end date.
Class Roster screenshot - Send Email
Notes:
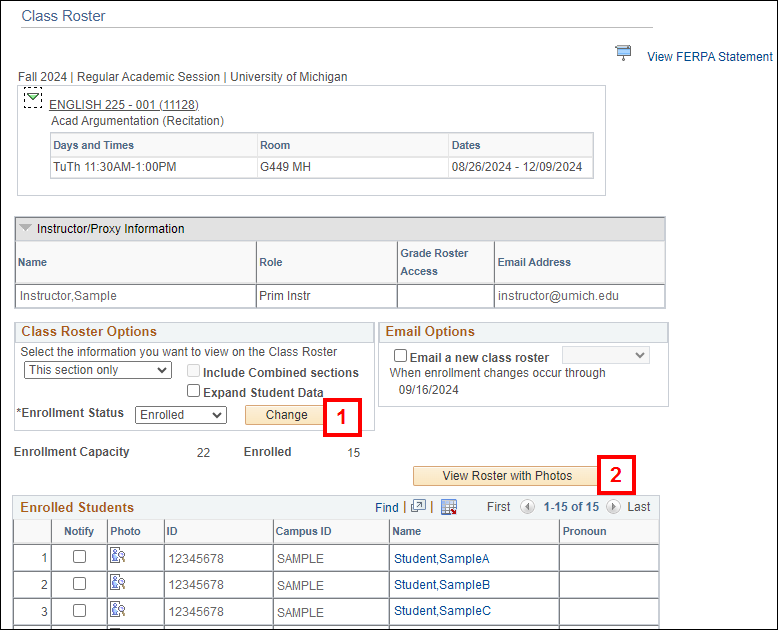
View and Print the Photo Class Roster
Important Information
- A student can request to have his/her MCard photo deleted from the database by filling out the Request for Deletion of Mcard Digitized Photograph Form.
- Refer to SPG 601.13 for more information about the appropriate use of photos.
- Select the Class Roster Options (refer to Define Class Roster View Options) and then click Change to update the Class Roster results.
- The Photo Class Roster will return ONLY those students you define to see in the Class Roster View Options.
- Click the View Roster with Photos button.
- You can view individual student photos by clicking Photo
 located to the left of the student name.
- You can view individual student photos by clicking Photo
- The Photo Class Roster opens in a new tab/window. (In this document, for privacy purposes, no pictures display.)
- View and Print the Photo Class Roster. Use the Web browser or Adobe PDF print function to print the Class Roster. (e.g., File > Print or press CTRL+P)
- Photos are only available for enrolled students. If there is no photo for the student, No Photo Available displays.
Class Roster screenshot - View and Print

Download the Class Roster to Microsoft Excel
- Select the Class Roster Options (refer to Define Class Roster View Options) and then click Change to update the Class Roster results.
- Click Download
 .
. - Click Save and then choose a location on your local network or computer to save the Excel file.
OR
Click Open to open the document with Microsoft Excel. - If you are using a pre-Office 2007 version of Excel, the report may open in the Web browser window. Select Save As from the File menu to save the report.
- If necessary, click YES on the Microsoft Office Excel warning message.
- When the report opens in Excel, it leaves a blank browser window, which needs to be closed separately.
Class Roster page screenshot - Download
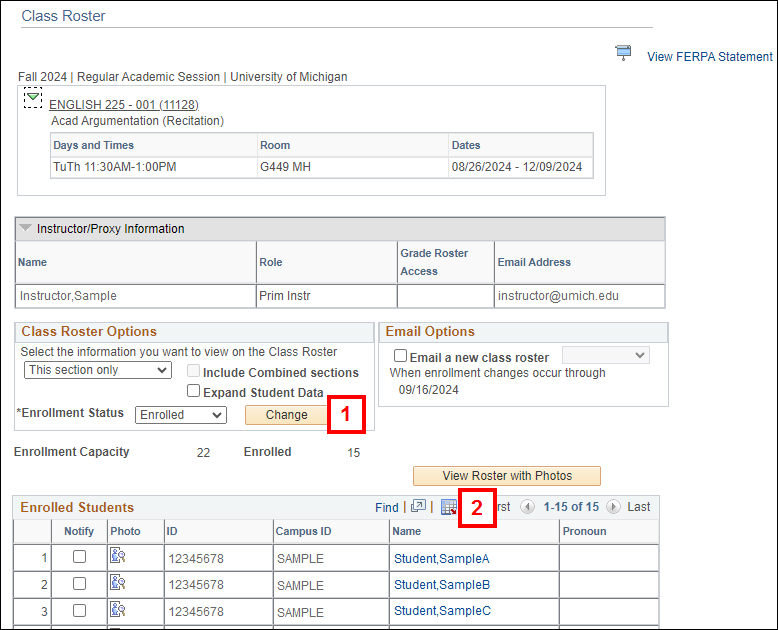
Note: If the File Download window does not appear after clicking Download  , you may need to adjust your Internet Explorer Security options to accept File Downloads. Refer to Download Grid Data to Excel for more detailed information.
Notes:
Assign Permission to Waitlisted Students
Important Information
- You must have the SR CLASS ROSTER USER or SR INDEPENDENT STUDY USER role in M-Pathways to assign permissions to waitlisted students on the Class Roster page.
- When permissions are assigned, an email will be sent to each student separately and the staff assigning the permissions will receive a copy.
- Students will be removed from the wait list if the permission is not used by the expiration date.
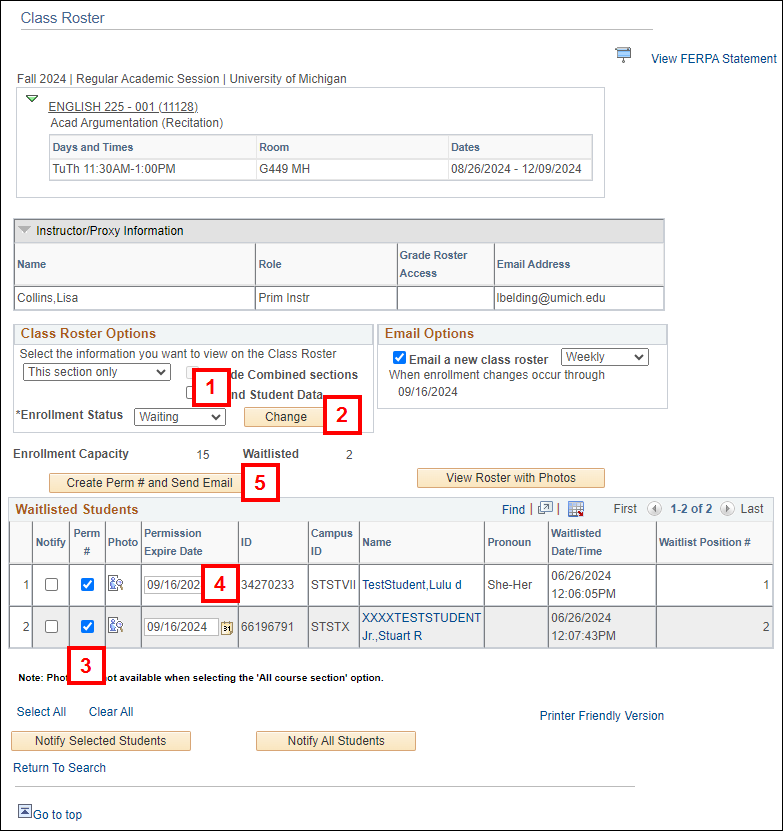
- Select Waiting from the Enrollment Status drop-down list and any other desired Class Roster Options (refer to Define Class Roster View Options).
- Click Change to update the Class Roster results.
- Students are listed on the Waitlisted page in order of the date/time they were added to the waitlist not the waitlist position number.
- Students that transfer careers cross-campus retain the same waitlist position number. This may result in the waitlist position numbers not always appearing in sequential order because students on the waitlist are listed by the date/time they were added to the waitlist.
- To view the students in waitlist position order, click the Status Note field heading.
- Check the Perm # box for the student(s) that need permissions created.
- Accept the default Permission Expire Date or modify the date the permission expires.
- Click Create Perm # and Send email.
- The view on the class roster page will not change after clicking Create Perm # and Send Email.
- The student remains on the wait list until they enroll in the class or the permission expires, whichever comes first.
- An email is sent to the student with the permission information. The staff person who created the permission will receive a copy of the email sent to the student.
Note: If working with combined sections, you can only assign permissions to students who are waitlisted for the class your department owns/sponsors/maintains and to which you have been granted access. If the combined section contains classes from more than one department, uncheck the Include Combined sections checkbox before continuing to step 2.
Class Roster screenshot - Assign Permission
Notes:
Note: The Permission Expire Date defaults to drop/add deadline (third week of the term). If entering permission after the deadline, you must update the expiration date.
Notes: