Overview
New checklists can be created using the Checklist Set Up Quick Entry. The process of setting up a checklist is restricted to users with appropriate access. If you need a checklist created but do not have access, contact the ITS Service Center.
Navigation
NavBar > Navigator > Campus Community > Checklists > Set Up Checklists > Checklist Quick Set Up
Step-by-Step Process
- If you are creating a new checklist, enter a new Checklist Code and continue to step 2.
- You cannot duplicate checklist codes. If you enter a checklist code that is already in use, you receive a message.
- After entering the checklist code, the information about the code displays in the Checklist Details section. These fields cannot be modified.
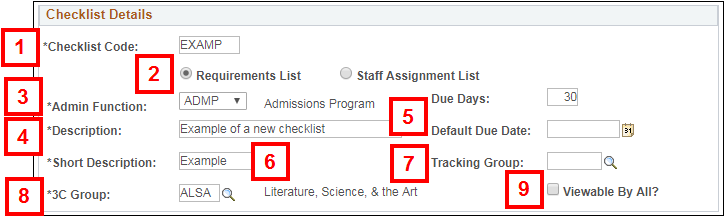
- Select either Requirements List or Staff Assignment List, depending on the purpose of the checklist.
- Select the Admin Function.
Note: Administrative Functions are high-level identifiers used to group checklists. Each Administrative Function represents a functional area that processes checklists. Refer to the list of Administrative Functions for more information. - Enter a Description.
- Enter the number of days from the point the checklist is assigned until it’s due in the Due Days field.
OR
Enter a specific due date for the checklist in the Default Due Date field.
- Either the Due Days or the Default Due Date must be filled in.
- Enter a Short Description.
- (Optional) Enter or Lookup a Tracking Group.
- Tracking groups are a way to organize and monitor a group of checklists at the same time.
- Enter or Lookup the 3C Group.
- Check the Viewable by All? box if the checklist should be made available to all departments and units.
Add Checklist Items
If you are creating a new checklist, you do not have to add checklist items immediately. You can return to this procedure and follow the instructions for entering checklist items to an existing checklist.
When working with checklists, you can add existing checklist items, create new checklist items, or do a combination of both. Follow the appropriate steps for entering existing and/or new checklist items.
Enter Existing Checklist Items
- Enter or Lookup the Item Code.
Checklist Item Details Screenshot
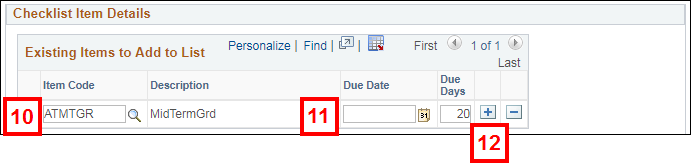
- Enter the number of days from the point the checklist is assigned until it’s due in the Due Days field.
OR
Enter a specific due date for the checklist in the Default Due Date field.
- Either the Due Days or the Default Due Date must be filled in. Neither of these dates can be after the Due Days/Default Due Date given to the checklist as a whole.
- To add additional existing items to the checklist, click Add Row
 and repeat steps 10-11 for each additional checklist item.
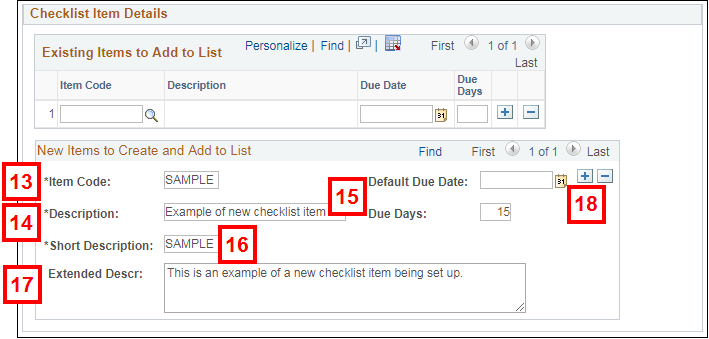
Enter New Checklist Items
- Enter the Item Code.
- Enter a Description.
- Enter the number of days from the point the checklist is assigned until it’s due in the Due Days field.
OR
Enter a specific due date for the checklist in the Default Due Date field.
- Either the Due Days or the Default Due Date must be filled in. Neither of these dates can be after the Due Days/Default Due Date given to the checklist as a whole.
- Enter a Short Description.
- (optional) Enter an explanation of the item in the Extended Descr field.
- To add additional new items to the checklist, click Add Row and repeat steps 13-17 for each additional checklist item.
Checklist Item Details Screenshot
Complete Setup
- Click Create Set Up to create the checklist.
- Click OK on the completion messages that display. There may be two or three messages depending on if you added items to the checklist.