Overview
The scheduling function in BusinessObjects enables you to run reports at specific times, even when you are not logged in to BusinessObjects.You can schedule a report to run repeatedly or once. For example, you can:
- Run a report at regular intervals (once a week, after Month End Close, etc.) and automatically email a PDF or Excel version of the latest results to selected users' email or BusinessObjects inbox.
- Refresh a long-running report during off-hours.
- Schedule a report to refresh, then leave your desk or work another report. You don't need to be logged in while the report runs.
This procedure includes the following:
- Schedule a Report
- View Report History
- Reschedule or Edit a Report
- Delete a Recurring Scheduled Report
- ITS Deletion of Older Instances
Scheduling Guidelines
- To schedule a UM-maintained report, copy it to your Personal Folders or one of its subfolder.
- Select times when the UM Data Warehouse is available: 12pm Sunday - 11pm Saturday.
- Avoid scheduling reports:
- When the data set(s) they use are being refreshed (see the Refresh Schedule).
- During the daily reboot of BusinessObjects servers, 4am-5am.
- When scheduling email delivery of reports containing sensitive information:
- Do not send BusinessObjects reports via e-mail to non-umich addresses or to a distribution list.
- Never use email to send reports containing social security numbers or other sensitive data.
If you modify a scheduled report, BusinessObjects will run the modified version at the scheduled time(s).
Financial data set users: To streamline your report for scheduling, replace query prompts with report objects such as Today's Date, Previous Accounting Period, Current Fiscal Year and more, in combination with calendars such as Month End Close.
Schedule a Report
- Locate the report in Personal Folders.
- Right-click the report title and select Schedule.
- Alternately, you can click the three-dot More menu at the end of the report row and click Schedule.
- (Optional) Rename the Instance Title.
- An instance is a single scheduled refresh of the report, stored with data. A report can have multiple instances.
- If you schedule the report to run more than once, the same title is used for every instance.
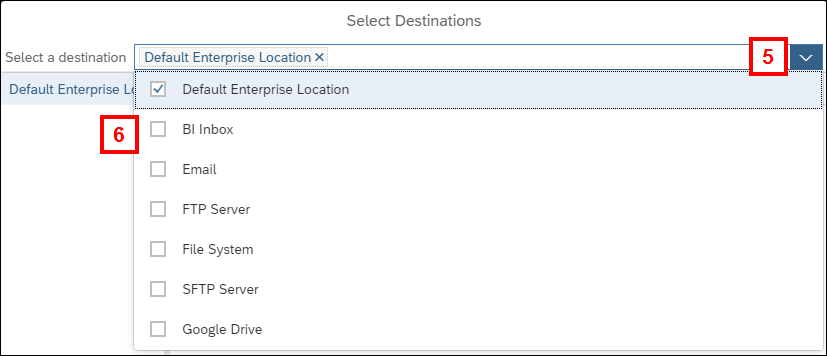
Destinations
- Click Add in the Destinations section.
- The Default Enterprise Location means the instance(s) will be stored in the same folder as the report. If this is the correct and only needed destination, go to step 9.
- Click the Select a Destination drop-down list.
- Check and uncheck the boxes next to the delivery destinations.
- Configure the settings for each delivery destination by clicking the destination on the left-hand panel.
- All options include the following settings:
- Keep instance in history: check or uncheck the box, depending on your preference.
- Use default settings: this is only applicable if defaults have been configured. Once checked, the remaining options are hidden.
- Use automatically generated name and Use Specific name: Click the radio button of your preferred option. If you choose a specific name, enter the name in the text box that displays.
- BI Inbox: Sends the report to a user's BI Inbox.
- Click Select in the Recipients section.
- Search for the user's name.
- Check the Include box on the user row.
- Repeat A-C until all users are selected.
- Click OK.
- Click the radio button next to either Shortcut or Copy in the Send As section, depending on how you want to send the report.
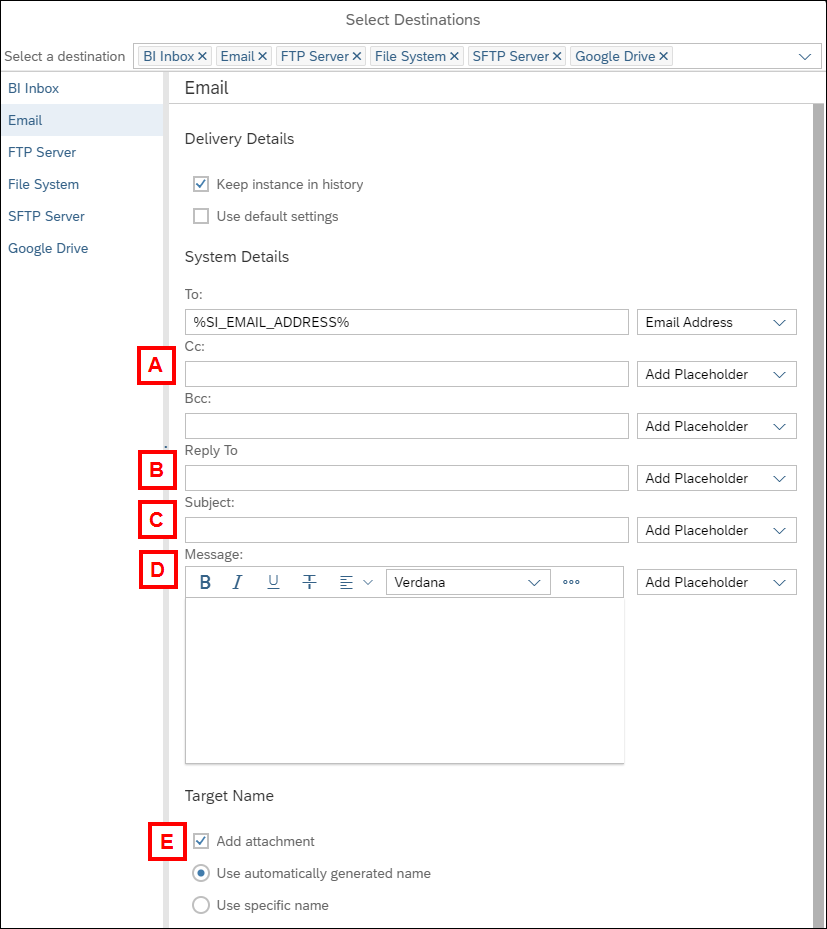
- Email: Emails the report as an attachment to a user(s).
- Enter the email addresses of recipients, separated by commas, in the To:, CC:, and BCC: fields, as applicable.
- Enter the email address to which any replies to the scheduled email should be sent in the Reply To: field.
- Enter a Subject:.
- Enter the Message:.
- Verify Add attachment is checked in the Target Name section.
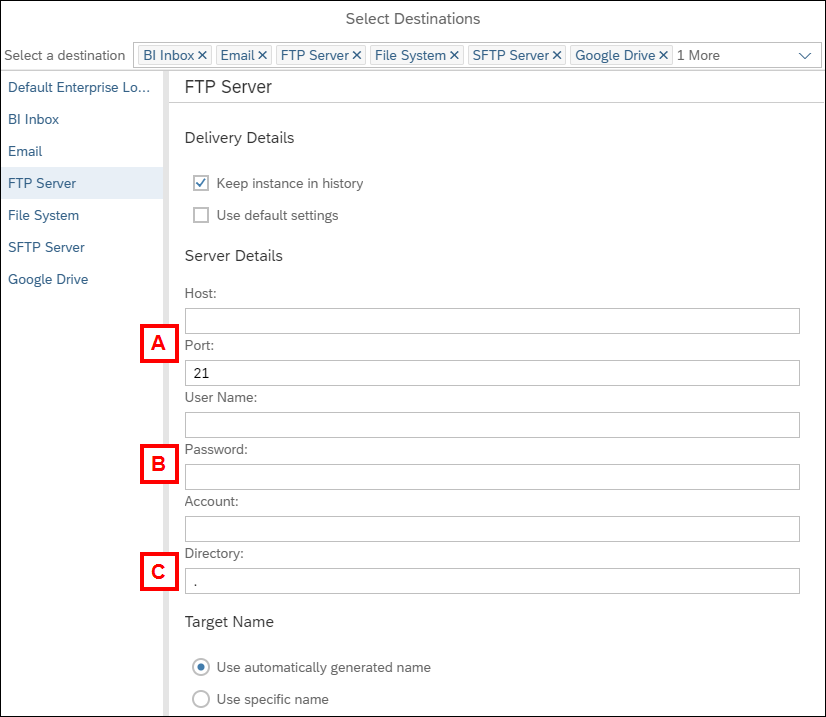
- FTP Server and SFTP Server: Sends the report to a specified FTP or SFTP server.
- Enter the server's Host and Port.
- Enter the User Name, Password, and Account for the server.
- Enter the Directory where the file should be stored.
- (SFTP Only) Enter the FingerPrint information.
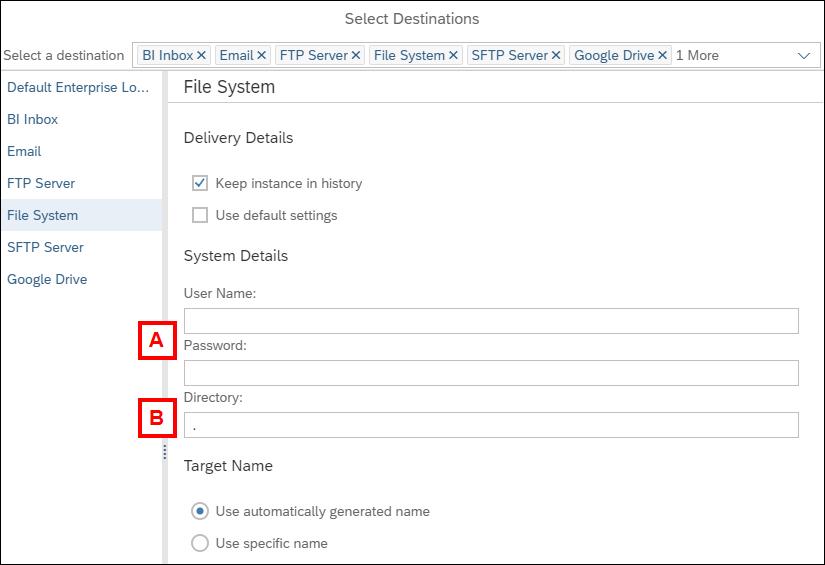
- File System: Sends the report to a specific location.
- Enter the User Name and Password for the location.
- Enter the Directory where the file should be sent.
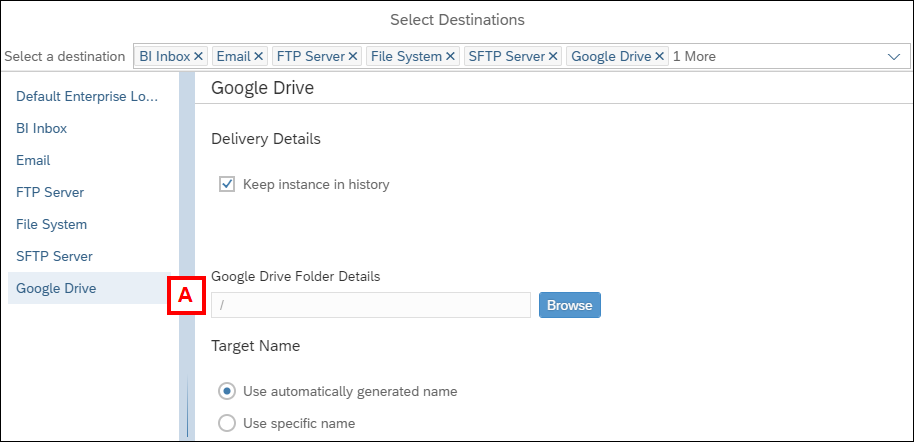
- Google Drive: Sends the report to a specific Google Drive folder.
Note: Google Drive does not work in the most recent release of BusinessObjects. This issue is being addressed by the vendor and should be fixed in a future update.- Enter the Google Drive Folder Details or click Browse to navigate to and select a folder.
- All options include the following settings:
- Click Confirm once all settings are complete.
View Select Destinations window
Recurrence
- Select an option from the Run Report drop-down list:
- Now: Runs the report when you click Schedule.
- Once: Runs the report a single time.
- Enter the day/time it should run in the Start Date field.
- Calendar: Runs the report on specific days.
- Select the Calendar Name for when you want the report to run. For example, if you select Day After Monthly Pay Confirm, it will the day after monthly payroll is confirmed.
- Select the Start Date of when you want to turn on the schedule.
- Select the End Date of when you want the schedule to stop. By default, this is 10 years from the Start Date.
- Recurring: Runs the report multiple times based on the set schedule.
- Select how often the report should run from the Repeat drop-down list. Each option needs to be configured, including a Start Date and End Date:
- Hourly: Enter the number of hours between each run. For example, to run the report every 1 hour, enter 1; to run the report every 6 hours, enter 6.
- Daily: Enter the number of days between each run. For example, if it should run every other day, enter 2; if it should run every third day, enter 3.
- Weekly: Select the specific day(s) of the week it should run on each week.
- Business Hours: Restricts the report to only run during business hours, regardless of how often it is scheduled to run. Select the specific days of the week when it should run, configure the business hours, and a value for how many hours between each run.
- Monthly: Enter the number of months between each run. For example, if it should run quarterly, enter 3.
- Day of the month: Select the day of the month when the report should run.
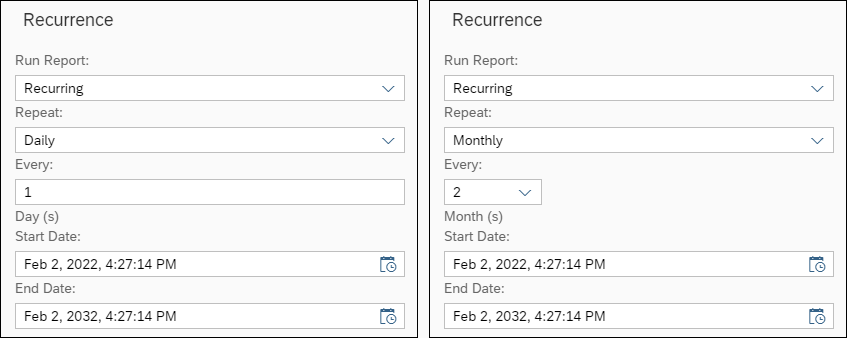
The left image shows a recurring schedule for the report to run every day. The right image shows a recurring schedule for a report to run every other month.
- Select how often the report should run from the Repeat drop-down list. Each option needs to be configured, including a Start Date and End Date:
- Toggle the Allow Retries button to On if you want the system to try to resend reports if there is a delivery issue on the first try.
Note: Events and Scheduling Server Group are items configured at the system level and may or may not be available to you.
Notification
- Click to toggle the Email when job ran successfully button to On if you want to be notified when a job ran successfully.
- When turned on, you need to configure the From, To, Subject and Message fields for the email. Alternatively, you can click the radio button to use the job server's defaults, if available.
- Click to toggle the Email when job failed to run button to On if you want to be notified if a job failed.
- When turned on, you need to configure the From, To, Subject and Message fields for the email. Alternatively, you can click the radio button to use the job server's defaults, if available.
Formats
- Click Report Features
- Select the format in which the report should be sent from the Formats drop-down list. These include Web Intelligence, Excel, PDF (Adobe Acrobat), CSV, plain text, and HTML.
- If sending the report via email, do not select Web Intelligence, the BusinessObjects format. The recipient will not be able to open it.
Prompts
If a report has prompts, they display in this section. If there are no prompts, or the prompt values that display are correct, you can go to the Delivery Rules section.
- Click Edit Prompt Values
- Click a Prompt on the left side of the screen.
- Click Refresh to see a list of valid values.
- If the list of values is long, you can search for a value using the search bar.
- Check the box next to each value to be included in the report. If a value is included but should not be, uncheck its box.
- Repeat steps 18-20 for each prompt.
- Click Apply.

The left image shows a recurring schedule for the report to run every day. The right image shows a recurring schedule for a report to run every other month.
Delivery Rules
- Check the box and select either Warning or Failed if you want to set a delivery rule based on if a report was not successfully refreshed or does not contain data.
- Click Schedule.
View Report History
The History page displays previous instances of a report.
- Right click on a report title or click the three-dot More menu on the report row/tile.
- Select History.
- Click the an instance title to open that instance of the report.
Reschedule or Edit a Report
- Right click on a report title or click the three-dot More menu on the report row/tile.
- Select History.
- From the three-dot More menu at the end of an instance row, select Reschedule.
- Re-configure the schedule and report options as detailed in the Schedule a Report section of this document.
- If a report is scheduled for future runs, a Replace section displays. Click the radio button next to Replace existing schedule to schedule additional runs of this report using the edited values you entered. Otherwise, click the Create a new schedule from existing schedule radio button.
- Click Schedule.
Delete a Recurring Scheduled Report
If you no longer need a scheduled report to run:
- Right-click the report title or click the three-dot More menu on the report row/tile and select History.
- Click the three-dot More menu on an instance row whose Status is Recurring or Pending.
- Select Delete.
- Click OK to confirm deletion.
Note: If you do not need to delete a schedule, but rather stop the report from running for a period of time, click Pause instead of Delete in step 3.
ITS Deletion of Older Instances
ITS periodically deletes BusinessObjects scheduled report instances that ran more than 120 days ago.
Each time a scheduled report runs, it creates an instance--a single refresh of the report, stored with data. A report can have multiple instances. ITS periodically deletes instances (not the scheduled report itself) that are more than 4 months old.
NOTE: This policy does not affect reports that are scheduled to run in the future (recurring and pending instances).
To keep an instance that is more than 120 days old:
- Right-click the report title or click the three-dot More menu on the report row/tile and select History.
- Locate the instance of the report you want to keep, using the Instance Time to help determine the age of the report.
- Click the report row to open the instance.
- The report Type must be Web Intelligence in order to open in BusinessObjects.
- Click Save and select Save As to save the report with a different name.