Important Information
Before using this step-by-step procedure to upload a new customer, check to make sure the customer does not already exist.
- Run the M_AR_10_CUSTOMER_LIST query.
- This query is run using M-Pathways Financials & Physical Resources System in Wolverine Access.
- Navigation: NavBar > Navigator > Reporting Tools > Query > Query Manager or Query Viewer
- Review the returned results for the customer you wish to add.
- It is recommended that you run the query to Excel so that the query results can be filtered. To confirm that a customer exists for general receivable customers, the query results should be filtered by Setid GNALL. The customer must exist in GNALL. The customer information must also be exactly the same as the customer you wish to invoice; this includes any attention to and/or any other specific box numbers.
- If the customer does not exist, continue with this step-by-step procedure.
To upload a General Customer into M-Pathways, complete the following:
Download the General Customer Upload Template
Download the General Customer Upload Template from the Shared Services Center (SSC) Website. It is recommended that you download an updated version of the template periodically.
- Click Save.
- Save the template file (AR_BU_General_Customer_Upload.xltm) to your computer.
Complete the General Customer Upload Template
- Do not re-format columns.
- Leave unused fields in the spreadsheet blank. Do not enter "none" or "N/A."
- See the Instructions tab within the spreadsheet for complete information about the fields in the spreadsheet, including usage information.
- Field names that are bold in the spreadsheet are required.
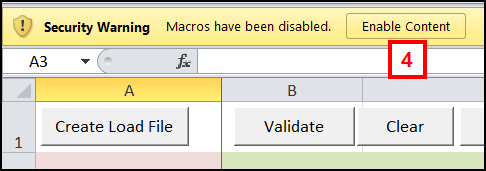
- Open the General Customer Upload Template (AR_BU_General_Customer_Upload.xltm) from the location where you stored it on your computer/network.
- Click Enable Content.
General Customer Upload Excel File Screenshot
- Enter the applicable value in the Customer Name field.
General Customer Upload Excel File Screenshot
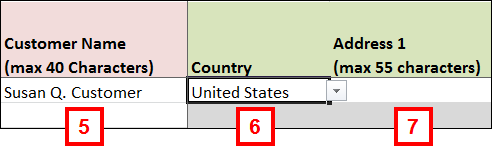
- Accept the default of United States in the Country field or select a new value from the drop-down list.
- Enter applicable information in the Address 1 field.
Notes:
- Address fields 2-4 are optional.
- The four address fields are used to identify the complete address of the customer.
- Enter the City.
General Customer Upload Excel File Screenshot
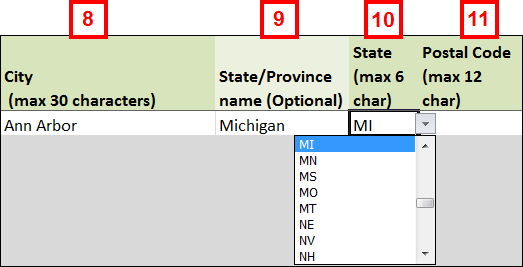
- Enter or select the State/Province name (Optional).
Note: If you complete the State/Province name (Optional) field, the State field is populated (skip step 11).
- Select a value from the State drop-down list.
- Enter the Postal Code.
- Enter the Customer email address.
General Customer Upload Excel File Screenshot

- Enter the Customer Contact name.
- If applicable, enter the Telephone Prefix.
General Customer Upload Excel File Screenshot

- Enter the Customer Phone #.
- If applicable, enter the Telephone Extension.
- Enter applicable uniqname or MCommunity specified group name in the UM Dept Contact email field.
Note: Do not include @umich.edu
- Repeat steps 5-17 to add more customers.
Notes:
- Create one customer per line.
- Any address variation (e.g., a different Attn. To:) requires the creation of a new customer.
Important Information
Validate and Print the General Customer Upload Template
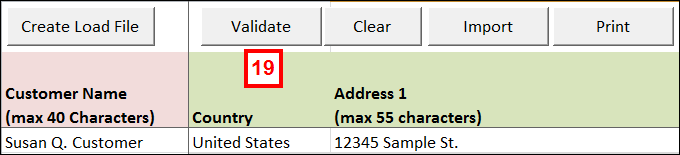
- Click Validate.
Notes:
- If errors are not found, go to step 20.
- If errors are found, go to step 21.
General Customer Upload Excel File Screenshot
- Click OK and go to step 24.
- Click OK
Note: Clicking OK automatically redirects to the Errors tab.
- Review Error Descriptions(s).

- Click each Cell Address link to go directly to the cell in the spreadsheet with the error. Make applicable changes.
Note: After correcting all errors, go to step 19.
- Click File.
- Click Save As.
- Open the desired folder to save the document in.
- Enter a File name for the General Customer Upload Excel File.
- Select Excel Macro-Enabled Workbook from the Save as type drop-down list.
- Click Save.
- If desired, click Print.
Note: Clicking print automatically redirects to the Print View tab. Print View will only display the lines of the invoice that is currently selected on the Data tab.
- If desired, click File and select Print from the drop-down menu.
Send the Data File to SSC
- After you validate, save and print the General Customer Upload, send the file as an attachment in an e-mail to genrecinvoices@umich.edu.
- The UM Dept. Contact email (step 17) listed in the template is contacted upon successful customer creation by SSC.